Welcome to Day 11 of 21 Days of AWS using Terraform, topic for today is Introduction to S3 using terraform.
What is AWS S3?
AWS Simple Storage Service(S3) provides secure, durable and highly scalable object storage. S3 is easy to use and we can store and retrieve any amount of data from anywhere on the web.
bucket: name of the bucket, if we ommit that terraform will assign random bucket name
acl: Default to Private(other options public-read and public-read-write)
versioning: Versioning automatically keeps up with different versions of the same object.
NOTE: Every S3 bucket must be unique and that why random id is useful to prevent our bucket to collide with others.
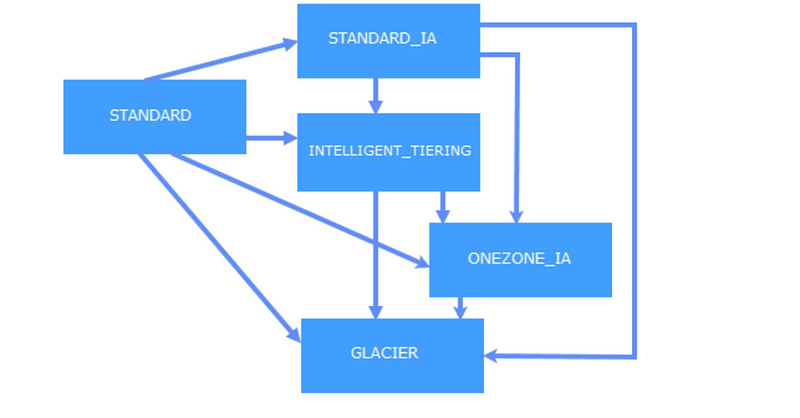
In most of the cases, data which is generated by our application is relevant for us for the first 30 days and after that, we don’t access that data as frequently.
Welcome to Day 10 of 21 Days of AWS using Terraform, topic for today is Introduction to IAM using terraform.
What is IAM?
Identity and Access Management(IAM) is used to manage AWS
Users
Groups
Roles
Api Keys
IAM Access Policies
and it provide access/access-permissions to AWS resources(such as EC2,S3..)
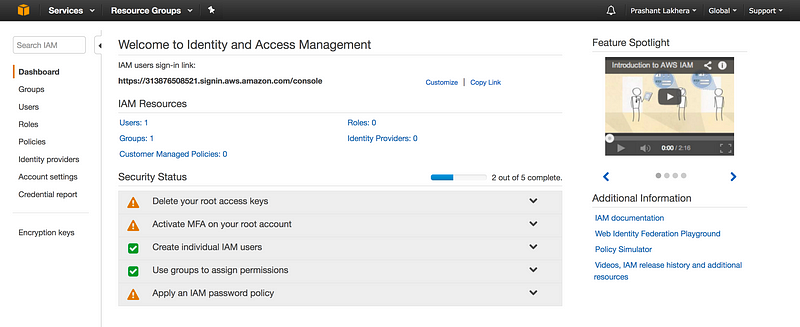
If we notice at the right hand side at the top of console it says Global i.e creating a user/groups/roles will apply to all regions
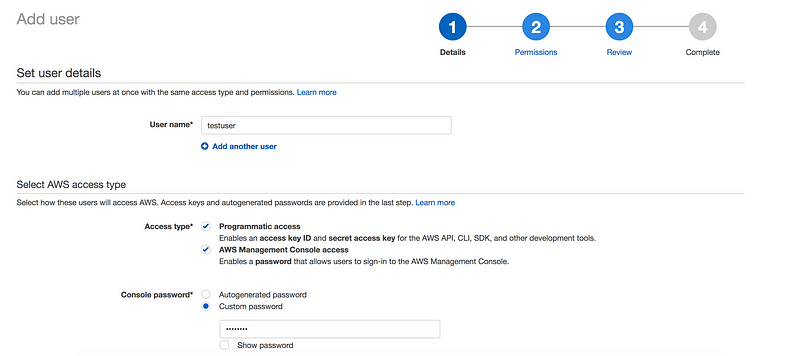
To create a new user,Just click on Users on the left navbar
By default any new IAM account created with NO access to any AWS services(non-explicit deny)
Always follow the best practice and for daily work try to use a account with least privilege(i.e non root user)
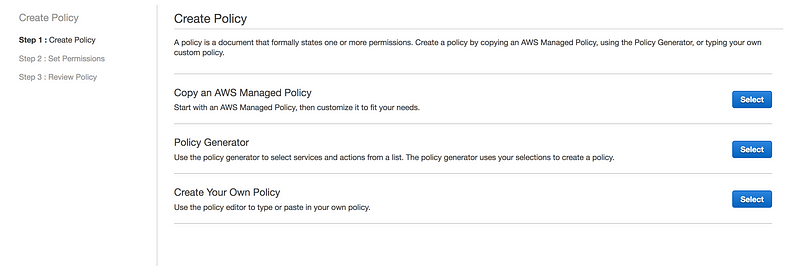
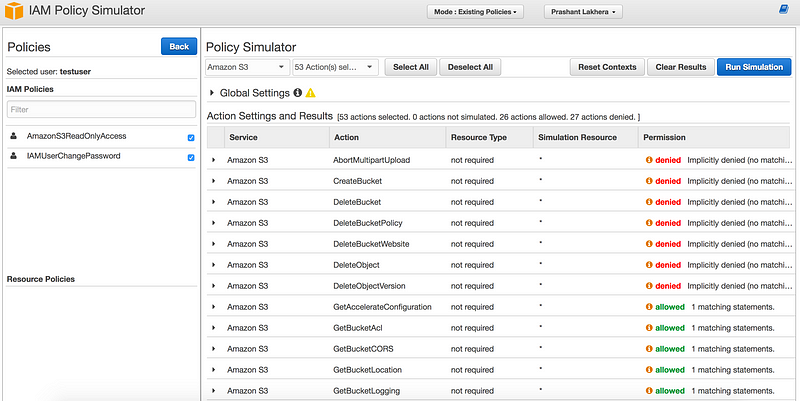
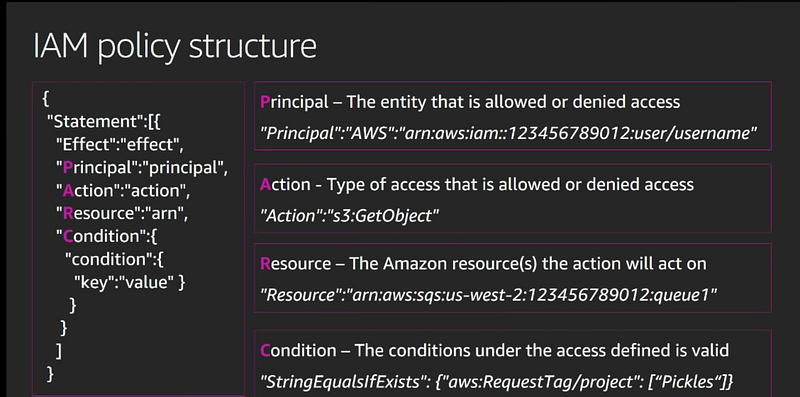
IAM Policies: A policy is a document that formally states one or more permissions.For eg: IAM provides some pre-built policy templates to assign to users and groups
Administrator access: Full access to AWS resources
Power user access: Admin access except it doesn’t allow user/group management
Read only access: As name suggest user can only view AWS resources
Default policy is explicitly deny which will override any explicitly allow policy
One way to achieve the same is copy paste the same piece of code but that defeats the whole purpose of DRY.
Terraform provides meta parameters called count to achieve the same i.e to do certain types of loops.The count is a meta parameter which defines how many copies of the resource to create.
element(list, index) — Returns a single element from a list at the given index. If the index is greater than the number of elements, this function will wrap using a standard mod algorithm. This function only works on flat lists.
OR
The element function returns the item located at INDEX in the given LIST
length(list) — Returns the number of members in a given list or map, or the number of characters in a given string.
OR
The length function returns the number of items in LIST (it also works with strings and maps)
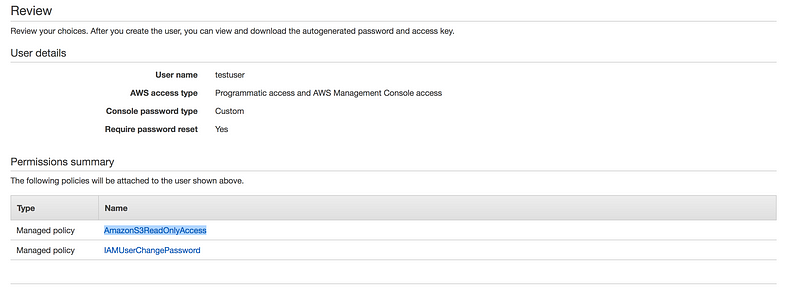
Now when you run the plan command, you’ll see that Terraform wants to create three IAM users, each with a unique name
One thing to note as we have used count on a resource, it becomes the list of resources rather than just a single resource.
For example, if you wanted to provide the Amazon Resource Name (ARN) of one of the IAM users as an output variable, you would need to do the following:
# outputs.tf
output “user_arn” {
 value = “${aws_iam_user.example.0.arn}”
}
If you want the ARNs of all the IAM users, you need to use the splat character, “*”, instead of the index:
# outputs.tf
output “user_arn” {
 value = “${aws_iam_user.example.*.arn}”
}
As we are done with creating IAM user, now let attach some policy with these users(As by default new user have no permission whatsoever)
IAM Policies are JSON documents used to describe permissions within AWS. This is used to grant access to your AWS users to particular AWS resources.
IAM Policy is a json document
Terraform provides a handy data source called the aws_iam_policy_document that gives you a more concise way to define the IAM policy
This code uses the count parameter to “loop” over each of your IAM users and the element interpolation function to select each user’s ARN from the list returned by aws_iam_user.example.*.arn.
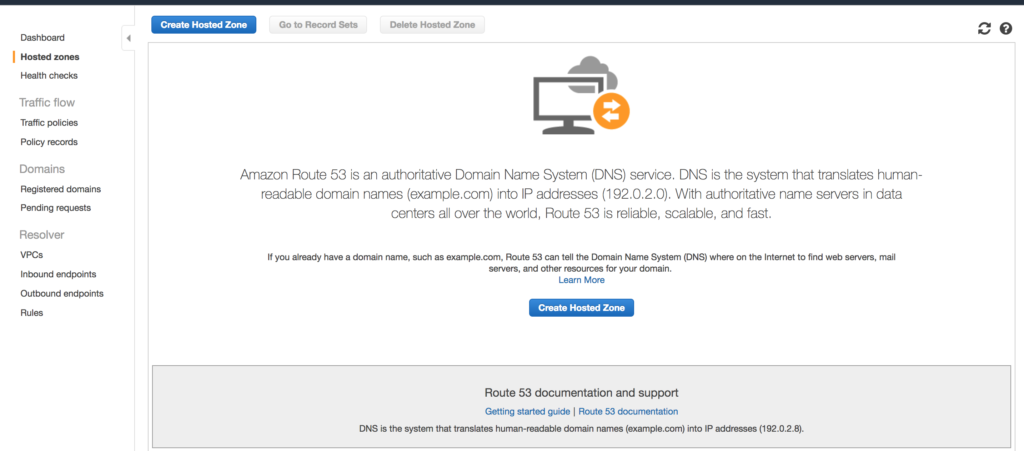
Welcome to Day 9 of 21 Days of AWS using Terraform, topic for today is Introduction to Route53 using terraform.
What is AWS Route53?
Amazon Route 53 is a highly available and scalable Domain Name System (DNS) web service. You can use Route 53 to perform three main functions in any combination:
Domain Registration
DNS Routing
Health Checking
Key DNS Terms
A Record
A record is used to translate human-friendly domain names such as “www.example.com” into IP-addresses such as 192.168.0.1 (machine friendly numbers).
CNAME Record
A Canonical Name record (abbreviated as CNAME record) is a type of resource record in the Domain Name System (DNS) which maps one domain name (an alias) to another (the Canonical Name.)
NameServer Record
NS-records identify the DNS servers responsible (authoritative) for a zone.
Amazon Route 53 automatically creates a name server (NS) record that has the same name as your hosted zone. It lists the four name servers that are the authoritative name servers for your hosted zone. Do not add, change, or delete name servers in this record.
A Start of Authority record (abbreviated as SOA record) is a type of resource record in the Domain Name System (DNS) containing administrative information about the zone, especially regarding zone transfers
AWS Specific DNS Terms
Alias Record
Amazon Route 53 alias records provide a Route 53–specific extension to DNS functionality. Alias records let you route traffic to selected AWS resources, such as CloudFront distributions and Amazon S3 buckets. They also let you route traffic from one record in a hosted zone to another record.
Unlike a CNAME record, you can create an alias record at the top node of a DNS namespace, also known as the zone apex. For example, if you register the DNS name example.com, the zone apex is example.com. You can’t create a CNAME record for example.com, but you can create an alias record for example.com that routes traffic to www.example.com.
AWS Route53 Health Check
Amazon Route 53 health checks monitor the health and performance of your web applications, web servers, and other resources. Each health check that you create can monitor one of the following:
The health of a specified resource, such as a web server
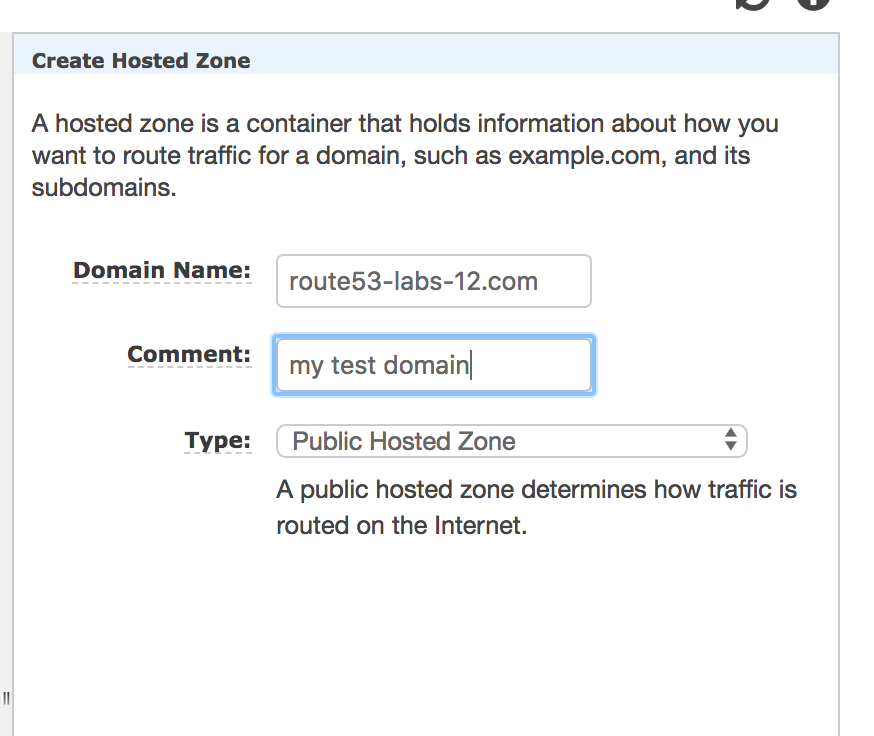
* Domain Name: You must need to purchase this domain either from your Domain Registrar or you can purchase from Amazon
* Comment: Add some comment
* Type: Public Hosted Zone(if purchased by a domain registrar) OR you can set Private Hosted Zone for Amazon VPC
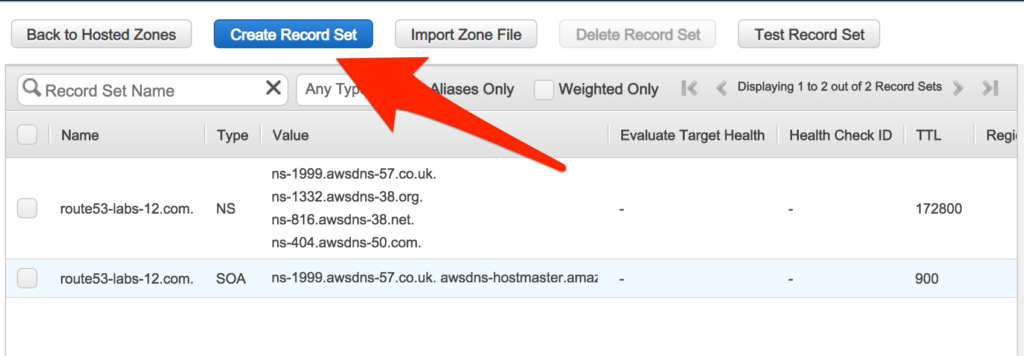
The moment you create a hosted zone four NS and SOA record will be created for you.
NOTE: Please don’t change or alter these records.
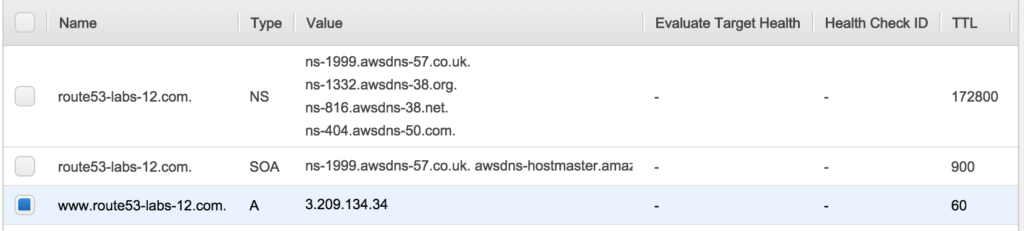
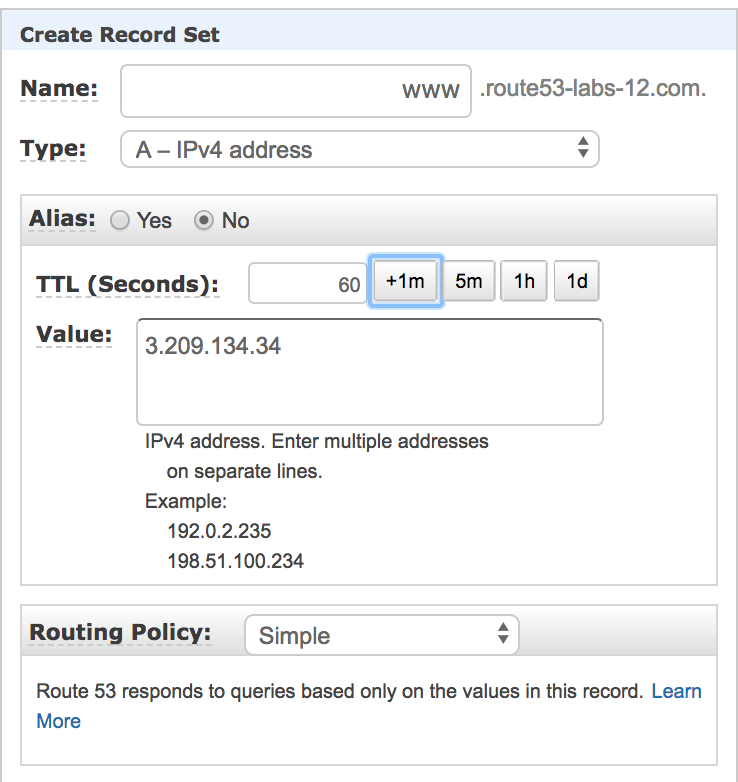
Step2: Create A record
* Name : www
* Type: A-IPv4 address
* Alias: No
* TTL: Select +1m(60second)
* Value: Public IP of your EC2 instance
* Routing Policy: Simple
You will see the record like this
Choosing a Routing Policy
When you create a record, you choose a routing policy, which determines how Amazon Route 53 responds to queries:
Simple Routing
Simple Routing Policy use for a single resource that performs a given function for your domain, for example, a web server that serves content for the example.com website.
If you choose the simple routing policy in the Route 53 console, you can’t create multiple records that have the same name and type, but you can specify multiple values in the same record, such as multiple IP addresses. If you specify multiple values in a record, Route 53 returns all values to the recursive resolver in random order, and the resolver returns the values to the client (such as a web browser) that submitted the DNS query. The client then chooses a value and resubmits the query.
As you can see in the above case we are using Simple Routing Policy.
Let’s automate this with the help of terraform code
records – (Required for non-alias records) A string list of records
Here I am using element function
element retrieves a single element from a list.

element(list, index)
The index is zero-based. This function produces an error if used with an empty list.

Use the built-in index syntax list[index] in most cases. Use this function only for the special additional "wrap-around" behavior described below.
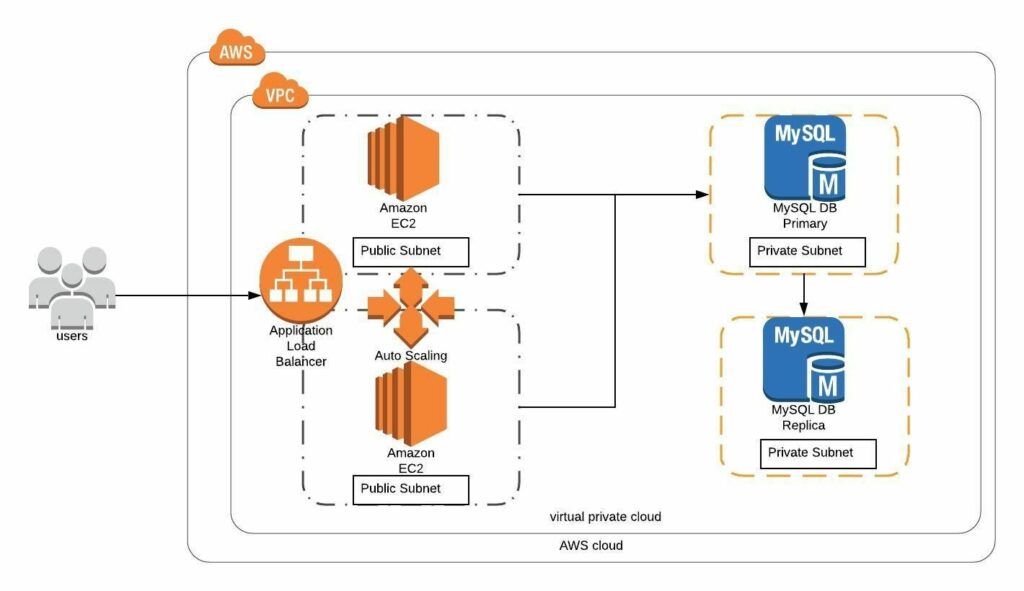
Welcome to Day 8 of 21 Days of AWS using Terraform. The topic for today is Introduction to AWS RDS MySQL using Terraform. With that we will be able to finish the last part of our two-tier architecture i.e MySQL DB is private subnets.
What is AWS RDS?
Amazon Relational Database Service (Amazon RDS) is a web service that makes it easier to set up, operate, and scale a relational database in the cloud. It provides cost-efficient, resizable capacity for an industry-standard relational database and manages common database administration tasks.
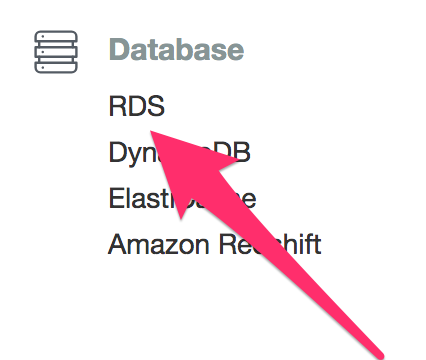
To create a database, go to Database section(AWS Console) and click on RDS
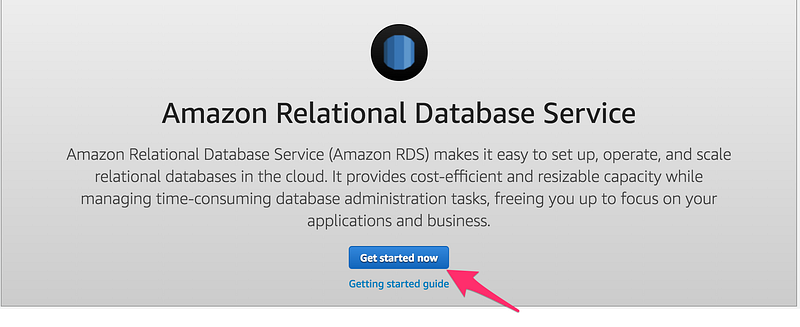
Click on Get Started Now
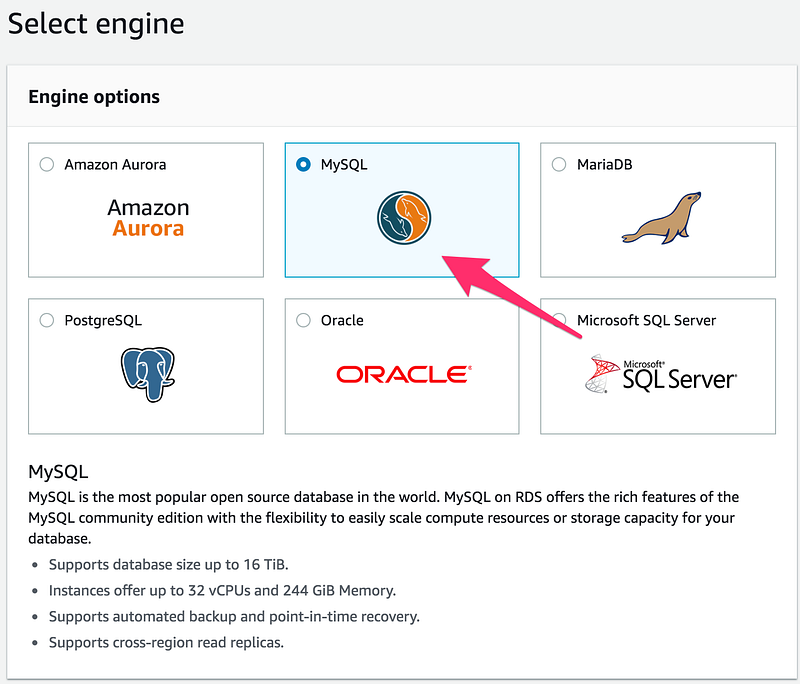
Then Select MySQL
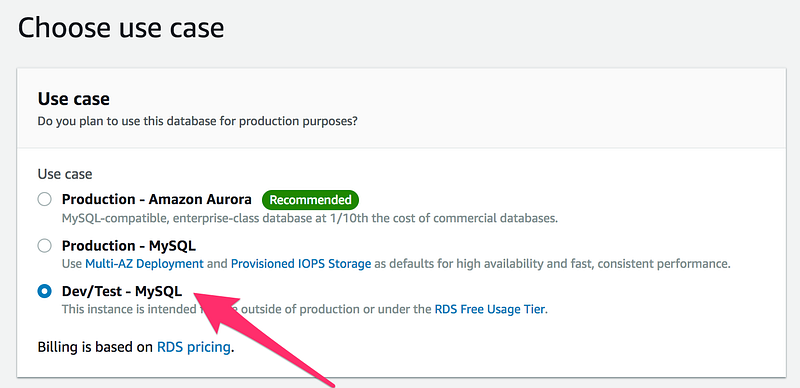
On the next screen, choose Dev/Test -MySQL(or depend upon your requirement, as my use case is only for testing purpose)
On the next screen provide all the info
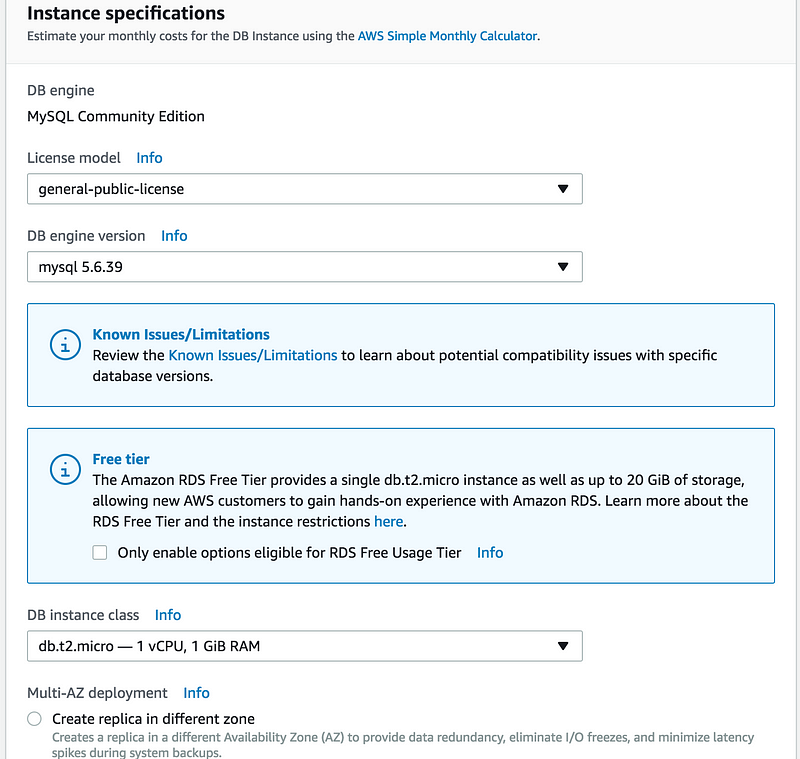
As this is for testing Purpose
DB instance class(db.t2.micro)
Skip MultiAZ deployment for the time being
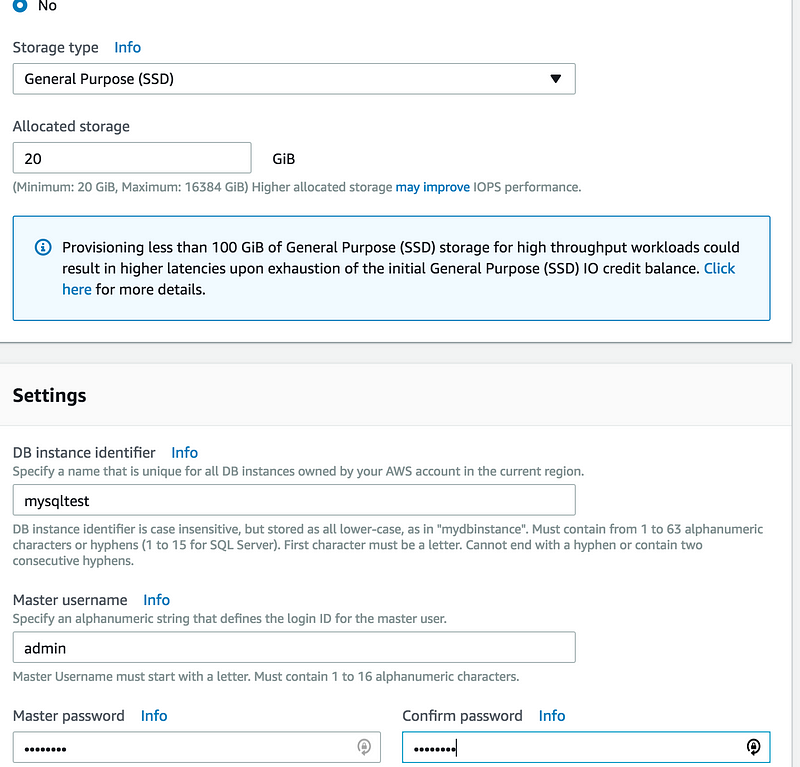
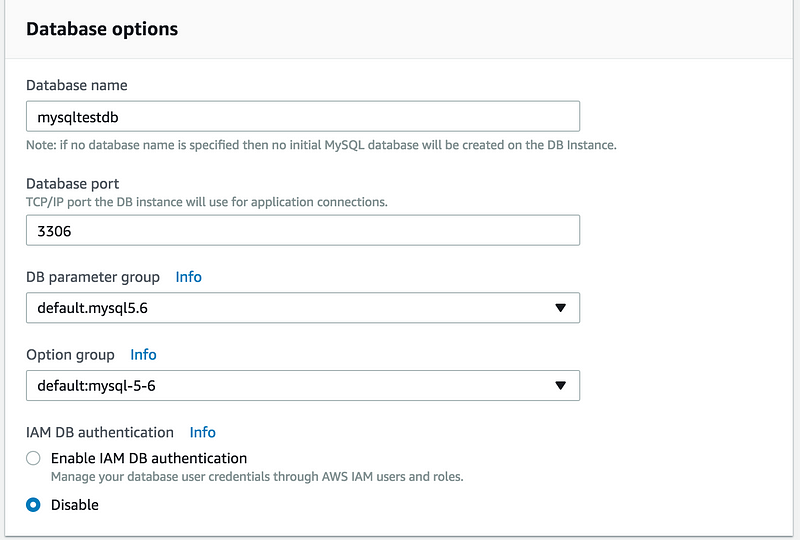
Gave all the info like(DB instance identifier, Master username, Master password)
Fill all the details in the next screen
Mainly you need to fill
Database name(Don’t confuse it DB instance identifier)
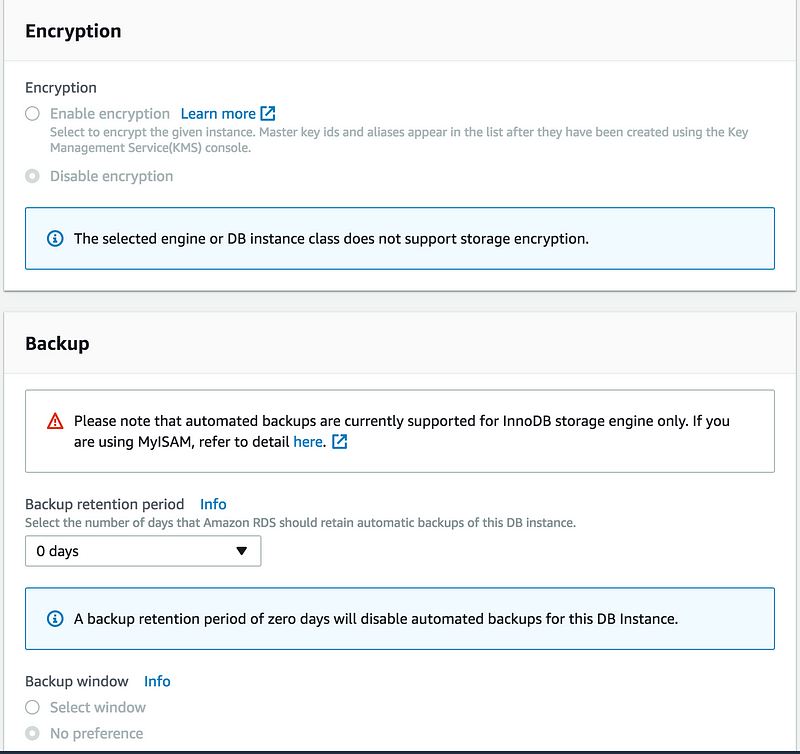
Backup retention period(0 days, for the time being)
Then click on Launch DB instance
Wait for few mins 5–10min(or depend upon your instance type and size) and check Instance Status(It should be available)
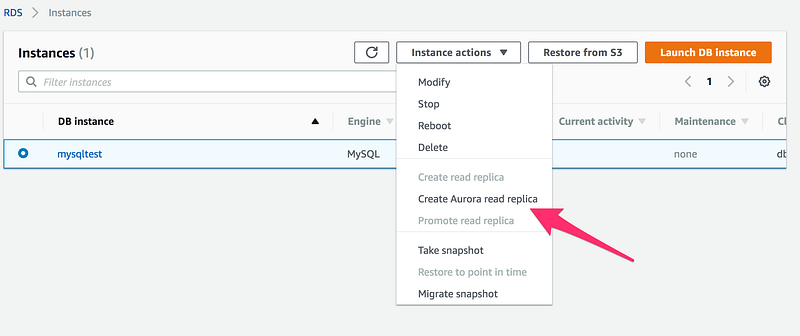
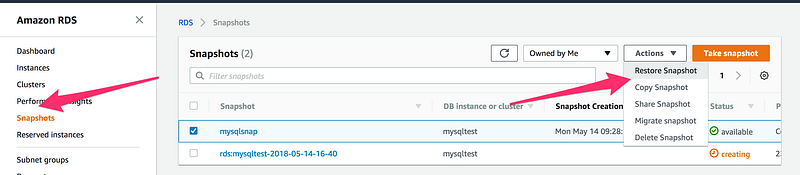
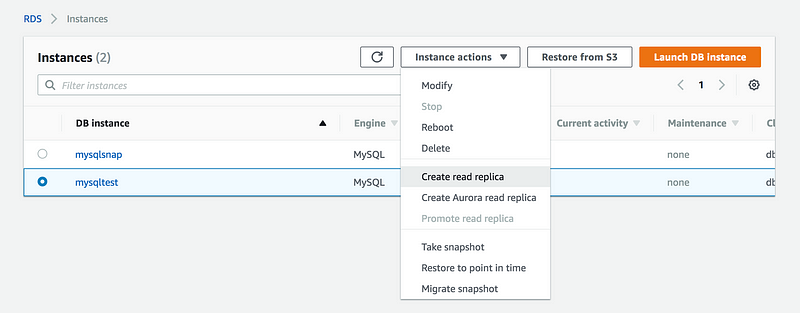
Now lets try to create Read Replica out of this database
Ohho no Create read replica option is not highlighted for me and the reason for that
We don’t have a snapshot
We don’t have an automated backups
Read replica is always created from a snapshot or the latest backup
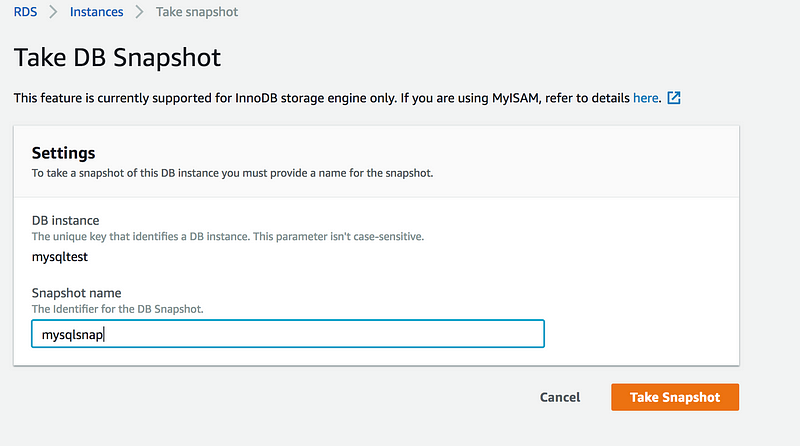
Let’s take a snapshot of this database
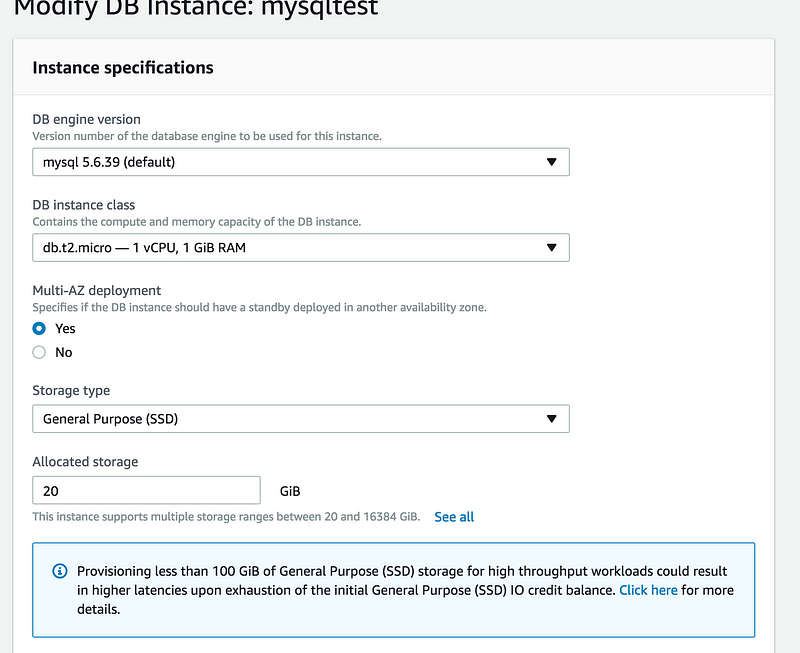
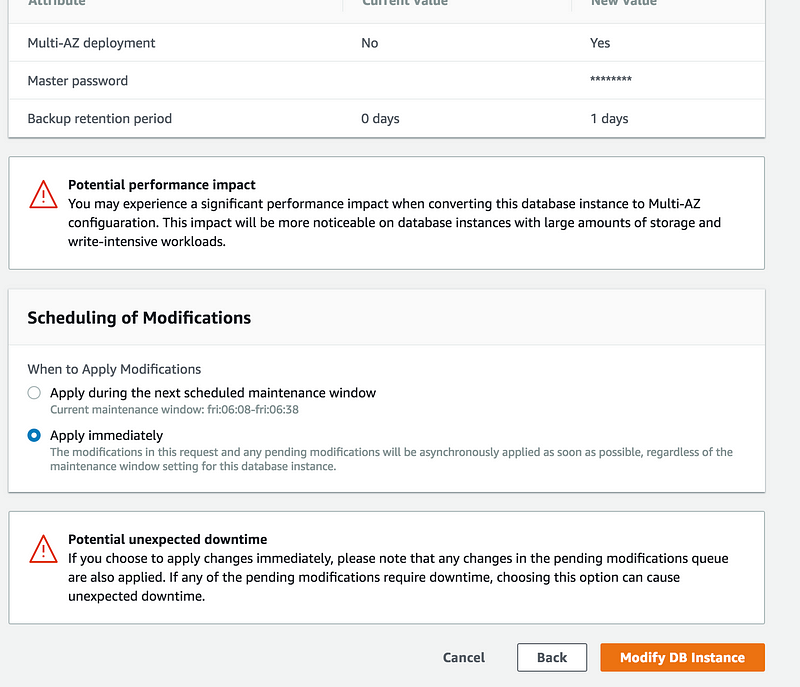
Once the snapshot creation is done, let’s try to convert this into multi-AZ. Go to Instance actions and click on Modify
These are the things you need to modify
Multi-AZ set to Yes
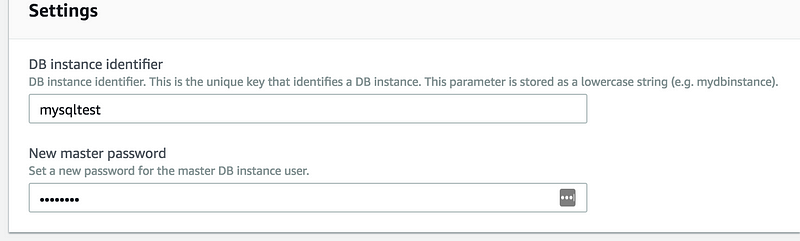
Under settings you need to enter the password again
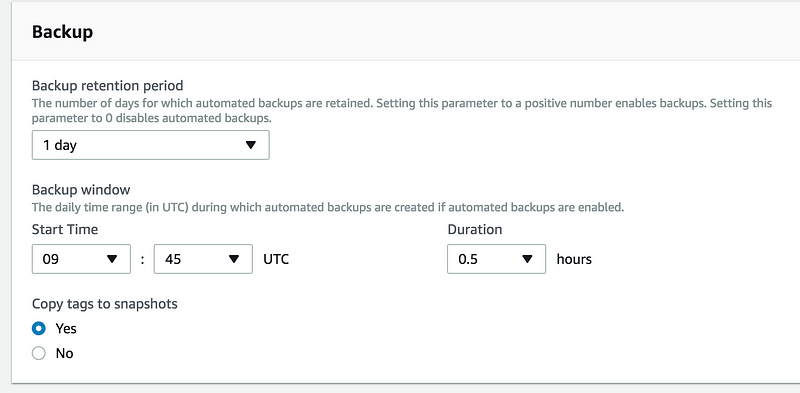
I am enabling backup and set it to 1 day
On the final screen, you have the option
1: Apply during the next scheduled maintenance window
2: Apply immediately(This will cause a downtime)
To restore a database from the snapshot
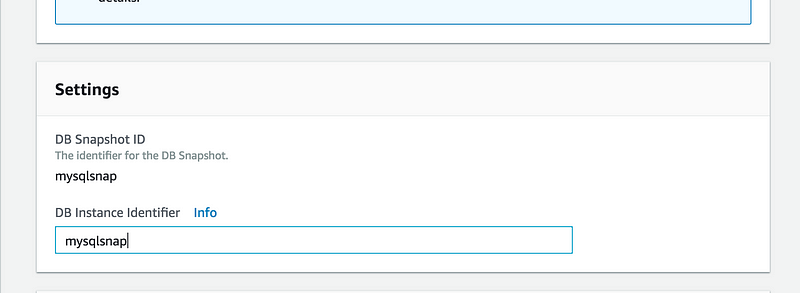
and then on the next screen, give DB Instance Identifier or any other setting you want to modify while restoring
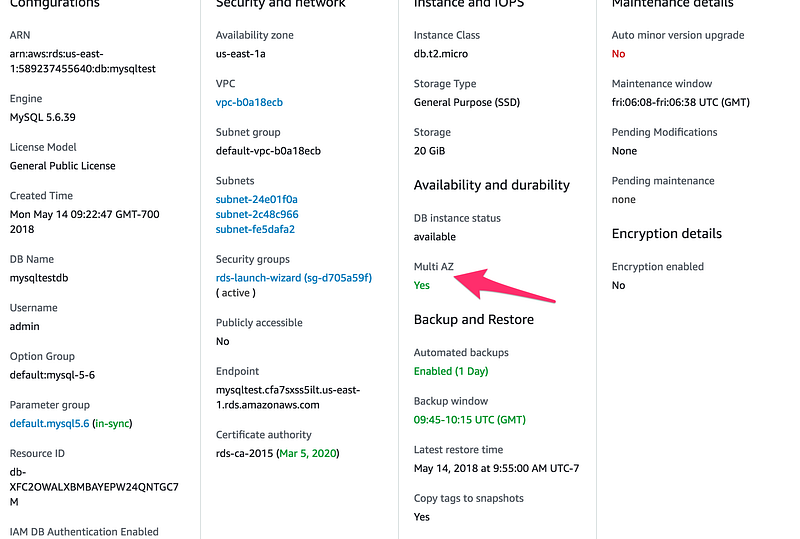
To Verify if Multi-AZ is enabled, Click on the particular DB
Now let’s try to create read-replica again, as you can see Create read replica tab is now enabled
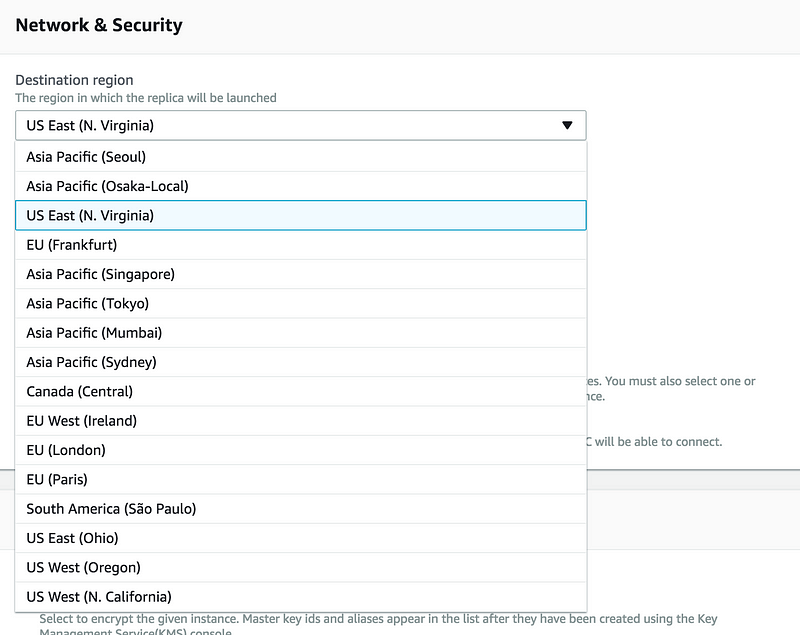
The Important thing to remember we can create read replica in any other region
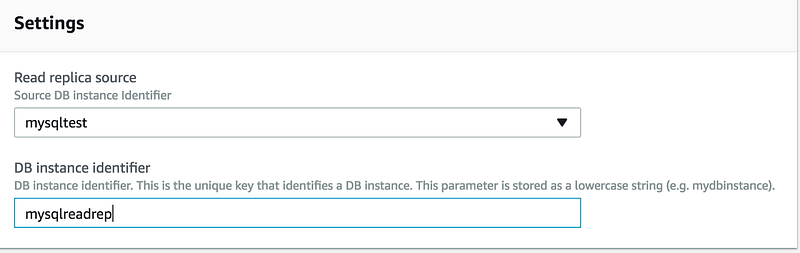
Under the Settings tab, give it a unique name
Now whatever we have done manually here, let’s try to terraformed it
* allocated_storage: This is the amount in GB
* storage_type: Type of storage we want to allocate(options avilable "standard" (magnetic), "gp2" (general purpose SSD), or "io1" (provisioned IOPS SSD)
* engine: Database engine(for supported values check https://docs.aws.amazon.com/AmazonRDS/latest/APIReference/API_CreateDBInstance.html) eg: Oracle, Amazon Aurora,Postgres
* engine_version: engine version to use
* instance_class: instance type for rds instance
* name: The name of the database to create when the DB instance is created.
* username: Username for the master DB user.
* password: Password for the master DB user
* db_subnet_group_name:  DB instance will be created in the VPC associated with the DB subnet group. If unspecified, will be created in the default VPC
* vpc_security_group_ids: List of VPC security groups to associate.
* allows_major_version_upgrade: Indicates that major version upgrades are allowed. Changing this parameter does not result in an outage and the change is asynchronously applied as soon as possible.
* auto_minor_version_upgrade:Indicates that minor engine upgrades will be applied automatically to the DB instance during the maintenance window. Defaults to true.
* backup_retention_period: The days to retain backups for. Must be between 0 and 35. When creating a Read Replica the value must be greater than 0
* backup_window:The daily time range (in UTC) during which automated backups are created if they are enabled. Must not overlap with maintenance_window
* maintainence_window:The window to perform maintenance in. Syntax: "ddd:hh24:mi-ddd:hh24:mi".
* multi_az: Specifies if the RDS instance is multi-AZ
* skip_final_snapshot: Determines whether a final DB snapshot is created before the DB instance is deleted. If true is specified, no DBSnapshot is created. If false is specified, a DB snapshot is created before the DB instance is deleted, using the value from final_snapshot_identifier. Default is false
NOTE: Here we are storing mysql password in plan text, I will come up the blog shortly how to store this password in encrypted format.
We need to do some changes in order to make this work, by outputting the value of private subnet in terraform vpc module which will act an input to rds aws_db_subnet_group
output "private_subnet1" {
  value = "${element(aws_subnet.private_subnet.*.id, 1 )}"
}

output "private_subnet2" {
  value = "${element(aws_subnet.private_subnet.*.id, 2 )}"
}
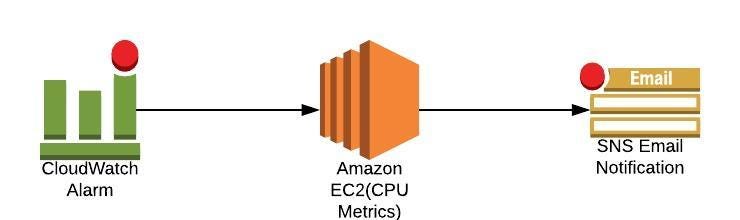
Welcome to Day 7 of 21 Days of AWS using Terraform. Topic for today is Introduction to CloudWatch using terraform.
What is CloudWatch?
AWS CloudWatch is a monitoring service to monitor AWS resources, as well as the applications that run on AWS.
As per official documentation
Amazon CloudWatch monitors your Amazon Web Services (AWS) resources and the applications you run on AWS in real time. You can use CloudWatch to collect and track metrics, which are variables you can measure for your resources and applications.
EC2/Host Level Metrics that CloudWatch monitors by default consist of
CPU
Network
Disk
Status Check
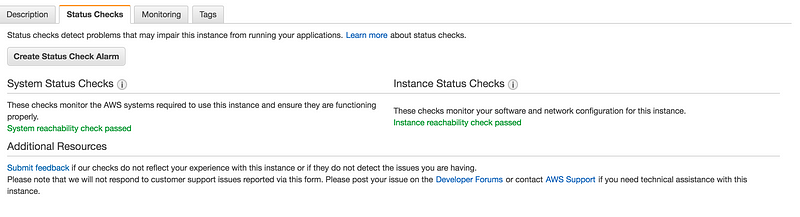
There are two types of status check
System status check: Monitor the AWS System on which your instance runs. It either requires AWS involvement to repair or you can fix it by yourself by just stop/start the instance(in case of EBS volumes).Examples of problems that can cause system status checks to fail
* Loss of network connectivity
* Loss of system power
* Software issues on the physical host
* Hardware issues on the physical host that impact network reachability
Instance status check: Monitor the software and network configuration of an individual instance. It checks/detects problems that require your involvement to repair.
By default, EC2 monitoring is 5 minutes intervals but we can always enable detailed monitoring(1 minutes interval, but that will cost you some extra $$$)
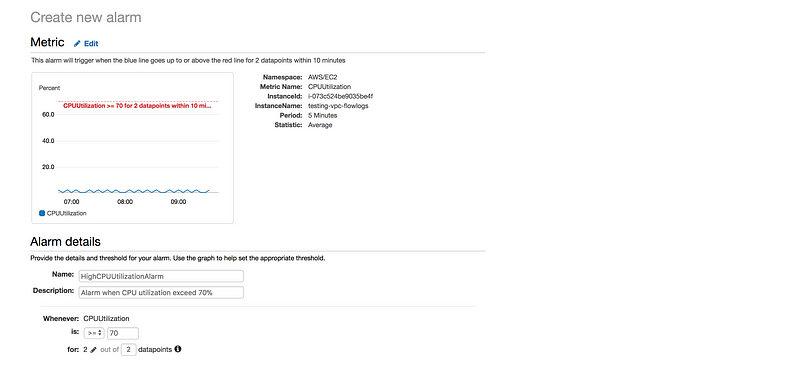
In the navigation pane, choose Alarms, Create Alarm.
Go to Metric → Select metric → EC2 → Per-Instance-Metrics → CPU Utilization → Select metric
Define the Alarm as follows
* Type the unique name for the alarm(eg: HighCPUUtilizationAlarm)
* Description of the alarm
* Under whenever,choose >= and type 70, for type 2. This specify that the alarm is triggered if the CPU usage is above 70% for two consecutive sampling period
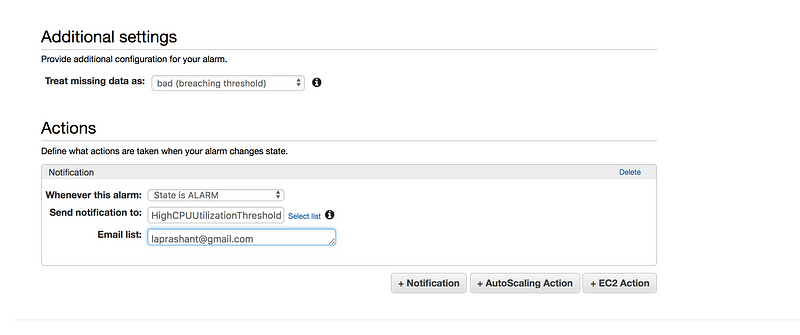
* Under Additional settings, for treat missing data as, choose bad(breaching threshold), as missing data points may indicate that the instance is down
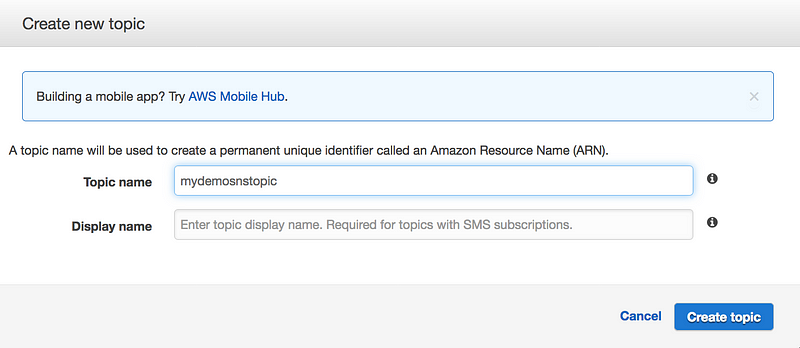
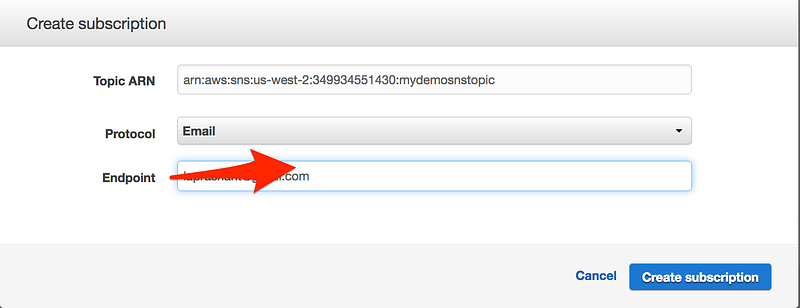
* Under Actions, for whenever this alarm, choose state is alarm. For Send notification to, select an exisiting SNS topic or create a new one
* To create a new SNS topic, choose new list, for send notification to, type a name of SNS topic(for eg: HighCPUUtilizationThreshold) and for Email list type a comma-seperated list of email addresses to be notified when the alarm changes to the ALARM state.
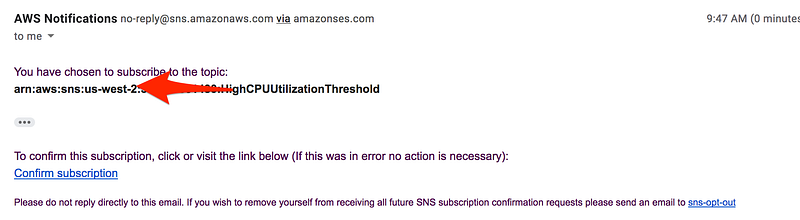
* Each email address is sent to a topic subscription confirmation email. You must confirm the subscription before notifications can be sent.
* Click on Create Alarm
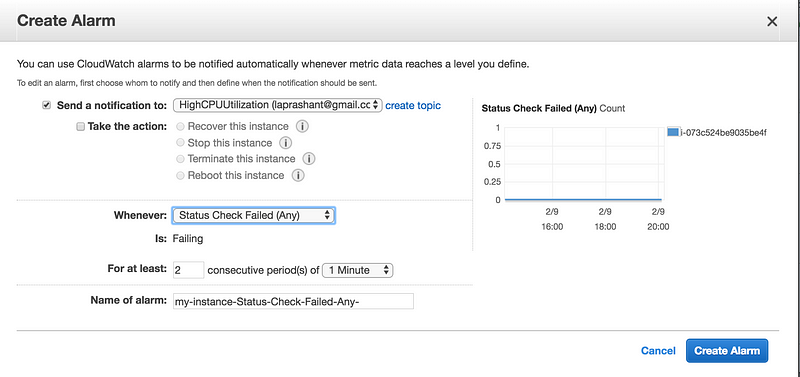
Scenario2: Create a status check alarm to notify when an instance has failed a status check
Creating a Status Check Alarm Using the AWS Console
Select the instance, choose the Status Checks tab, and choose to Create Status Check Alarm.
* You can create new SNS notification or use the exisiting one(I am using the existing one create in earlier example of high CPU utilization)
* In Whenever, select the status check that you want to be notified about(options Status Check Failed(Any), Status Check Failed(Instance) and Status Check Failed(System)
* In For at least, set the number of periods you want to evaluate and in consecutive periods, select the evaluation period duration before triggering the alarm and sending an email.
* In Name of alarm, replace the default name with another name for the alarm.
* Choose Create Alarm.
alarm_name – The descriptive name for the alarm. This name must be unique within the user’s AWS account
comparison_operator – The arithmetic operation to use when comparing the specified Statistic and Threshold. The specified Statistic value is used as the first operand. Either of the following is supported: GreaterThanOrEqualToThreshold, GreaterThanThreshold, LessThanThreshold, LessThanOrEqualToThreshold.
evaluation_periods – The number of periods over which data is compared to the specified threshold.
metric_name – The name for the alarm’s associated metric.
namespace – The namespace for the alarm’s associated metric.
period – The period in seconds over which the specified statistic is applied.
statistic – The statistic to apply to the alarm’s associated metric. Either of the following is supported: SampleCount, Average, Sum, Minimum, Maximum
threshold – The value against which the specified statistic is compared.
alarm_actions – The list of actions to execute when this alarm transitions into an ALARM state from any other state. Each action is specified as an Amazon Resource Name (ARN).
dimensions – The dimensions for the alarm’s associated metric.
We need to modify our SNS module a little bit where the output of SNS arn will act as a input to this cloudwatch module.
output "sns_arn" {
  value = "${aws_sns_topic.my-test-alarm.arn}"
}
Same way output of EC2 module will act as an input to cloudwatch module
output "instance_id" {
  value = "${element(aws_instance.my-test-instance.*.id, 1)}"
}
There is a bug in terraform code, where I can’t specify multiple instances
output "instance_id" {
  value = "${aws_instance.my-test-instance.*.id)}"
}
If we try to use the above it’s will fail due to below error
Error: Incorrect attribute value type

  on cloudwatch/main.tf line 12, in resource "aws_cloudwatch_metric_alarm" "cpu-utilization":
  12: dimensions = {

Inappropriate value for attribute "dimensions": element "InstanceId": string
required.


Error: Incorrect attribute value type

  on cloudwatch/main.tf line 29, in resource "aws_cloudwatch_metric_alarm" "instance-health-check":
  29: dimensions = {

Inappropriate value for attribute "dimensions": element "InstanceId": string
required.
Welcome to Day 6 of 21 Days of AWS using Terraform. Topic for today is Introduction to Simple Notification to Service(SNS) using terraform.
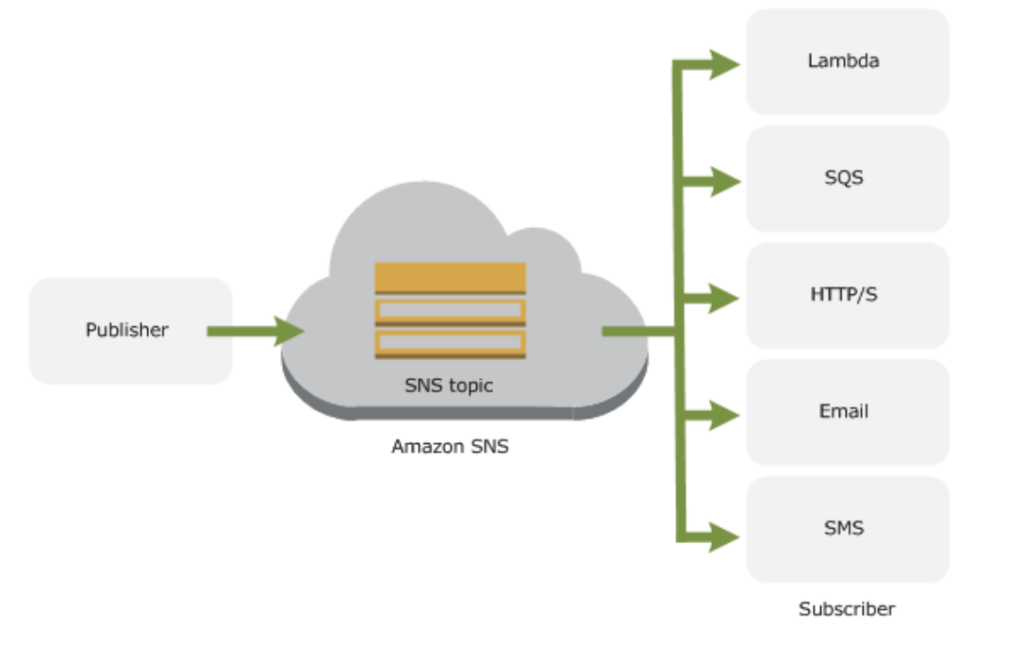
What is SNS?
As per official documentation
AWS SNS is a web service that coordinates and manages the delivery or sending of messages to subscribing endpoints or clients.
In case of cloudwatch(high CPU utilization or System/Instance Status Check) when the certain event occurs and SNS is used to send a notification. CloudWatch in combination with SNS creates a full monitoring solution with notifies the administrator in case of any environment issue(high CPU, Downtime…).
The entity that triggers the sending of a message(eg: CloudWatch Alarm, Any application or S3 events)
Topic
Object to which you publish your message(≤256KB)
Subscriber subscribe to the topic to receive the message
Soft limit of 10 million subscribers
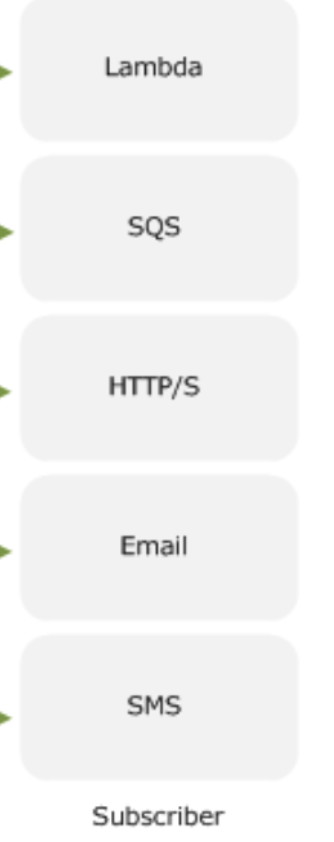
Subscriber
An endpoint to a message is sent. Message are simultaneously pushed to the subscriber
As you can see it follows the publish-subscribe(pub-sub) messaging paradigm with notification being delivered to the client using a push mechanism that eliminates the need to periodically check or poll for new information and updates.
To prevent the message from being lost, all messages published to Amazon SNS are stored redundantly across multiple Availability Zones.
The local-exec provisioner invokes a local executable after a resource is created. This invokes a process on the machine running Terraform, not on the resource. For more info https://www.terraform.io/docs/provisioners/local-exec.html
variables.tf
variable "alarms_email" {}
outputs.tf
output "sns_arn" {
  value = "${aws_sns_topic.my-test-alarm.arn}"
}
Welcome to Day 5 of 21 Days of AWS using Terraform, So far we build VPC ,EC2 and Application Load Balancer, let’s build Auto Scaling Group and rather then creating an instance via EC2 module, let auto-scaling group take care of it based on load.
What is Auto Scaling?
What auto-scaling will do, it ensures that we have a correct number of EC2 instances to handle the load of your applications.
How Auto Scaling works
It all started with the creation of the Auto Scaling group which is the collection of EC2 instances.
You can specify a minimum number of instances and AWS EC2 Auto Scaling ensures that your group never goes below this size.
The same way we can specify the maximum number of instances and AWS EC2 Auto Scaling ensures that your group never goes above this size.
If we specify the desired capacity, AWS EC2 Auto Scaling ensures that your group has this many instances.
Configuration templates(launch template or launch configuration): Specify Information such as AMI ID, instance type, key pair, security group
If we specify scaling policies then AWS EC2 Auto Scaling can launch or terminate instances as demand on your application increased or decreased. For eg: We can configure a group to scale based on the occurrence of specified conditions(dynamic scaling) or on a schedule.
Scaling policies we define adjust the minimum or a maximum number of instances based on the criteria we specify.
Step1: The first step in creating the AutoScaling Group is to create a launch configuration, which specifies how to configure each EC2 instance in the autoscaling group.
One of the available lifecycle settings are create_before_destroy, which, if set to true, tells Terraform to always create a replacement resource before destroying the original resource. For example, if you set create_before_destroy to true on an EC2 Instance, then whenever you make a change to that Instance, Terraform will first create a new EC2 Instance, wait for it to come up, and then remove the old EC2 Instance.
The catch with the create_before_destroy the parameter is that if you set it to true on resource X, you also have to set it to true on every resource that X depends on (if you forget, you’ll get errors about cyclical dependencies).
We need to make slight changes to our VPC module outputs.tf file, as the output of subnet block, will not act as an input to autoscaling group vpc_zone_identifier
output "public_subnets" {
  value = "${aws_subnet.public_subnet.*.id}"
}
Same way we need to output the target arn from alb module so that it can act as an input to auto-scaling group module(target_group_arn)
output "alb_target_group_arn" {
  value = "${aws_lb_target_group.my-target-group.arn}"
}
Final word, as we are now using auto-scale/auto-launch configuration to spin up our instance we probably don’t need EC2 module. I am leaving it for the time being but for ALB let me comment out the code
Welcome to Day 4 of 21 Days of AWS using Terraform, So far we build VPC and EC2, let’s build Application Load Balancer and add two instances behind it. This is going to be a modular approach i.e we are going to get vpc id,subnet1 and subnet2 created during the VPC module and instance id from EC2 module.
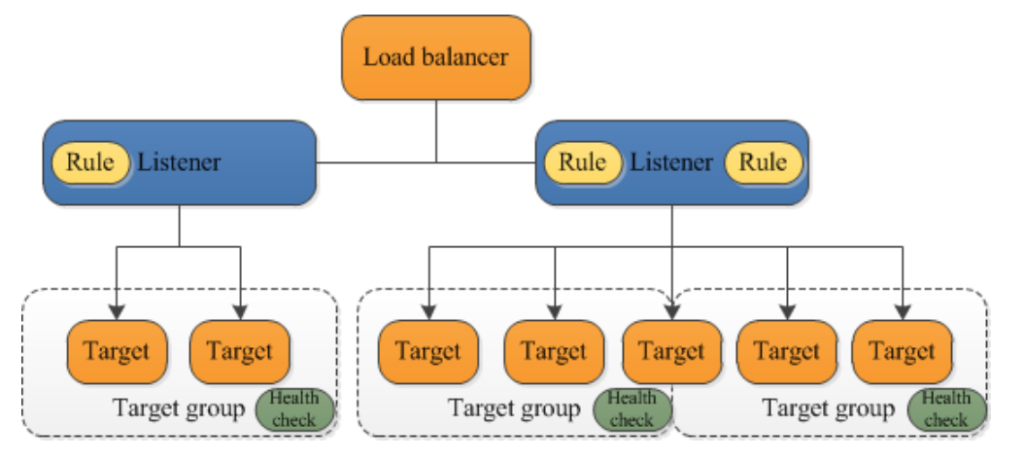
The Application Load Balancer is a feature of ElasticLoad Balancing that allows a developer to configure and route incoming end-user traffic to applications based in the Amazon Web Services (AWS) public cloud.
Features
Layer7 load balancer(HTTP and HTTPs traffic)
Support Path and Host-based routing(which let you route traffic to different target group)
Listener support IPv6
Some Key Terms
Target Group
Target types:
Instance types: Route traffic to the Primary Private IP address of that Instance
IP: Route traffic to a specified IP address
Lambda function
Health Check
Determines whether to send traffic to a given instance
Each instance must pass its a health check
Sends HTTP GET request and looks for a specific response/success code
health_check: Your Application Load Balancer periodically sends requests to its registered targets to test their status. These tests are called health checks
interval: The approximate amount of time, in seconds, between health checks of an individual target. Minimum value 5 seconds, Maximum value 300 seconds. Default 30 seconds.
path: The destination for the health check request
protocol: The protocol to use to connect with the target. Defaults to HTTP
timeout:The amount of time, in seconds, during which no response means a failed health check. For Application Load Balancers, the range is 2 to 60 seconds and the default is 5 seconds
healthy_threshold: The number of consecutive health checks successes required before considering an unhealthy target healthy. Defaults to 3.
unhealthy_threshold: The number of consecutive health check failures required before considering the target unhealthy
matcher: The HTTP codes to use when checking for a successful response from a target. You can specify multiple values (for example, "200,202") or a range of values (for example, "200-299")name: The name of the target group. If omitted, Terraform will assign a random, unique name.
port: The port on which targets receive traffic
protocol: The protocol to use for routing traffic to the targets. Should be one of "TCP", "TLS", "HTTP" or "HTTPS". Required when target_type is instance or ip
vpc_id:The identifier of the VPC in which to create the target group. This value we will get from the VPC module we built earlier
target_type: The type of target that you must specify when registering targets with this target group.Possible values instance id, ip address
The VPC module we built earlier, we need to modify it a little built by outputting the value of VPC id(outputs.tf) which will act as an input to Application Load Balancer Module
output "vpc_id" {
  value = "${aws_vpc.main.id}"
}
Step2: Provides the ability to register instances with an Application Load Balancer (ALB)
target_group_arn: The ARN of the target group with which to register targets target_id: The ID of the target. This is the Instance ID for an instance. We will get this value from EC2 module port: The port on which targets receive traffic.
We need to modify the EC2 module(outputs.tf) by outputting the value of EC2 id which will act as an input to Application Load Balancer Module
output "instance1_id" {
  value = "${element(aws_instance.my-test-instance.*.id, 1)}"
}

output "instance2_id" {
  value = "${element(aws_instance.my-test-instance.*.id, 2)}"
}
element(list, index) – Returns a single element from a list at the given index. If the index is greater than the number of elements, this function will wrap using a standard mod algorithm. This function only works on flat lists.
name: The name of the LB. This name must be unique within your AWS account, can have a maximum of 32 characters, must contain only alphanumeric characters or hyphens, and must not begin or end with a hyphen. If not specified, Terraform will autogenerate a name beginning with tf-lb (This part is important as Terraform auto internal: If true, the LB will be internal. load_balancer_type: The type of load balancer to create. Possible values are application or network. The default value is the application. ip_address_type: The type of IP addresses used by the subnets for your load balancer. The possible values are ipv4 and dualstack subnets: A list of subnet IDs to attach to the LB. In this case, I am attaching two public subnets we created during load balancer creation. This value we will get out from the VPC module. tags: A mapping of tags to assign to the resource.
We need to modify the VPC module and output the value of two subnet id which will act as an input to application load balancer module
output "subnet1" {
  value = "${element(aws_subnet.public_subnet.*.id, 1 )}"
}

output "subnet2" {
  value = "${element(aws_subnet.public_subnet.*.id, 2 )}"
}
load_balancer_arn – The ARN of the load balancer(we created in step3)
port – (Required) The port on which the load balancer is listening.
protocol – (Optional) The protocol for connections from clients to the load balancer. Valid values are TCP, TLS, UDP, TCP_UDP, HTTP and HTTPS. Defaults to HTTP.
In order to deploy EC2 instance we need a bunch of resources
AMI
Key Pair
EBS Volumes Creation
User data
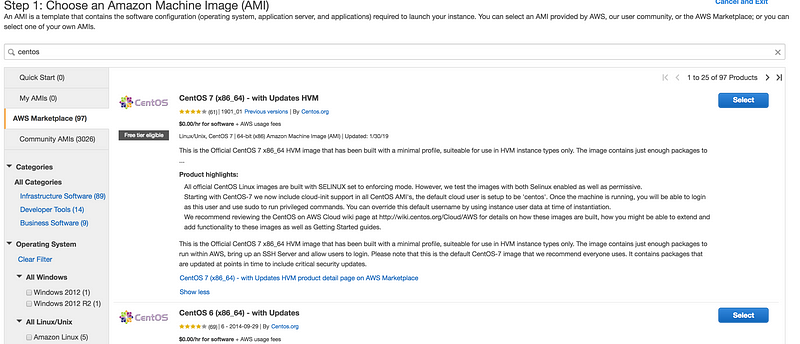
The first step in deploying EC2 instance is choosing correct AMI and in terraform, there are various ways to do that
We can hardcore the value of AMI
We can use data resource(similar to what we used for Availability Zone in VPC section) to query and filter AWS and get the latest AMI based on the region, as the AMI id is different in a different region.
data "aws_ami" "centos" {
  owners      = ["679593333241"]
  most_recent = true

  filter {
    name   = "name"
    values = ["CentOS Linux 7 x86_64 HVM EBS *"]
  }

  filter {
    name   = "architecture"
    values = ["x86_64"]
  }

  filter {
    name   = "root-device-type"
    values = ["ebs"]
  }
}
NOTE: Use of data resource is not ideal and each and every used case, eg: In the case of Production we might want to use a specific version of CentOS.
The above code will help us to get the latest Centos AMI, the code is self-explanatory but one important parameter we used is owners
owners – Limit search to specific AMI owners. Valid items are the numeric account ID, amazon, or self.
most_recent – If more than one result is returned, use the most recent AMI.This is to get the latest Centos AMI as per our use case.
As we are able to figure out the AMI part, the next step is to create and use the key pair
Either we can hardcode the value of key pair or generate a new key via command line and then refer to this file.
$ ssh-keygen
Generating public/private rsa key pair.
Enter file in which to save the key (/home/prashant/.ssh/id_rsa): /tmp/id_rsa
Enter passphrase (empty for no passphrase):
Enter same passphrase again:
Your identification has been saved in /tmp/id_rsa.
Your public key has been saved in /tmp/id_rsa.pub.
The key fingerprint is:
SHA256:A7lYe+KDAVoUFEDsC14wnb+NePzCntjZruJdJf0+apM prashant@prashant-ThinkPad-T440s
The key's randomart image is:
+---[RSA 2048]----+
|++*o.            |
| = o   .         |
|. = . +          |
|.+ o + +.        |
|+ o = B.So       |
| o . O +o..      |
|    + +.  ..     |
|   .+o=o E..     |
|  .ooB+o..o..    |
+----[SHA256]-----+
There is one more resource, I want to use here called template_file. The template_file data source renders a template from a template string, which is usually loaded from an external file. This you can use with user_data resource to execute any script during instance boot time
data "template_file" "init" {
  template = "${file("${path.module}/userdata.tpl")}"
}
userdata.tpl file will be like
#!/bin/bash
yum -y install httpd
echo "hello from terraform" >> /var/www/html/index.html
service httpd start
chkconfig httpd on
After AMI and Keys out of our way, let start building EC2 instance
Most of these parameters I already discussed in the first section, but let's quickly review it and check the new one
* count: The number of instance, we want to create
* ami: This time we are pulling ami using data resource
* instance_type: Important parameter in AWS Realm, the type of instance we want to create
* key_name: Resource we create earlier and we are just referencing it here* tags: Tags are always helpful to assign label to your resources.
Below ones are special(vpc_security_group_ids & subnet_id), because both of these resource we created during the vpc section, so now what we need to do is to output it during VPC module and use there output as the input to this module.
If you notice the above code, one thing which is interesting here is vpc_security_group_ids and subnet_id
The interesting part, we already created these as a part of VPC code, so we just need to call in our EC2 terraform and the way to do it using outputs.tf.
output "public_subnets" {
  value = "${aws_subnet.public_subnet.*.id}"
}

output "security_group" {
  value = "${aws_security_group.test_sg.id}"
}
After calling these values here, we just need to define as the part of main module and the syntax of doing that is
* To create EBS Volumes, I am using ebs_volume resource and to attach it use aws_volume_attachment
* We are creating two Volumes here
* As Volume is specific to Availibility Zone, I am using aws_availibility_zone data resource
* Size of the Volume is 1GB
* Type is gp2(other available options "standard", "gp2", "io1", "sc1" or "st1" (Default: "standard"))
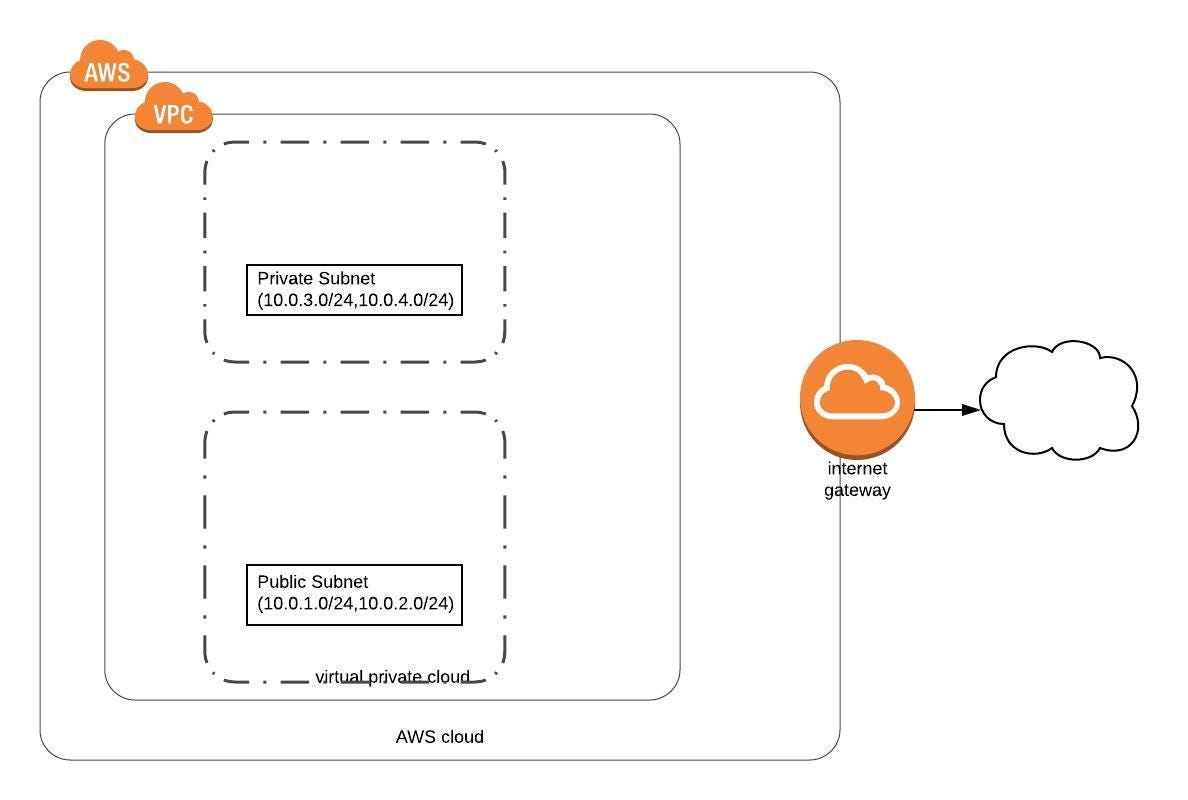
Welcome to Day 2 of 21 Days of AWS using Terraform, Let continue our journey, yesterday I discussed terraform, today let’s build VPC using terraform
What is VPC?
Without going to all the nitty-gritty details of VPC, first, let’s try to understand VPC in the simplest term. Before the cloud era, we use to have datacenters where we deploy all of our infrastructures.
You can think of VPC as your datacentre in a cloud but rather than spending months or weeks to set up that datacenter it’s now just a matter of minutes(API calls). It’s the place where you define your network which closely resembles your own traditional data centers with the benefits of using the scalable infrastructure provided by AWS.
Today we are going to build the first half of the equation i.e VPC
Once we create the VPC using AWS Console, these things created for us by-default
* Network Access Control List(NACL)* Security Group* Route Table
We need to take care of
* Internet Gateways
* Subnets
* Custom Route Table
But the bad news is as we are creating this via terraform we need to create all these things manually but this is just one time task, later on, if we need to build one more VPC we just need to call this module with some minor changes(eg: Changes in CIDR Range, Subnet) true Infrastructure as a Code(IAAC)
So the first step is to create a data resource, what data resource did is to query/list all the AWS available Availablity zone in a given region and then allow terraform to use those resource.
enable_dns_support – (Optional) A boolean flag to enable/disable DNS support in the VPC. Defaults true. Amazon provided DNS server(AmazonProvidedDNS) can resolve Amazon provided private DNS hostnames, that we specify in a private hosted zones in Route53.
enable_dns_hostnames – (Optional) A boolean flag to enable/disable DNS hostnames in the VPC. Defaults false. This will ensure that instances that are launched into our VPC receive a DNS hostname.
* Internet gateway is a horizontally scaled, redundant and highly avilable VPC component.
* Internet gateway serves one more purpose, it performs NAT for instances that have been assigned public IPv4 addresses.
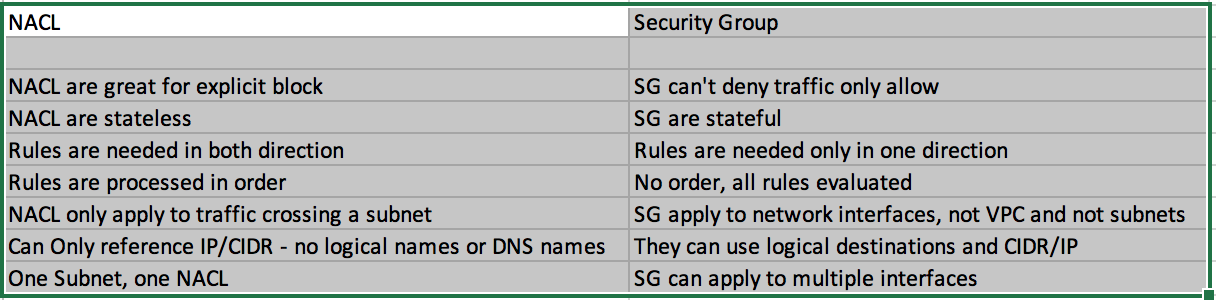
Network Access Control List(NACL) A network access control list (ACL) is an optional layer of security for your VPC that acts as a firewall for controlling traffic in and out of one or more subnets.
Security Group acts as a virtual firewall and is used to control the traffic for its associated instances.
$ terraform  init
Initializing modules...
- vpc in vpc

Initializing the backend...

Initializing provider plugins...
- Checking for available provider plugins...
- Downloading plugin for provider "aws" (hashicorp/aws) 2.35.0...

The following providers do not have any version constraints in configuration,
so the latest version was installed.

To prevent automatic upgrades to new major versions that may contain breaking
changes, it is recommended to add version = "..." constraints to the
corresponding provider blocks in configuration, with the constraint strings
suggested below.

* provider.aws: version = "~> 2.35"

Terraform has been successfully initialized!

You may now begin working with Terraform. Try running "terraform plan" to see
any changes that are required for your infrastructure. All Terraform commands
should now work.

If you ever set or change modules or backend configuration for Terraform,
rerun this command to reinitialize your working directory. If you forget, other
commands will detect it and remind you to do so if necessary.
Execute terraform plan
Generate and show an execution plan
$ terraform plan
Refreshing Terraform state in-memory prior to plan...
The refreshed state will be used to calculate this plan, but will not be
persisted to local or remote state storage.
module.vpc.data.aws_availability_zones.available: Refreshing state...
------------------------------------------------------------------------
An execution plan has been generated and is shown below.
Resource actions are indicated with the following symbols:
+ create
Terraform will perform the following actions:
# module.vpc.aws_default_route_table.private_route will be created
+ resource "aws_default_route_table" "private_route" {
+ default_route_table_id = (known after apply)
+ id = (known after apply)
+ owner_id = (known after apply)
+ route = (known after apply)
+ tags = {
+ "Name" = "my-private-route-table"
}
+ vpc_id = (known after apply)
}
# module.vpc.aws_internet_gateway.gw will be created
+ resource "aws_internet_gateway" "gw" {
+ id = (known after apply)
+ owner_id = (known after apply)
+ tags = {
+ "Name" = "my-test-igw"
}
+ vpc_id = (known after apply)
}
# module.vpc.aws_route_table.public_route will be created
+ resource "aws_route_table" "public_route" {
+ id = (known after apply)
+ owner_id = (known after apply)
+ propagating_vgws = (known after apply)
+ route = [
+ {
+ cidr_block = "0.0.0.0/0"
+ egress_only_gateway_id = ""
+ gateway_id = (known after apply)
+ instance_id = ""
+ ipv6_cidr_block = ""
+ nat_gateway_id = ""
+ network_interface_id = ""
+ transit_gateway_id = ""
+ vpc_peering_connection_id = ""
},
]
+ tags = {
+ "Name" = "my-test-public-route"
}
+ vpc_id = (known after apply)
}
# module.vpc.aws_route_table_association.private_subnet_assoc[0] will be created
+ resource "aws_route_table_association" "private_subnet_assoc" {
+ id = (known after apply)
+ route_table_id = (known after apply)
+ subnet_id = (known after apply)
}
# module.vpc.aws_route_table_association.private_subnet_assoc[1] will be created
+ resource "aws_route_table_association" "private_subnet_assoc" {
+ id = (known after apply)
+ route_table_id = (known after apply)
+ subnet_id = (known after apply)
}
# module.vpc.aws_route_table_association.public_subnet_assoc[0] will be created
+ resource "aws_route_table_association" "public_subnet_assoc" {
+ id = (known after apply)
+ route_table_id = (known after apply)
+ subnet_id = (known after apply)
}
# module.vpc.aws_route_table_association.public_subnet_assoc[1] will be created
+ resource "aws_route_table_association" "public_subnet_assoc" {
+ id = (known after apply)
+ route_table_id = (known after apply)
+ subnet_id = (known after apply)
}
# module.vpc.aws_security_group.test_sg will be created
+ resource "aws_security_group" "test_sg" {
+ arn = (known after apply)
+ description = "Managed by Terraform"
+ egress = (known after apply)
+ id = (known after apply)
+ ingress = (known after apply)
+ name = "my-test-sg"
+ owner_id = (known after apply)
+ revoke_rules_on_delete = false
+ vpc_id = (known after apply)
}
# module.vpc.aws_security_group_rule.all_outbound_access will be created
+ resource "aws_security_group_rule" "all_outbound_access" {
+ cidr_blocks = [
+ "0.0.0.0/0",
]
+ from_port = 0
+ id = (known after apply)
+ protocol = "-1"
+ security_group_id = (known after apply)
+ self = false
+ source_security_group_id = (known after apply)
+ to_port = 0
+ type = "egress"
}
# module.vpc.aws_security_group_rule.ssh_inbound_access will be created
+ resource "aws_security_group_rule" "ssh_inbound_access" {
+ cidr_blocks = [
+ "0.0.0.0/0",
]
+ from_port = 22
+ id = (known after apply)
+ protocol = "tcp"
+ security_group_id = (known after apply)
+ self = false
+ source_security_group_id = (known after apply)
+ to_port = 22
+ type = "ingress"
}
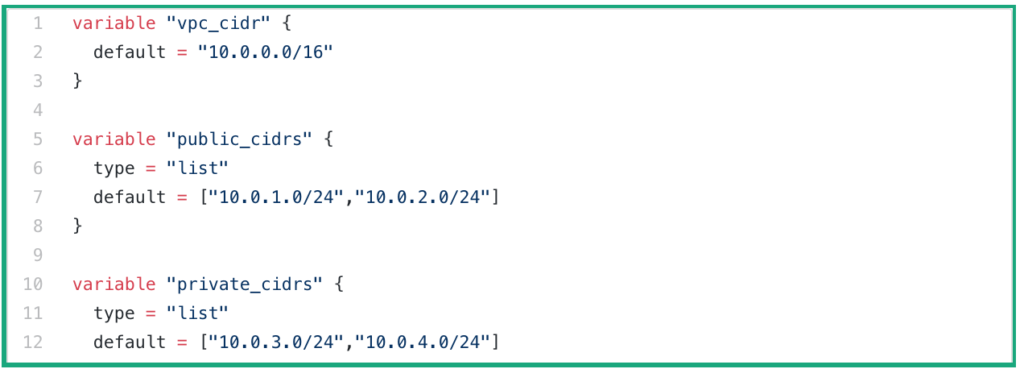
# module.vpc.aws_subnet.private_subnet[0] will be created
+ resource "aws_subnet" "private_subnet" {
+ arn = (known after apply)
+ assign_ipv6_address_on_creation = false
+ availability_zone = "us-west-2a"
+ availability_zone_id = (known after apply)
+ cidr_block = "10.0.3.0/24"
+ id = (known after apply)
+ ipv6_cidr_block = (known after apply)
+ ipv6_cidr_block_association_id = (known after apply)
+ map_public_ip_on_launch = false
+ owner_id = (known after apply)
+ tags = {
+ "Name" = "my-test-private-subnet.1"
}
+ vpc_id = (known after apply)
}
# module.vpc.aws_subnet.private_subnet[1] will be created
+ resource "aws_subnet" "private_subnet" {
+ arn = (known after apply)
+ assign_ipv6_address_on_creation = false
+ availability_zone = "us-west-2b"
+ availability_zone_id = (known after apply)
+ cidr_block = "10.0.4.0/24"
+ id = (known after apply)
+ ipv6_cidr_block = (known after apply)
+ ipv6_cidr_block_association_id = (known after apply)
+ map_public_ip_on_launch = false
+ owner_id = (known after apply)
+ tags = {
+ "Name" = "my-test-private-subnet.2"
}
+ vpc_id = (known after apply)
}
# module.vpc.aws_subnet.public_subnet[0] will be created
+ resource "aws_subnet" "public_subnet" {
+ arn = (known after apply)
+ assign_ipv6_address_on_creation = false
+ availability_zone = "us-west-2a"
+ availability_zone_id = (known after apply)
+ cidr_block = "10.0.1.0/24"
+ id = (known after apply)
+ ipv6_cidr_block = (known after apply)
+ ipv6_cidr_block_association_id = (known after apply)
+ map_public_ip_on_launch = true
+ owner_id = (known after apply)
+ tags = {
+ "Name" = "my-test-public-subnet.1"
}
+ vpc_id = (known after apply)
}
# module.vpc.aws_subnet.public_subnet[1] will be created
+ resource "aws_subnet" "public_subnet" {
+ arn = (known after apply)
+ assign_ipv6_address_on_creation = false
+ availability_zone = "us-west-2b"
+ availability_zone_id = (known after apply)
+ cidr_block = "10.0.2.0/24"
+ id = (known after apply)
+ ipv6_cidr_block = (known after apply)
+ ipv6_cidr_block_association_id = (known after apply)
+ map_public_ip_on_launch = true
+ owner_id = (known after apply)
+ tags = {
+ "Name" = "my-test-public-subnet.2"
}
+ vpc_id = (known after apply)
}
# module.vpc.aws_vpc.main will be created
+ resource "aws_vpc" "main" {
+ arn = (known after apply)
+ assign_generated_ipv6_cidr_block = false
+ cidr_block = "10.0.0.0/16"
+ default_network_acl_id = (known after apply)
+ default_route_table_id = (known after apply)
+ default_security_group_id = (known after apply)
+ dhcp_options_id = (known after apply)
+ enable_classiclink = (known after apply)
+ enable_classiclink_dns_support = (known after apply)
+ enable_dns_hostnames = true
+ enable_dns_support = true
+ id = (known after apply)
+ instance_tenancy = "default"
+ ipv6_association_id = (known after apply)
+ ipv6_cidr_block = (known after apply)
+ main_route_table_id = (known after apply)
+ owner_id = (known after apply)
+ tags = {
+ "Name" = "my-new-test-vpc"
}
}
Plan: 15 to add, 0 to change, 0 to destroy.
------------------------------------------------------------------------
Note: You didn't specify an "-out" parameter to save this plan, so Terraform
can't guarantee that exactly these actions will be performed if
"terraform apply" is subsequently run.
Final step terraform apply
Builds or changes the infrastructure
$ terraform  apply
module.vpc.data.aws_availability_zones.available: Refreshing state...

An execution plan has been generated and is shown below.
Resource actions are indicated with the following symbols:
  + create

Terraform will perform the following actions:

  # module.vpc.aws_default_route_table.private_route will be created
  + resource "aws_default_route_table" "private_route" {
      + default_route_table_id = (known after apply)
      + id                     = (known after apply)
      + owner_id               = (known after apply)
      + route                  = (known after apply)
      + tags                   = {
          + "Name" = "my-private-route-table"
        }
      + vpc_id                 = (known after apply)
    }

  # module.vpc.aws_internet_gateway.gw will be created
  + resource "aws_internet_gateway" "gw" {
      + id       = (known after apply)
      + owner_id = (known after apply)
      + tags     = {
          + "Name" = "my-test-igw"
        }
      + vpc_id   = (known after apply)
    }

  # module.vpc.aws_route_table.public_route will be created
  + resource "aws_route_table" "public_route" {
      + id               = (known after apply)
      + owner_id         = (known after apply)
      + propagating_vgws = (known after apply)
      + route            = [
          + {
              + cidr_block                = "0.0.0.0/0"
              + egress_only_gateway_id    = ""
              + gateway_id                = (known after apply)
              + instance_id               = ""
              + ipv6_cidr_block           = ""
              + nat_gateway_id            = ""
              + network_interface_id      = ""
              + transit_gateway_id        = ""
              + vpc_peering_connection_id = ""
            },
        ]
      + tags             = {
          + "Name" = "my-test-public-route"
        }
      + vpc_id           = (known after apply)
    }

  # module.vpc.aws_route_table_association.private_subnet_assoc[0] will be created
  + resource "aws_route_table_association" "private_subnet_assoc" {
      + id             = (known after apply)
      + route_table_id = (known after apply)
      + subnet_id      = (known after apply)
    }

  # module.vpc.aws_route_table_association.private_subnet_assoc[1] will be created
  + resource "aws_route_table_association" "private_subnet_assoc" {
      + id             = (known after apply)
      + route_table_id = (known after apply)
      + subnet_id      = (known after apply)
    }

  # module.vpc.aws_route_table_association.public_subnet_assoc[0] will be created
  + resource "aws_route_table_association" "public_subnet_assoc" {
      + id             = (known after apply)
      + route_table_id = (known after apply)
      + subnet_id      = (known after apply)
    }

  # module.vpc.aws_route_table_association.public_subnet_assoc[1] will be created
  + resource "aws_route_table_association" "public_subnet_assoc" {
      + id             = (known after apply)
      + route_table_id = (known after apply)
      + subnet_id      = (known after apply)
    }

  # module.vpc.aws_security_group.test_sg will be created
  + resource "aws_security_group" "test_sg" {
      + arn                    = (known after apply)
      + description            = "Managed by Terraform"
      + egress                 = (known after apply)
      + id                     = (known after apply)
      + ingress                = (known after apply)
      + name                   = "my-test-sg"
      + owner_id               = (known after apply)
      + revoke_rules_on_delete = false
      + vpc_id                 = (known after apply)
    }

  # module.vpc.aws_security_group_rule.all_outbound_access will be created
  + resource "aws_security_group_rule" "all_outbound_access" {
      + cidr_blocks              = [
          + "0.0.0.0/0",
        ]
      + from_port                = 0
      + id                       = (known after apply)
      + protocol                 = "-1"
      + security_group_id        = (known after apply)
      + self                     = false
      + source_security_group_id = (known after apply)
      + to_port                  = 0
      + type                     = "egress"
    }

  # module.vpc.aws_security_group_rule.ssh_inbound_access will be created
  + resource "aws_security_group_rule" "ssh_inbound_access" {
      + cidr_blocks              = [
          + "0.0.0.0/0",
        ]
      + from_port                = 22
      + id                       = (known after apply)
      + protocol                 = "tcp"
      + security_group_id        = (known after apply)
      + self                     = false
      + source_security_group_id = (known after apply)
      + to_port                  = 22
      + type                     = "ingress"
    }

  # module.vpc.aws_subnet.private_subnet[0] will be created
  + resource "aws_subnet" "private_subnet" {
      + arn                             = (known after apply)
      + assign_ipv6_address_on_creation = false
      + availability_zone               = "us-west-2a"
      + availability_zone_id            = (known after apply)
      + cidr_block                      = "10.0.3.0/24"
      + id                              = (known after apply)
      + ipv6_cidr_block                 = (known after apply)
      + ipv6_cidr_block_association_id  = (known after apply)
      + map_public_ip_on_launch         = false
      + owner_id                        = (known after apply)
      + tags                            = {
          + "Name" = "my-test-private-subnet.1"
        }
      + vpc_id                          = (known after apply)
    }

  # module.vpc.aws_subnet.private_subnet[1] will be created
  + resource "aws_subnet" "private_subnet" {
      + arn                             = (known after apply)
      + assign_ipv6_address_on_creation = false
      + availability_zone               = "us-west-2b"
      + availability_zone_id            = (known after apply)
      + cidr_block                      = "10.0.4.0/24"
      + id                              = (known after apply)
      + ipv6_cidr_block                 = (known after apply)
      + ipv6_cidr_block_association_id  = (known after apply)
      + map_public_ip_on_launch         = false
      + owner_id                        = (known after apply)
      + tags                            = {
          + "Name" = "my-test-private-subnet.2"
        }
      + vpc_id                          = (known after apply)
    }

  # module.vpc.aws_subnet.public_subnet[0] will be created
  + resource "aws_subnet" "public_subnet" {
      + arn                             = (known after apply)
      + assign_ipv6_address_on_creation = false
      + availability_zone               = "us-west-2a"
      + availability_zone_id            = (known after apply)
      + cidr_block                      = "10.0.1.0/24"
      + id                              = (known after apply)
      + ipv6_cidr_block                 = (known after apply)
      + ipv6_cidr_block_association_id  = (known after apply)
      + map_public_ip_on_launch         = true
      + owner_id                        = (known after apply)
      + tags                            = {
          + "Name" = "my-test-public-subnet.1"
        }
      + vpc_id                          = (known after apply)
    }

  # module.vpc.aws_subnet.public_subnet[1] will be created
  + resource "aws_subnet" "public_subnet" {
      + arn                             = (known after apply)
      + assign_ipv6_address_on_creation = false
      + availability_zone               = "us-west-2b"
      + availability_zone_id            = (known after apply)
      + cidr_block                      = "10.0.2.0/24"
      + id                              = (known after apply)
      + ipv6_cidr_block                 = (known after apply)
      + ipv6_cidr_block_association_id  = (known after apply)
      + map_public_ip_on_launch         = true
      + owner_id                        = (known after apply)
      + tags                            = {
          + "Name" = "my-test-public-subnet.2"
        }
      + vpc_id                          = (known after apply)
    }

  # module.vpc.aws_vpc.main will be created
  + resource "aws_vpc" "main" {
      + arn                              = (known after apply)
      + assign_generated_ipv6_cidr_block = false
      + cidr_block                       = "10.0.0.0/16"
      + default_network_acl_id           = (known after apply)
      + default_route_table_id           = (known after apply)
      + default_security_group_id        = (known after apply)
      + dhcp_options_id                  = (known after apply)
      + enable_classiclink               = (known after apply)
      + enable_classiclink_dns_support   = (known after apply)
      + enable_dns_hostnames             = true
      + enable_dns_support               = true
      + id                               = (known after apply)
      + instance_tenancy                 = "default"
      + ipv6_association_id              = (known after apply)
      + ipv6_cidr_block                  = (known after apply)
      + main_route_table_id              = (known after apply)
      + owner_id                         = (known after apply)
      + tags                             = {
          + "Name" = "my-new-test-vpc"
        }
    }

Plan: 15 to add, 0 to change, 0 to destroy.

Do you want to perform these actions?
  Terraform will perform the actions described above.
  Only 'yes' will be accepted to approve.

  Enter a value: yes

module.vpc.aws_vpc.main: Creating...
module.vpc.aws_vpc.main: Creation complete after 5s [id=vpc-0b97129b9e91cac4d]
module.vpc.aws_internet_gateway.gw: Creating...
module.vpc.aws_default_route_table.private_route: Creating...
module.vpc.aws_subnet.private_subnet[0]: Creating...
module.vpc.aws_subnet.private_subnet[1]: Creating...
module.vpc.aws_security_group.test_sg: Creating...
module.vpc.aws_subnet.public_subnet[1]: Creating...
module.vpc.aws_subnet.public_subnet[0]: Creating...
module.vpc.aws_default_route_table.private_route: Creation complete after 2s [id=rtb-034ed4f91b0c6e970]
module.vpc.aws_subnet.private_subnet[0]: Creation complete after 2s [id=subnet-0fb890defa508e1bd]
module.vpc.aws_subnet.private_subnet[1]: Creation complete after 2s [id=subnet-0f210acfcdbb26b1c]
module.vpc.aws_route_table_association.private_subnet_assoc[1]: Creating...
module.vpc.aws_route_table_association.private_subnet_assoc[0]: Creating...
module.vpc.aws_subnet.public_subnet[1]: Creation complete after 2s [id=subnet-0c1da219075f58bbf]
module.vpc.aws_internet_gateway.gw: Creation complete after 2s [id=igw-048be706e974b88cb]
module.vpc.aws_subnet.public_subnet[0]: Creation complete after 2s [id=subnet-0d881fbf8d72978ab]
module.vpc.aws_route_table.public_route: Creating...
module.vpc.aws_route_table_association.private_subnet_assoc[1]: Creation complete after 0s [id=rtbassoc-08c8b58da17951c27]
module.vpc.aws_route_table_association.private_subnet_assoc[0]: Creation complete after 0s [id=rtbassoc-033c1036cbb76fbd3]
module.vpc.aws_security_group.test_sg: Creation complete after 2s [id=sg-05a2779f164a402c7]
module.vpc.aws_security_group_rule.ssh_inbound_access: Creating...
module.vpc.aws_security_group_rule.all_outbound_access: Creating...
module.vpc.aws_security_group_rule.all_outbound_access: Creation complete after 2s [id=sgrule-4135805673]
module.vpc.aws_route_table.public_route: Creation complete after 2s [id=rtb-07f3c3293741dfbaf]
module.vpc.aws_route_table_association.public_subnet_assoc[0]: Creating...
module.vpc.aws_route_table_association.public_subnet_assoc[1]: Creating...
module.vpc.aws_route_table_association.public_subnet_assoc[1]: Creation complete after 0s [id=rtbassoc-06332e5c154dae9d8]
module.vpc.aws_route_table_association.public_subnet_assoc[0]: Creation complete after 0s [id=rtbassoc-02aa98f854d51e7aa]
module.vpc.aws_security_group_rule.ssh_inbound_access: Creation complete after 3s [id=sgrule-2460989827]

Apply complete! Resources: 15 added, 0 changed, 0 destroyed.
Terraform Module
You can think of Terraform Module like any other language module eg: Python, it’s the same terraform file but just that after creating a module out it we can re-use that code OR Instead copy-pasting the code the same code in different places we can turn into reusable modules.