
Welcome to Day 10 of 21 Days of AWS using Terraform, topic for today is Introduction to IAM using terraform.
What is IAM?
Identity and Access Management(IAM) is used to manage AWS
- Users
- Groups
- Roles
- Api Keys
- IAM Access Policies
and it provide access/access-permissions to AWS resources(such as EC2,S3..)
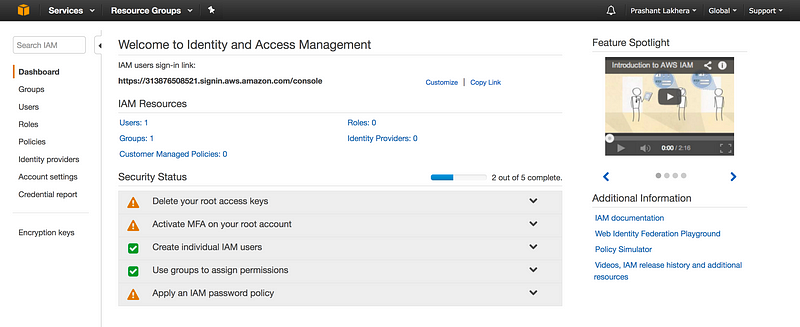
If we notice at the right hand side at the top of console it says Global i.e creating a user/groups/roles will apply to all regions
To create a new user,Just click on Users on the left navbar
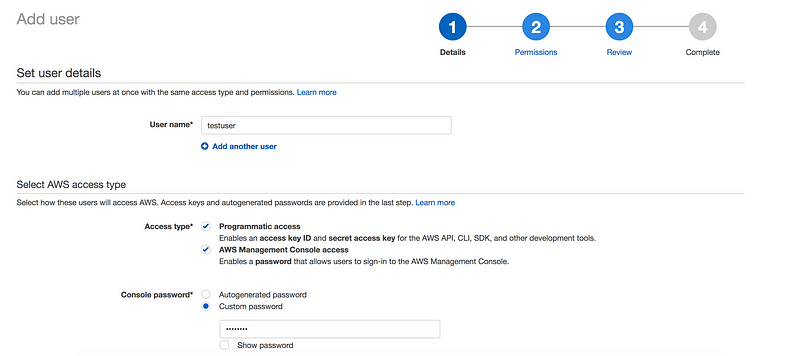
By default any new IAM account created with NO access to any AWS services(non-explicit deny)

Always follow the best practice and for daily work try to use a account with least privilege(i.e non root user)
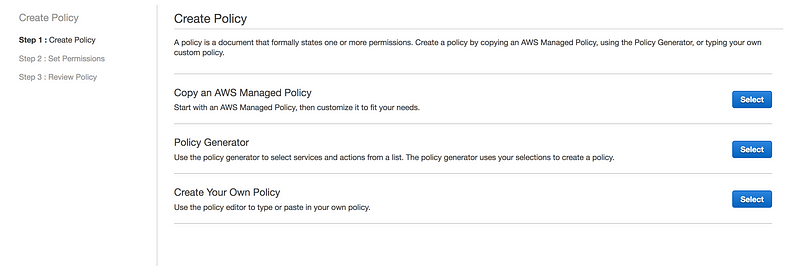
IAM Policies: A policy is a document that formally states one or more permissions.For eg: IAM provides some pre-built policy templates to assign to users and groups
- Administrator access: Full access to AWS resources
- Power user access: Admin access except it doesn’t allow user/group management
- Read only access: As name suggest user can only view AWS resources
Default policy is explicitly deny which will override any explicitly allow policy

Let take a look at these policies
AdministratorAccess
{
  "Version": "2012-10-17",
  "Statement": [
    {
      "Effect": "Allow",
      "Action": "*",
      "Resource": "*"
    }
  ]
}
We can create our own custom policy using policy generator or written from scratch
So Custom Policy where everything denies for EC2 resources
{
 “Version”: “2012–10–17”,
 “Statement”: [
 {
 “Sid”: “Stmt1491718191000”,
 “Effect”: “Deny”,
 “Action”: [
 “ec2:*”
 ],
 “Resource”: [
 “*”
 ]
 }
 ]
}
- More than one policy can be attached to a user or group at the same time
- Policy cannot be directly attached to AWS resources(eg: EC2 instance)
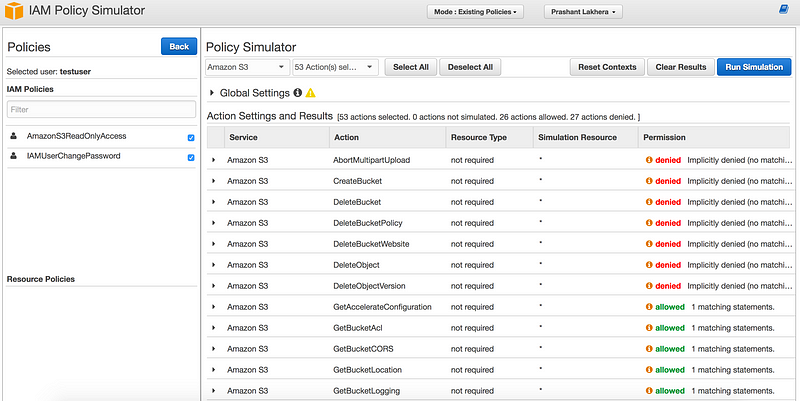
- There is a really nice tool https://policysim.aws.amazon.comwhich we can use to test and troubleshoot IAM and resource based policies
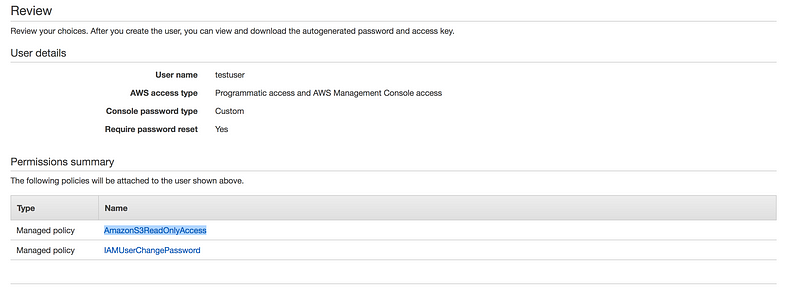
Below is the simulation I run where I created a test user who has only Amazon S3 read only access
Now let me run the simulation,as you can see it’s a nice way to test your policies
Let’s create IAM user using terraform
resource "aws_iam_user" "example" {
  name = "prashant"
}
AWS: aws_iam_user — Terraform by HashiCorp
Provides an IAM user.www.terraform.io
Now if I want to create two IAM user
One way to achieve the same is copy paste the same piece of code but that defeats the whole purpose of DRY.
Terraform provides meta parameters called count to achieve the same i.e to do certain types of loops.The count is a meta parameter which defines how many copies of the resource to create.
resource "aws_iam_user" "example" {
  count = 3
  name = "prashant"
}
One problem with this code is that all three IAM users would have the same name, which would cause an error since usernames must be unique
To accomplish the same thing in Terraform, you can use count.index to get the index of each “iteration” in the “loop”:
resource “aws_iam_user” “example” {
 count = 3
 name = “prashant.${count.index}”
}
If we run the plan again we will see terraform want to create three IAM user, each with a different name(prashant.0, prashant.1, prashant.2)
Think of a real-world scenario, we are hardly going to see names like prashant.0–2
The solution for this issue, If we combine count.index with interpolation functions built into Terraform, you can customize each “iteration” of the “loop” even more. To achieve this we need two interpolation functions length and elementInterpolation Syntax — Terraform by HashiCorp
Embedded within strings in Terraform, whether you’re using the Terraform syntax or JSON syntax, you can interpolate…www.terraform.io
element(list, index) — Returns a single element from a list at the given index. If the index is greater than the number of elements, this function will wrap using a standard mod algorithm. This function only works on flat lists.
OR
The element function returns the item located at INDEX in the given LIST
length(list) — Returns the number of members in a given list or map, or the number of characters in a given string.
OR
The length function returns the number of items in LIST (it also works with strings and maps)
#variables.tf
variable "username" {
  type = "list"
  default = ["prashant","pankaj","ashish"]
}
#main.tf
resource "aws_iam_user" "example" {
  count = "${length(var.username)}"
  name = "${element(var.username,count.index )}"
}
Now when you run the plan command, you’ll see that Terraform wants to create three IAM users, each with a unique name
One thing to note as we have used count on a resource, it becomes the list of resources rather than just a single resource.
For example, if you wanted to provide the Amazon Resource Name (ARN) of one of the IAM users as an output variable, you would need to do the following:
# outputs.tf
output “user_arn” {
 value = “${aws_iam_user.example.0.arn}”
}
If you want the ARNs of all the IAM users, you need to use the splat character, “*”, instead of the index:
# outputs.tf
output “user_arn” {
 value = “${aws_iam_user.example.*.arn}”
}
As we are done with creating IAM user, now let attach some policy with these users(As by default new user have no permission whatsoever)
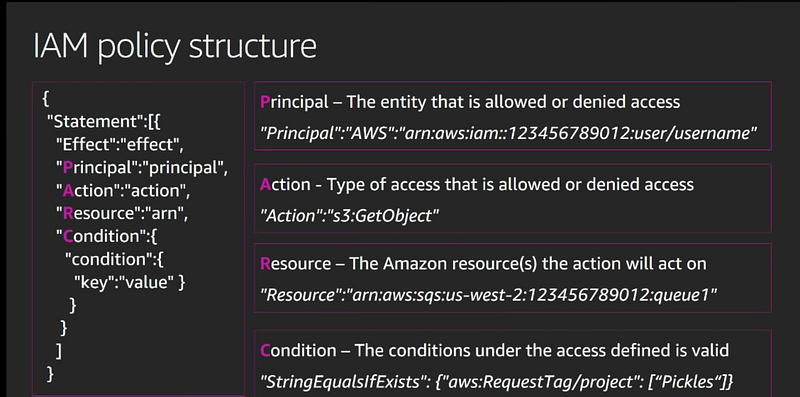
IAM Policies are JSON documents used to describe permissions within AWS. This is used to grant access to your AWS users to particular AWS resources.
IAM Policy is a json document
Terraform provides a handy data source called the aws_iam_policy_document that gives you a more concise way to define the IAM policy
data "aws_iam_policy_document" "example" {
  statement {
    actions = [
      "ec2:Describe*"]
    resources = [
      "*"]
  }
}
- IAM Policy consists of one or more statements
- Each of which specifies an effect (either “Allow” or “Deny”)
- One or more actions (e.g., “ec2:Describe*” allows all API calls to EC2 that start with the name “Describe”),
- One or more resources (e.g., “*” means “all resources”)
To create a new IAM managed policy from this document, we need to use aws_iam_policy resource
resource “aws_iam_policy” “example” {
 name = “ec2-read-only”
 policy = “${data.aws_iam_policy_document.example.json}”
}
This code uses the count parameter to “loop” over each of your IAM users and the element interpolation function to select each user’s ARN from the list returned by aws_iam_user.example.*.arn.
resource “aws_iam_user_policy_attachment” “test-attach” {
 count = “${length(var.username)}”
 user = “${element(aws_iam_user.example.*.name,count.index )}”
 policy_arn = “${aws_iam_policy.example.arn}”
}
IAM Roles are used to granting the application access to AWS Services without using permanent credentials.
IAM Role is one of the safer ways to give permission to your EC2 instances.
We can attach roles to an EC2 instance, and that allows us to give permission to EC2 instance to use other AWS Services eg: S3 buckets
Motivation
- Give EC2 instance access to S3 bucket
Step1
- Create a file iam.tf
- Create an IAM role by copy-paste the content of a below-mentioned link
- assume_role_policy — (Required) The policy that grants an entity permission to assume the role.
AWS: aws_iam_role — Terraform by HashiCorp
Provides an IAM role.www.terraform.io
resource "aws_iam_role" "test_role" {
  name = "test_role"
  assume_role_policy = <<EOF
{
  "Version": "2012-10-17",
  "Statement": [
    {
      "Action": "sts:AssumeRole",
      "Principal": {
        "Service": "ec2.amazonaws.com"
      },
      "Effect": "Allow",
      "Sid": ""
    }
  ]
}
EOF
  tags = {
      tag-key = "tag-value"
  }
}
- This is going to create IAM role but we can’t link this role to AWS instance and for that, we need EC2 instance Profile
Step2
- Create EC2 Instance Profile
resource "aws_iam_instance_profile" "test_profile" {
  name = "test_profile"
  role = "${aws_iam_role.test_role.name}"
}
- Now if we execute the above code, we have Role and Instance Profile but with no permission.
- Next step is to add IAM Policies which allows EC2 instance to execute specific commands for eg: access to S3 Bucket
Step3
- Adding IAM Policies
- To give full access to S3 bucket
resource "aws_iam_role_policy" "test_policy" {
  name = "test_policy"
  role = "${aws_iam_role.test_role.id}"
  policy = <<EOF
{
  "Version": "2012-10-17",
  "Statement": [
    {
      "Action": [
        "s3:*"
      ],
      "Effect": "Allow",
      "Resource": "*"
    }
  ]
}
EOF
}
Step4
- Attach this role to EC2 instance
resource "aws_instance" "role-test" {
  ami = "ami-0bbe6b35405ecebdb"
  instance_type = "t2.micro"
  iam_instance_profile = "${aws_iam_instance_profile.test_profile.name}"
  key_name = "mytestpubkey"
}
GitHub Link
https://github.com/100daysofdevops/21_days_of_aws_using_terraform/tree/master/iam
Looking forward for you guys to join this journey
- Website: https://100daysofdevops.com/
- Twitter: @100daysofdevops OR @lakhera2015
- Facebook: https://www.facebook.com/groups/795382630808645/
- Medium: https://medium.com/@devopslearning
- GitHub: https://github.com/100daysofdevops/100daysofdevops
- Slack: https://join.slack.com/t/100daysofdevops/shared_invite/enQtNzg1MjUzMzQzMzgxLWM4Yjk0ZWJiMjY4ZWE3ODBjZjgyYTllZmUxNzFkNTgxZjQ4NDlmZjkzODAwNDczOTYwOTM2MzlhZDNkM2FkMDA
- YouTube Channel: https://www.youtube.com/user/laprashant/videos?view_as=subscriber
In addition to that, I am going to host 5 meetups whose aim is to build the below architecture.

- Meetup: https://www.meetup.com/100daysofdevops
- Day1(Nov 10): Introduction to Terraform https://www.meetup.com/100daysofdevops/events/266192294/
- Day 2(Nov 16): Building VPC using Terraform
- Day 3(Nov 17): Creating EC2 Instance inside this VPC using Terraform
- Day 4(Nov 23): Adding Application Load Balancer and Auto-Scaling to the EC2 instance created on Day 3
- Day5(Nov 24): Add Backend MySQL Database and CloudWatch Alarm using Terraform