
Welcome to Day 13 of 21 Days of AWS using Terraform. The topic for today is Introduction to Nat Gateway using Terraform
What is NAT Gateway
NAT gateway enables instance in Private Subnet to connect to the internet or other AWS services but prevent the internet from initiating a connection with those instances.
How NAT works
- NAT device has an Elastic IP address and is connected to the Internet through an internet gateway.
- When we connect an instance in a private subnet through the NAT device, which routes traffic from the instance to the internet gateway and routes any response to the instance
- NAT maps multiple private IPv4 addresses to a single public IPv4 address.
NAT gateway doesn’t support IPv6 traffic for that you need to use Egress only gateway.
NOTE: IPv6 traffic is separate from IPv4 traffic, route table must include separate routes for IPv6 traffic.
For more info
https://docs.aws.amazon.com/vpc/latest/userguide/vpc-nat-comparison.html
To create a NAT gateway
Go to VPC Dashboard → NAT Gateways → Create NAT gateways

- Make sure you select the Public Subnet in your custom VPC
- For NAT gateway to work, it needs Elastic IP
NOTE: NAT Gateway creation will take 10–15 min
- Once the NAT gateway is available, add it to your default Route table
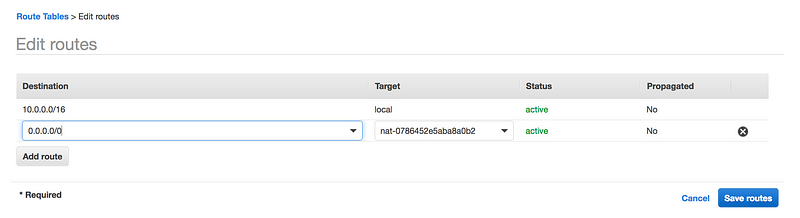
The advantage of NAT Gateway
- NAT gateway is highly available but we need it per availability zone.
- Can scale up to 45Gbps
- Managed by AWS
Limitation of NAT Gateway
- You can associate exactly one Elastic IP address with a NAT gateway. You cannot disassociate an Elastic IP address from a NAT gateway after it’s created. To use a different Elastic IP address for your NAT gateway, you must create a new NAT gateway with the required address, update your route tables, and then delete the existing NAT gateway if it’s no longer required.
- You cannot associate a security group with a NAT gateway. You can use security groups for your instances in the private subnets to control the traffic to and from those instances.
- You can use a network ACL to control the traffic to and from the subnet in which the NAT gateway is located. The network ACL applies to the NAT gateway’s traffic
On Day 2 we wrote the AWS VPC code, now its time to modify that code
- As we done via AWS UI, first step is to create Elastic IP
resource "aws_eip" "my-test-eip" {
  vpc = true
}
vpc – Boolean if the EIP is in a VPC or not.
- Let’s create NAT gateway
resource "aws_nat_gateway" "my-test-nat-gateway" {
  allocation_id = "${aws_eip.my-test-eip.id}"
  subnet_id = "${aws_subnet.public_subnet.1.id}"
}
allocation_id– The Allocation ID of the Elastic IP address for the gateway.subnet_id– The Subnet ID of the subnet in which to place the gateway.
- Once the NAT gateway is available, add it to your default Route table
resource "aws_default_route_table" "private_route" {
  default_route_table_id = "${aws_vpc.main.default_route_table_id}"
  route {
    nat_gateway_id = "${aws_nat_gateway.my-test-nat-gateway.id}"
    cidr_block = "0.0.0.0/0"
  }

  tags = {
    Name = "my-private-route-table"
  }
}
GitHub Link
https://github.com/100daysofdevops/21_days_of_aws_using_terraform/tree/master/vpc
- Website: https://100daysofdevops.com/
- Twitter: @100daysofdevops OR @lakhera2015
- Facebook: https://www.facebook.com/groups/795382630808645/
- Medium: https://medium.com/@devopslearning
- GitHub: https://github.com/100daysofdevops/100daysofdevops
- Slack: https://join.slack.com/t/100daysofdevops/shared_invite/enQtNzg1MjUzMzQzMzgxLWM4Yjk0ZWJiMjY4ZWE3ODBjZjgyYTllZmUxNzFkNTgxZjQ4NDlmZjkzODAwNDczOTYwOTM2MzlhZDNkM2FkMDA
- YouTube Channel: https://www.youtube.com/user/laprashant/videos?view_as=subscriber