Session link
GitHub Link
https://github.com/100daysofdevops/21_days_of_aws_using_terraform
Hello everyone and welcome to Day 1 of 21 Days of AWS using Terraform, the topic for today is Introduction to Terraform. Let’s begin our AWS automation journey using Terraform.
What is terraform?
Terraform is a tool for provisioning infrastructure(or managing Infrastructure as Code). It supports multiple providers(eg, AWS, Google Cloud, Azure, OpenStack..).
https://www.terraform.io/docs/providers/index.html
Installing Terraform
Installing Terraform is pretty straightforward, download it from Terraform download page and select the appropriate package based on your operating system.
https://learn.hashicorp.com/terraform/getting-started/install.html
https://www.terraform.io/downloads.html
I am using Centos7, so these are the steps I need to follow, to install terraform on Centos7.
Step1: Download the Package
$ wget https://releases.hashicorp.com/terraform/0.12.13/terraform_0.12.13_linux_amd64.zip
--2019-11-08 18:47:29--  https://releases.hashicorp.com/terraform/0.12.13/terraform_0.12.13_linux_amd64.zip
Resolving releases.hashicorp.com (releases.hashicorp.com)... 2a04:4e42:2f::439, 151.101.201.183
Connecting to releases.hashicorp.com (releases.hashicorp.com)|2a04:4e42:2f::439|:443... connected.
HTTP request sent, awaiting response... 200 OK
Length: 16341595 (16M) [application/zip]
Saving to: ‘terraform_0.12.13_linux_amd64.zip’

100%[==================================================================================================================================================================>] 16,341,595  --.-K/s   in 0.09s

2019-11-08 18:47:29 (172 MB/s) - ‘terraform_0.12.13_linux_amd64.zip’ saved [16341595/16341595]

Step2: Unzip it
$ unzip terraform_0.12.13_linux_amd64.zip
Archive:  terraform_0.12.13_linux_amd64.zip
  inflating: terraform

Step3: Add the binary to PATH environment variable
sudo cp terraform /usr/local/bin/
sudo chmod +x /usr/local/bin/terraform

Step4:  Logout and log back in
- To verify terraform is installed properly
$ terraform version
Terraform v0.12.13
As mentioned above terraform support many providers, for my use case I am using AWS.
Prerequisites1: Existing AWS Account(OR Setup a new account)
2: IAM full access(OR at least have AmazonEC2FullAccess)
3: AWS Credentials(AWS_ACCESS_KEY_ID and AWS_SECRET_ACCESS_KEY)
Once you have pre-requisites 1 and 2 done, the first step is to export Keys AWS_ACCESS_KEY_ID and AWS_SECRET_ACCESS_KEY.
export AWS_ACCESS_KEY_ID="your access key id here"
export AWS_SECRET_ACCESS_KEY="your secret access key id here"
NOTE: These two variables are bound to your current shell, in case of reboot, or if open a new shell window, these changes will be lost
With all pre-requisites in place, it’s time to write your first terraform code, but before that just a brief overview about terraform language
- Terraform code is written in the HashiCorp Configuration Language(HCL)
- All the code ends with the extension of .tf
- It’s a declarative language(We need to define what infrastructure we want and terraform will figure out how to create it)
In this first example I am going to build EC2 instance, but before creating EC2 instance go to AWS console and think what the different things we need to build EC2 instance are
- Amazon Machine Image(AMI)
- Instance Type
- Network Information(VPC/Subnet)
- Tags
- Security Group
- Key Pair
Let break each of these steps by step
- Amazon Machine Image(AMI): It’s an Operating System Image used to run EC2 instance. For this example, I am using Centos 7 ami-01ed306a12b7d1c96. We can create our own AMI using AWS console or Packer.
Other ways to find out the AMI id for Centos7 Image is
$ aws ec2 describe-images \
>       --owners aws-marketplace \
>       --filters Name=product-code,Values=aw0evgkw8e5c1q413zgy5pjce \
>       --query 'Images[*].[CreationDate,Name,ImageId]' \
>       --filters "Name=name,Values=CentOS Linux 7*" \
>       --region us-west-2 \
>       --output table \
>   | sort -r
|                                                                        DescribeImages                                                                         |
|  2019-01-30T23:43:37.000Z|  CentOS Linux 7 x86_64 HVM EBS ENA 1901_01-b7ee8a69-ee97-4a49-9e68-afaee216db2e-ami-05713873c6794f575.4  |  ami-01ed306a12b7d1c96  |
|  2018-06-13T15:58:14.000Z|  CentOS Linux 7 x86_64 HVM EBS ENA 1805_01-b7ee8a69-ee97-4a49-9e68-afaee216db2e-ami-77ec9308.4           |  ami-3ecc8f46           |
|  2018-05-17T09:30:44.000Z|  CentOS Linux 7 x86_64 HVM EBS ENA 1804_2-b7ee8a69-ee97-4a49-9e68-afaee216db2e-ami-55a2322a.4            |  ami-5490ed2c           |
|  2018-04-04T00:11:39.000Z|  CentOS Linux 7 x86_64 HVM EBS ENA 1803_01-b7ee8a69-ee97-4a49-9e68-afaee216db2e-ami-8274d6ff.4           |  ami-0ebdd976           |
|  2017-12-05T14:49:18.000Z|  CentOS Linux 7 x86_64 HVM EBS 1708_11.01-b7ee8a69-ee97-4a49-9e68-afaee216db2e-ami-95096eef.4            |  ami-b63ae0ce           |
+--------------------------+----------------------------------------------------------------------------------------------------------+-------------------------+
+--------------------------+----------------------------------------------------------------------------------------------------------+-------------------------+
-----------------------------------------------------------------------------------------------------------------------------------------------------------------
For more info please refer to AWS official doc
https://docs.aws.amazon.com/AWSEC2/latest/UserGuide/AMIs.html
- Instance Type: Type of EC2 instance to run, as every instance type provides different capabilities(CPU, Memory, I/O). For this example, I am using t2.micro(1 Virtual CPU, 1GB Memory)
For more info please refer to Amazon EC2 instance type
https://aws.amazon.com/ec2/instance-types/
- Network Information(VPC/Subnet Id): Virtual Private Cloud(VPC) is an isolated area of AWS account that has it’s own virtual network and IP address space. For this example, I am using default VPC which is part of a new AWS account. In case if you want to set up your instance in custom VPC, you need to add two additional parameters(vpc_security_group_ids and subnet_id) to your terraform code
For more information about VPC, please refer
https://docs.aws.amazon.com/vpc/latest/userguide/what-is-amazon-vpc.html
Tags: Tag we can think of a label that helps to categorize AWS resources.
For more information about the tag, please refer
https://docs.aws.amazon.com/AWSEC2/latest/UserGuide/Using_Tags.html
Security Group: Security group can think like a virtual firewall, and it controls the traffic of your instance
For more information about Security Group, please refer
https://docs.aws.amazon.com/AWSEC2/latest/UserGuide/ec2-security-groups.html
Key Pair: Key Pair is used to access EC2 instance
For more info about Key Pair, please refer to
https://docs.aws.amazon.com/general/latest/gr/aws-sec-cred-types.html#key-pairs
Let review all these parameters and see what we already have and what we need to create to spun our first EC2 instance
- Amazon Machine Image(AMI) → ami-01ed306a12b7d1c96
- Instance Type → t2.micro
- Network Information(VPC/Subnet) → Default VPC
- Tags
- Security Group
- Key Pair
So we already have AMI, Instance Type and Network Information, we need to write terraform code for rest of the parameter to spun our first EC2 instance.
Let start with Key Pair
Go to terraform documentation and search for aws key pair
https://www.terraform.io/docs/providers/aws/r/key_pair.html
resource "aws_key_pair" "example" {
  key_name = "example-key"
  public_key = ""
}
Let try to dissect this code
- Under resource, we specify the type of resource to create, in this case we are using aws_key_pair as a resource
- an example is an identifier which we can use throughout the code to refer back to this resource
- key_name: Is the name of the Key
- public_key: Is the public portion of ssh generated Key
The same thing we need to do for Security Group, go back to the terraform documentation and search for the security group.
https://www.terraform.io/docs/providers/aws/r/security_group.html
resource "aws_security_group" "examplesg" {

  ingress {
    from_port   = 22
    to_port     = 22
    protocol    = "tcp"
    cidr_blocks = ["0.0.0.0/0"]
  }
}- Same thing let do with this code, first two parameter is similar to key pair
- ingress: refer to in-bound traffic to port 22, using protocol tcp
- cidr_block: list of cidr_block where you want to allow this traffic(This is just as an example please never use 0.0.0.0/0)
With Key_pair and Security Group in place it’s time to create first EC2 instance.
https://www.terraform.io/docs/providers/aws/d/instance.html
resource "aws_instance" "ec2_instance" {
  ami = "ami-01ed306a12b7d1c96"
  instance_type = "t2.micro"
  vpc_security_group_ids = ["${aws_security_group.examplesg.id}"]
  key_name = "${aws_key_pair.example.id}"
  tags = {
    Name = "my-first-ec2-instance"
  }
}- In this case we just need to check the doc and fill out all the remaining values
- To refer back to the security group we need to use interpolation syntax by terraform
https://www.terraform.io/docs/configuration-0-11/interpolation.html
This look like
"${var_to_interpolate}
Whenever you see a $ sign and curly braces inside the double quotes, that means terraform is going to interpolate that code specially. To get the id of the security group
"${aws_security_group.examplesg.id}"
Same thing applied to key pair
"${aws_key_pair.example.id}"
Our code is ready but we are missing one thing, provider before starting any code we need to tell terraform which provider we are using(aws in this case)
provider "aws" {
  region = "us-west-2"
}
- This tells terraform that you are going to use AWS as provider and you want to deploy your infrastructure in us-west-2 region
- AWS has datacenter all over the world, which are grouped in region and availability zones. Region is a separate geographic area(Oregon, Virginia, Sydney) and each region has multiple isolated datacenters(us-west-2a,us-west-2b..)
For more info about regions and availability zones, please refer to the below doc
https://docs.aws.amazon.com/AWSEC2/latest/UserGuide/using-regions-availability-zones.html
provider "aws"{
  region = "us-west-2"
}

resource "aws_key_pair" "example" {
  key_name = "example-key"
  public_key = "ssh public key"
}


resource "aws_security_group" "examplesg" {
  ingress {
    from_port = 22
    protocol = "tcp"
    to_port = 22
    cidr_blocks = ["0.0.0.0/0"]
  }
}

resource "aws_instance" "ec2_instance" {
  ami = "ami-01ed306a12b7d1c96"
  instance_type = "t2.micro"
  vpc_security_group_ids = ["${aws_security_group.examplesg.id}"]
  key_name = "${aws_key_pair.example.id}"
  tags = {
    Name = "my-first-ec2-instance"
  }
}
Before running terraform command to spun our first EC2 instance, run terraform fmt command which will rewrite terraform configuration files to a canonical format and style
$ terraform  fmt
main.tf- The first command we are going to run to setup our instance is terraform init, what this will do is going to download code for a provider(aws) that we are going to use.
- Terraform binary contains the basic functionality for terraform but it doesn’t come with the code for any of the providers(eg: AWS, Azure and GCP), so when we are first starting to use terraform we need to run terraform init to tell terraform to scan the code and figure out which providers we are using and download the code for them.
- By default, the provider code will be downloaded into a .terraform directory which is a scrarch directory(we may want to add it in a .gitignore).
NOTE: It’s safe to run terraform init command multiple times as it’s idempotent.
$ terraform init

Initializing the backend...

Initializing provider plugins...
- Checking for available provider plugins...
- Downloading plugin for provider "aws" (hashicorp/aws) 2.35.0...

The following providers do not have any version constraints in configuration,
so the latest version was installed.

To prevent automatic upgrades to new major versions that may contain breaking
changes, it is recommended to add version = "..." constraints to the
corresponding provider blocks in configuration, with the constraint strings
suggested below.

* provider.aws: version = "~> 2.35"

Terraform has been successfully initialized!

You may now begin working with Terraform. Try running "terraform plan" to see
any changes that are required for your infrastructure. All Terraform commands
should now work.

If you ever set or change modules or backend configuration for Terraform,
rerun this command to reinitialize your working directory. If you forget, other
commands will detect it and remind you to do so if necessary.
- Next command we are going to run is “terraform plan”, this will tell what terraform actually do before making any changes
- This is good way of making any sanity check before making actual changes to env
- Output of terraform plan command looks similar to Linux diff command
1: (+ sign): Resource going to be created
2: (- sign): Resources going to be deleted
3: (~ sign): Resource going to be modified
t$ terraform plan
Refreshing Terraform state in-memory prior to plan...
The refreshed state will be used to calculate this plan, but will not be
persisted to local or remote state storage.


------------------------------------------------------------------------

An execution plan has been generated and is shown below.
Resource actions are indicated with the following symbols:
  + create

Terraform will perform the following actions:

  # aws_instance.ec2_instance will be created
  + resource "aws_instance" "ec2_instance" {
      + ami                          = "ami-01ed306a12b7d1c96"
      + arn                          = (known after apply)
      + associate_public_ip_address  = (known after apply)
      + availability_zone            = (known after apply)
      + cpu_core_count               = (known after apply)
      + cpu_threads_per_core         = (known after apply)
      + get_password_data            = false
      + host_id                      = (known after apply)
      + id                           = (known after apply)
      + instance_state               = (known after apply)
      + instance_type                = "t2.micro"
      + ipv6_address_count           = (known after apply)
      + ipv6_addresses               = (known after apply)
      + key_name                     = (known after apply)
      + network_interface_id         = (known after apply)
      + password_data                = (known after apply)
      + placement_group              = (known after apply)
      + primary_network_interface_id = (known after apply)
      + private_dns                  = (known after apply)
      + private_ip                   = (known after apply)
      + public_dns                   = (known after apply)
      + public_ip                    = (known after apply)
      + security_groups              = (known after apply)
      + source_dest_check            = true
      + subnet_id                    = (known after apply)
      + tags                         = {
          + "Name" = "my-first-ec2-instance"
        }
      + tenancy                      = (known after apply)
      + volume_tags                  = (known after apply)
      + vpc_security_group_ids       = (known after apply)

      + ebs_block_device {
          + delete_on_termination = (known after apply)
          + device_name           = (known after apply)
          + encrypted             = (known after apply)
          + iops                  = (known after apply)
          + kms_key_id            = (known after apply)
          + snapshot_id           = (known after apply)
          + volume_id             = (known after apply)
          + volume_size           = (known after apply)
          + volume_type           = (known after apply)
        }

      + ephemeral_block_device {
          + device_name  = (known after apply)
          + no_device    = (known after apply)
          + virtual_name = (known after apply)
        }

      + network_interface {
          + delete_on_termination = (known after apply)
          + device_index          = (known after apply)
          + network_interface_id  = (known after apply)
        }

      + root_block_device {
          + delete_on_termination = (known after apply)
          + encrypted             = (known after apply)
          + iops                  = (known after apply)
          + kms_key_id            = (known after apply)
          + volume_id             = (known after apply)
          + volume_size           = (known after apply)
          + volume_type           = (known after apply)
        }
    }

  # aws_key_pair.example will be created
  + resource "aws_key_pair" "example" {
      + fingerprint = (known after apply)
      + id          = (known after apply)
      + key_name    = "example-key"
      + public_key  = ""
    }

  # aws_security_group.examplesg will be created
  + resource "aws_security_group" "examplesg" {
      + arn                    = (known after apply)
      + description            = "Managed by Terraform"
      + egress                 = (known after apply)
      + id                     = (known after apply)
      + ingress                = [
          + {
              + cidr_blocks      = [
                  + "0.0.0.0/0",
                ]
              + description      = ""
              + from_port        = 22
              + ipv6_cidr_blocks = []
              + prefix_list_ids  = []
              + protocol         = "tcp"
              + security_groups  = []
              + self             = false
              + to_port          = 22
            },
        ]
      + name                   = (known after apply)
      + owner_id               = (known after apply)
      + revoke_rules_on_delete = false
      + vpc_id                 = (known after apply)
    }

Plan: 3 to add, 0 to change, 0 to destroy.

------------------------------------------------------------------------

Note: You didn't specify an "-out" parameter to save this plan, so Terraform
can't guarantee that exactly these actions will be performed if
"terraform apply" is subsequently run.
- To apply these changes, run terraform apply
$ terraform  apply

An execution plan has been generated and is shown below.
Resource actions are indicated with the following symbols:
  + create

Terraform will perform the following actions:

  # aws_instance.ec2_instance will be created
  + resource "aws_instance" "ec2_instance" {
      + ami                          = "ami-01ed306a12b7d1c96"
      + arn                          = (known after apply)
      + associate_public_ip_address  = (known after apply)
      + availability_zone            = (known after apply)
      + cpu_core_count               = (known after apply)
      + cpu_threads_per_core         = (known after apply)
      + get_password_data            = false
      + host_id                      = (known after apply)
      + id                           = (known after apply)
      + instance_state               = (known after apply)
      + instance_type                = "t2.micro"
      + ipv6_address_count           = (known after apply)
      + ipv6_addresses               = (known after apply)
      + key_name                     = (known after apply)
      + network_interface_id         = (known after apply)
      + password_data                = (known after apply)
      + placement_group              = (known after apply)
      + primary_network_interface_id = (known after apply)
      + private_dns                  = (known after apply)
      + private_ip                   = (known after apply)
      + public_dns                   = (known after apply)
      + public_ip                    = (known after apply)
      + security_groups              = (known after apply)
      + source_dest_check            = true
      + subnet_id                    = (known after apply)
      + tags                         = {
          + "Name" = "my-first-ec2-instance"
        }
      + tenancy                      = (known after apply)
      + volume_tags                  = (known after apply)
      + vpc_security_group_ids       = (known after apply)

      + ebs_block_device {
          + delete_on_termination = (known after apply)
          + device_name           = (known after apply)
          + encrypted             = (known after apply)
          + iops                  = (known after apply)
          + kms_key_id            = (known after apply)
          + snapshot_id           = (known after apply)
          + volume_id             = (known after apply)
          + volume_size           = (known after apply)
          + volume_type           = (known after apply)
        }

      + ephemeral_block_device {
          + device_name  = (known after apply)
          + no_device    = (known after apply)
          + virtual_name = (known after apply)
        }

      + network_interface {
          + delete_on_termination = (known after apply)
          + device_index          = (known after apply)
          + network_interface_id  = (known after apply)
        }

      + root_block_device {
          + delete_on_termination = (known after apply)
          + encrypted             = (known after apply)
          + iops                  = (known after apply)
          + kms_key_id            = (known after apply)
          + volume_id             = (known after apply)
          + volume_size           = (known after apply)
          + volume_type           = (known after apply)
        }
    }

  # aws_key_pair.example will be created
  + resource "aws_key_pair" "example" {
      + fingerprint = (known after apply)
      + id          = (known after apply)
      + key_name    = "example-key"
      + public_key  = ""
    }

  # aws_security_group.examplesg will be created
  + resource "aws_security_group" "examplesg" {
      + arn                    = (known after apply)
      + description            = "Managed by Terraform"
      + egress                 = (known after apply)
      + id                     = (known after apply)
      + ingress                = [
          + {
              + cidr_blocks      = [
                  + "0.0.0.0/0",
                ]
              + description      = ""
              + from_port        = 22
              + ipv6_cidr_blocks = []
              + prefix_list_ids  = []
              + protocol         = "tcp"
              + security_groups  = []
              + self             = false
              + to_port          = 22
            },
        ]
      + name                   = (known after apply)
      + owner_id               = (known after apply)
      + revoke_rules_on_delete = false
      + vpc_id                 = (known after apply)
    }

Plan: 3 to add, 0 to change, 0 to destroy.

Do you want to perform these actions?
  Terraform will perform the actions described above.
  Only 'yes' will be accepted to approve.

  Enter a value: yes <------------------------

aws_key_pair.example: Creating...
aws_security_group.examplesg: Creating...
aws_key_pair.example: Creation complete after 0s [id=example-key]
aws_security_group.examplesg: Creation complete after 2s [id=sg-0e1a943b062aa2315]
aws_instance.ec2_instance: Creating...
aws_instance.ec2_instance: Still creating... [10s elapsed]
aws_instance.ec2_instance: Still creating... [20s elapsed]
aws_instance.ec2_instance: Still creating... [30s elapsed]
aws_instance.ec2_instance: Creation complete after 33s [id=i-0d1ab0d8c1fc57f3d]

Apply complete! Resources: 3 added, 0 changed, 0 destroyed.
- What terraform is doing here is reading code and translating it to api calls to providers(aws in this case)
W00t you have deployed your first EC2 server using terraform
Go back to the EC2 console to verify your first deployed server

Let say after verification you realize that I need to give more meaningful tag to this server, so the rest of the code remain the same and you modified the tag parameter
  tags = {
    Name = "my-webserver-instance"
}- Run terraform plan command again, as you can see
  ~ tags                         = {
      ~ "Name" = "my-first-ec2-instance" -> "my-webserver-instance"
    }
$ terraform plan
Refreshing Terraform state in-memory prior to plan...
The refreshed state will be used to calculate this plan, but will not be
persisted to local or remote state storage.
aws_key_pair.example: Refreshing state... [id=example-key]
aws_security_group.examplesg: Refreshing state... [id=sg-0e1a943b062aa2315]
aws_instance.ec2_instance: Refreshing state... [id=i-0d1ab0d8c1fc57f3d]
------------------------------------------------------------------------
An execution plan has been generated and is shown below.
Resource actions are indicated with the following symbols:
~ update in-place
Terraform will perform the following actions:
# aws_instance.ec2_instance will be updated in-place
~ resource "aws_instance" "ec2_instance" {
ami = "ami-01ed306a12b7d1c96"
arn = "arn:aws:ec2:us-west-2:355622012945:instance/i-0d1ab0d8c1fc57f3d"
associate_public_ip_address = true
availability_zone = "us-west-2a"
cpu_core_count = 1
cpu_threads_per_core = 1
disable_api_termination = false
ebs_optimized = false
get_password_data = false
id = "i-0d1ab0d8c1fc57f3d"
instance_state = "running"
instance_type = "t2.micro"
ipv6_address_count = 0
ipv6_addresses = []
key_name = "example-key"
monitoring = false
primary_network_interface_id = "eni-0e5ddbe136b7d599d"
private_dns = "ip-172-31-28-131.us-west-2.compute.internal"
private_ip = "172.31.28.131"
public_dns = "ec2-54-185-56-146.us-west-2.compute.amazonaws.com"
public_ip = "54.185.56.146"
security_groups = [
"terraform-20191110052042521000000001",
]
source_dest_check = true
subnet_id = "subnet-3b929b42"
~ tags = {
~ "Name" = "my-first-ec2-instance" -> "my-webserver-instance"
}
tenancy = "default"
volume_tags = {}
vpc_security_group_ids = [
"sg-0e1a943b062aa2315",
]
credit_specification {
cpu_credits = "standard"
}
root_block_device {
delete_on_termination = false
encrypted = false
iops = 100
volume_id = "vol-0f48e9a8f42ac6dc4"
volume_size = 8
volume_type = "gp2"
}
}
Plan: 0 to add, 1 to change, 0 to destroy.
------------------------------------------------------------------------
Note: You didn't specify an "-out" parameter to save this plan, so Terraform
can't guarantee that exactly these actions will be performed if
"terraform apply" is subsequently run.
- Now if we can think about it, how does terraform knows that there only change in the tag parameter and nothing else
- Terraform keep track of all the resources it already created in .tfstate files, so its aware of the resources that already exist.
$ ls -la
total 28
drwxr-xr-x  4 prashant prashant 4096 Nov  9 21:25 .
drwxr-xr-x 31 prashant prashant 4096 Nov  9 21:14 ..
-rw-r--r--  1 prashant prashant 1009 Nov  9 21:24 main.tf
drwxr-xr-x  3 prashant prashant 4096 Nov  9 21:15 .terraform
-rw-rw-r--  1 prashant prashant 5348 Nov  9 21:21 terraform.tfstate
- If you notice at the top it says “Refreshing Terraform state in-memory prior to plan…”
- If I refresh my webbrowser after running terraform apply.
$ terraform apply
aws_key_pair.example: Refreshing state... [id=example-key]
aws_security_group.examplesg: Refreshing state... [id=sg-0e1a943b062aa2315]
aws_instance.ec2_instance: Refreshing state... [id=i-0d1ab0d8c1fc57f3d]

An execution plan has been generated and is shown below.
Resource actions are indicated with the following symbols:
  ~ update in-place

Terraform will perform the following actions:

  # aws_instance.ec2_instance will be updated in-place
  ~ resource "aws_instance" "ec2_instance" {
        ami                          = "ami-01ed306a12b7d1c96"
        arn                          = "arn:aws:ec2:us-west-2:355622012945:instance/i-0d1ab0d8c1fc57f3d"
        associate_public_ip_address  = true
        availability_zone            = "us-west-2a"
        cpu_core_count               = 1
        cpu_threads_per_core         = 1
        disable_api_termination      = false
        ebs_optimized                = false
        get_password_data            = false
        id                           = "i-0d1ab0d8c1fc57f3d"
        instance_state               = "running"
        instance_type                = "t2.micro"
        ipv6_address_count           = 0
        ipv6_addresses               = []
        key_name                     = "example-key"
        monitoring                   = false
        primary_network_interface_id = "eni-0e5ddbe136b7d599d"
        private_dns                  = "ip-172-31-28-131.us-west-2.compute.internal"
        private_ip                   = "172.31.28.131"
        public_dns                   = "ec2-54-185-56-146.us-west-2.compute.amazonaws.com"
        public_ip                    = "54.185.56.146"
        security_groups              = [
            "terraform-20191110052042521000000001",
        ]
        source_dest_check            = true
        subnet_id                    = "subnet-3b929b42"
      ~ tags                         = {
          ~ "Name" = "my-first-ec2-instance" -> "my-webserver-instance"
        }
        tenancy                      = "default"
        volume_tags                  = {}
        vpc_security_group_ids       = [
            "sg-0e1a943b062aa2315",
        ]

        credit_specification {
            cpu_credits = "standard"
        }

        root_block_device {
            delete_on_termination = false
            encrypted             = false
            iops                  = 100
            volume_id             = "vol-0f48e9a8f42ac6dc4"
            volume_size           = 8
            volume_type           = "gp2"
        }
    }

Plan: 0 to add, 1 to change, 0 to destroy.

Do you want to perform these actions?
  Terraform will perform the actions described above.
  Only 'yes' will be accepted to approve.

  Enter a value: yes

aws_instance.ec2_instance: Modifying... [id=i-0d1ab0d8c1fc57f3d]
aws_instance.ec2_instance: Modifications complete after 2s [id=i-0d1ab0d8c1fc57f3d]

Apply complete! Resources: 0 added, 1 changed, 0 destroyed.

In most of the cases we are working in team where we want to share this code with rest of team members and the best way to share code is by using GIT
git add main.tf
git commit -m "first terraform EC2 instance"
vim .gitignore
git add .gitignore
git commit -m "Adding gitignore file for terraform repository"
- Via .gitignore we are telling terraform to ignore(.terraform folder(temporary directory for terraform)and all *.tfstates file(as this file may contain secrets))
$ cat .gitignore
.terraform
*.tfstate
*.tfstate.backup
- Create a shared git repository
git remote add origin https://github.com/<user name>/terraform.git
- Push the code
$ git push -u origin master
- To Perform cleanup whatever we have created so far, run terraform destroy
$ terraform destroy
aws_key_pair.example: Refreshing state... [id=example-key]
aws_security_group.examplesg: Refreshing state... [id=sg-0e1a943b062aa2315]
aws_instance.ec2_instance: Refreshing state... [id=i-0d1ab0d8c1fc57f3d]

An execution plan has been generated and is shown below.
Resource actions are indicated with the following symbols:
  - destroy

Terraform will perform the following actions:

  # aws_instance.ec2_instance will be destroyed
  - resource "aws_instance" "ec2_instance" {
      - ami                          = "ami-01ed306a12b7d1c96" -> null
      - arn                          = "arn:aws:ec2:us-west-2:355622012945:instance/i-0d1ab0d8c1fc57f3d" -> null
      - associate_public_ip_address  = true -> null
      - availability_zone            = "us-west-2a" -> null
      - cpu_core_count               = 1 -> null
      - cpu_threads_per_core         = 1 -> null
      - disable_api_termination      = false -> null
      - ebs_optimized                = false -> null
      - get_password_data            = false -> null
      - id                           = "i-0d1ab0d8c1fc57f3d" -> null
      - instance_state               = "running" -> null
      - instance_type                = "t2.micro" -> null
      - ipv6_address_count           = 0 -> null
      - ipv6_addresses               = [] -> null
      - key_name                     = "example-key" -> null
      - monitoring                   = false -> null
      - primary_network_interface_id = "eni-0e5ddbe136b7d599d" -> null
      - private_dns                  = "ip-172-31-28-131.us-west-2.compute.internal" -> null
      - private_ip                   = "172.31.28.131" -> null
      - public_dns                   = "ec2-54-185-56-146.us-west-2.compute.amazonaws.com" -> null
      - public_ip                    = "54.185.56.146" -> null
      - security_groups              = [
          - "terraform-20191110052042521000000001",
        ] -> null
      - source_dest_check            = true -> null
      - subnet_id                    = "subnet-3b929b42" -> null
      - tags                         = {
          - "Name" = "my-webserver-instance"
        } -> null
      - tenancy                      = "default" -> null
      - volume_tags                  = {} -> null
      - vpc_security_group_ids       = [
          - "sg-0e1a943b062aa2315",
        ] -> null

      - credit_specification {
          - cpu_credits = "standard" -> null
        }

      - root_block_device {
          - delete_on_termination = false -> null
          - encrypted             = false -> null
          - iops                  = 100 -> null
          - volume_id             = "vol-0f48e9a8f42ac6dc4" -> null
          - volume_size           = 8 -> null
          - volume_type           = "gp2" -> null
        }
    }

  # aws_key_pair.example will be destroyed
  - resource "aws_key_pair" "example" {
      - fingerprint = "45:dd:55:74:bf:a3:07:3f:c7:02:9a:c1:9a:37:bf:40" -> null
      - id          = "example-key" -> null
      - key_name    = "example-key" -> null
      - public_key  = ""
    }

  # aws_security_group.examplesg will be destroyed
  - resource "aws_security_group" "examplesg" {
      - arn                    = "arn:aws:ec2:us-west-2:355622012945:security-group/sg-0e1a943b062aa2315" -> null
      - description            = "Managed by Terraform" -> null
      - egress                 = [] -> null
      - id                     = "sg-0e1a943b062aa2315" -> null
      - ingress                = [
          - {
              - cidr_blocks      = [
                  - "0.0.0.0/0",
                ]
              - description      = ""
              - from_port        = 22
              - ipv6_cidr_blocks = []
              - prefix_list_ids  = []
              - protocol         = "tcp"
              - security_groups  = []
              - self             = false
              - to_port          = 22
            },
        ] -> null
      - name                   = "terraform-20191110052042521000000001" -> null
      - owner_id               = "355622012945" -> null
      - revoke_rules_on_delete = false -> null
      - tags                   = {} -> null
      - vpc_id                 = "vpc-79e55a01" -> null
    }

Plan: 0 to add, 0 to change, 3 to destroy.

Do you really want to destroy all resources?
  Terraform will destroy all your managed infrastructure, as shown above.
  There is no undo. Only 'yes' will be accepted to confirm.

  Enter a value: yes

aws_instance.ec2_instance: Destroying... [id=i-0d1ab0d8c1fc57f3d]
aws_instance.ec2_instance: Still destroying... [id=i-0d1ab0d8c1fc57f3d, 10s elapsed]
aws_instance.ec2_instance: Still destroying... [id=i-0d1ab0d8c1fc57f3d, 20s elapsed]
aws_instance.ec2_instance: Still destroying... [id=i-0d1ab0d8c1fc57f3d, 30s elapsed]
aws_instance.ec2_instance: Destruction complete after 30s
aws_key_pair.example: Destroying... [id=example-key]
aws_security_group.examplesg: Destroying... [id=sg-0e1a943b062aa2315]
aws_key_pair.example: Destruction complete after 0s
aws_security_group.examplesg: Destruction complete after 0s

Destroy complete! Resources: 3 destroyed.
- Looking forward for you guys to join this journey
- Website: https://100daysofdevops.com/
- Twitter: @100daysofdevops OR @lakhera2015
- Facebook: https://www.facebook.com/groups/795382630808645/
- Medium: https://medium.com/@devopslearning
- GitHub: https://github.com/100daysofdevops/100daysofdevops
- Slack: https://join.slack.com/t/100daysofdevops/shared_invite/enQtNzg1MjUzMzQzMzgxLWM4Yjk0ZWJiMjY4ZWE3ODBjZjgyYTllZmUxNzFkNTgxZjQ4NDlmZjkzODAwNDczOTYwOTM2MzlhZDNkM2FkMDA
- YouTube Channel: https://www.youtube.com/user/laprashant/videos?view_as=subscriber
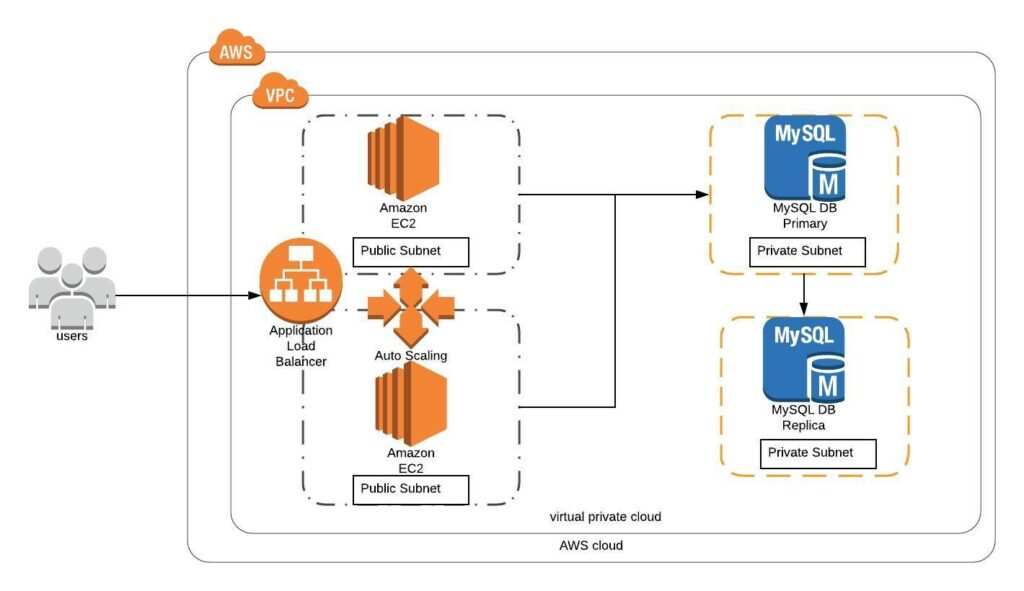
In addition to that, I am going to host 5 meetups whose aim is to build the below architecture.

- Meetup: https://www.meetup.com/100daysofdevops
- Day1(Nov 10): Introduction to Terraform https://www.meetup.com/100daysofdevops/events/266192294/
- Day 2(Nov 16): Building VPC using Terraform
- Day 3(Nov 17): Creating EC2 Instance inside this VPC using Terraform
- Day 4(Nov 23): Adding Application Load Balancer and Auto-Scaling to the EC2 instance created on Day 3
- Day5(Nov 24): Add Backend MySQL Database and CloudWatch Alarm using Terraform

