
Welcome to Day 5 of 21 Days of Docker. So far I discussed all the basic docker commands and if you are following my blogs at this stage you should know how to run a container.
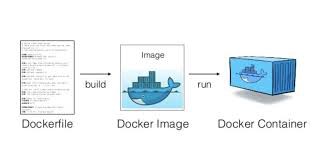
To run a Docker container, we pulled images from the Docker registry, now let see how we can build our own image and that can be done with the help of Dockerfile.
A Dockerfile is a text document that contains all the commands/set of instructions a user could call on the command line to create an image. These instructions are called directives.
https://docs.docker.com/engine/reference/builder/
Format of Dockerfile
Here is the format of the Dockerfile:
# CommentINSTRUCTION argumentsSome list of instructions in the Dockerfile
ADD:TheADDinstruction copies new files, directories or remote file URLs from<src>and adds them to the filesystem of the image at the path<dest>COPY:TheCOPYinstruction copies new files or directories from<src>and adds them to the filesystem of the container at the path<dest>.ENV: The ENV instruction sets the environment variable to the value. This value will be in the environment for all subsequent instructions in the build stage and can be replaced inline in many as well.EXPOSE : Documents which port(s) are intended to published when running a containerFROM: The FROM instruction initializes a new build stage and sets the Base Image for subsequent instructions. As such, a valid Dockerfile must start with a FROM instructionLABEL: TheLABELinstruction adds metadata to an image. ALABELis a key-value pair. To include spaces within aLABELvalue, use quotes and backslashes as you would in command-line parsingSTOPSIGNAL: TheSTOPSIGNALinstruction sets the system call signal that will be sent to the container to exit. This signal can be a valid unsigned number that matches a position in the kernel’s syscall table, for instance 9, or a signal name in the format SIGNAME, for instance SIGKILLUSER: TheUSERinstruction sets the user name (or UID) and optionally the user group (or GID) to use when running the image and for anyRUN,CMDandENTRYPOINTinstructions that follow it in theDockerfileVOLUME: TheVOLUMEinstruction creates a mount point with the specified name and marks it as holding externally mounted volumes from native host or other containersWORKDIR :TheWORKDIRinstruction sets the working directory for anyRUN,CMD,ENTRYPOINT,COPYandADDinstructions that follow it in theDockerfileSTOPSIGNAL:TheSTOPSIGNALinstruction sets the system call signal that will be sent to the container to exit. This signal can be a valid unsigned number that matches a position in the kernel’s syscall table, for instance, 9, or a signal name in the format SIGNAME, for instance SIGKILL.HEALTHCHECK:TheHEALTHCHECKinstruction tells Docker how to test a container to check that it is still working. This can detect cases such as a web server that is stuck in an infinite loop and unable to handle new connections, even though the server process is still running
A simple Dockerfile will look like this

* FROM: A Dockerfile must start with a FROM instruction. The FROM instruction specifies the Base Image from which you are building.
* RUN: The RUN instruction will execute any commands in a new layer on top of the current image and commit the results. The resulting committed image will be used for the next step in the Dockerfile
* CMD: The main purpose of a CMD is to provide defaults for an executing container- To build the image out from Dockerfile we can use the docker build command
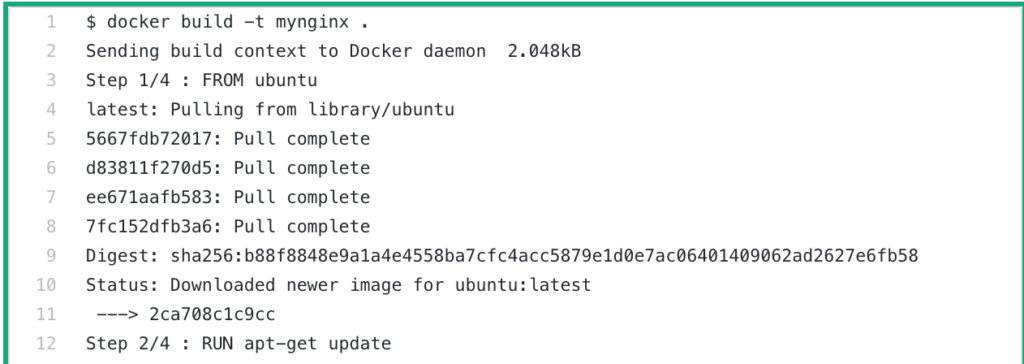
* Step1: It download the ubuntu image
* Step2: It pull all the latest update
* Step3: Install the nginx binary
* Step4: Start the nginx daemon
- To verify the new Nginx image, we just built
$ docker images
REPOSITORY          TAG                 IMAGE ID            CREATED             SIZE
mynginx             latest              43e91e210b23        4 minutes ago       152MB
- To run the container
$ docker run -d -p 80:80 mynginx
7f3d9fb752632f5acaee04b8ce18fca0e2b3da2dc5615a62253b9beae002436a
$ docker ps
CONTAINER ID        IMAGE               COMMAND                  CREATED             STATUS              PORTS                NAMES
7f3d9fb75263        mynginx             "nginx -g 'daemon of…"   3 seconds ago       Up 1 second         0.0.0.0:80->80/tcp   angry_ptolemy
- To test it
$ curl localhost
<!DOCTYPE html>
<html>
<head>
<title>Welcome to nginx!</title>
<style>
body {
width: 35em;
margin: 0 auto;
font-family: Tahoma, Verdana, Arial, sans-serif;
}
</style>
</head>
<body>
<h1>Welcome to nginx!</h1>
<p>If you see this page, the nginx web server is successfully installed and
working. Further configuration is required.</p>
<p>For online documentation and support please refer to
<a href="http://nginx.org/">nginx.org</a>.<br/>
Commercial support is available at
<a href="http://nginx.com/">nginx.com</a>.</p>
<p><em>Thank you for using nginx.</em></p>
</body>
</html>
Pages: 1 2
Thanks a lot for sharing this with all grouping you truly realize what you’re conversation about! Bookmarked. Delight also cover with my website =). We could get a unite vary statement between us!