1: As everyone needs to sign NDA with AWS, I can’t tell you the exact question asked during the exam neither I have GB of memory, but I can give you the pointer what to expect in the exam
2: As we all know AWS infrastructure updates everyday, so some of the stuff might not be relevant after a few days/weeks/months…
3: Please don’t ask for any exam dumps or question, that defeats the whole purpose of the exam.
Finally, after waiting for 5 years(Journey started at way back in 2014 when I first logged into AWS Console) yesterday, I cleared my AWS Certified Solution Architect Exam.
Why it took me so long to write my First AWS Exam?
Let me first start with trying to introduce myself; I am an X-RedHat Certified Architect(yes that’s true, I cleared all the 5 RedHat Exams). RedHat exams are mostly hand’s on which are based on the scenario you need to deploy or create some server/application
My initial assumption regarding AWS exam was it’s mostly theoretical, i.e. they will give you a series of questions(single/multiple choice), and you need to select one/multiple options, so basically you are not implementing anything. On the top of that to answer these question you need to memorize a bunch of stuff.
So how everything changed?
Initially, when I started preparing, I realized there is a lot of stuff which I completely miss/not paid attention. But later on, I paid special attention to those, e.g., S3 seems to the pretty straightforward concept, but when I start exploring it(mentioned below some of the different S3 services), I came to know its one of the amazing services.
Exam Preparation
If you don’t have any experience with AWS service, I will recommend first start with acloudguru. Please don’t miss AWS — 10,000 Foot Overview, this will give you a good overview of all the AWS Services
The second, one of the most useful resource is Linux Academy. One of the advantages of using Linux Academy is its hands-on lab. This will give you enough hand’s on experience required for the certification.
You must know these three services in order to clear this EXAM
EC2
VPC
S3
Some services which I under-estimate and I saw at least 2–4 question related to those services
DynamoDB
Kinesis Firehouse
CloudFront
SQS
I am not using any of these services in my day to day operation, and that’s why I didn’t pay much attention. Also, it’s time for AcloudGuru and Linux Academy to add some more in-depth content related to these services
Some surprise packages
AWS Athena
AWS Inspector
My Idea about the exam
As this is an associate level exam, my initial perception about this exam that I don’t need to go in-depth of all of the services but this exam surprises me with some in-depth questions. So please make sure to read/implement as much as possible about (EC2/VPC/S3).
Let’s talk about different Services and what concept you should know in order to clear this exam
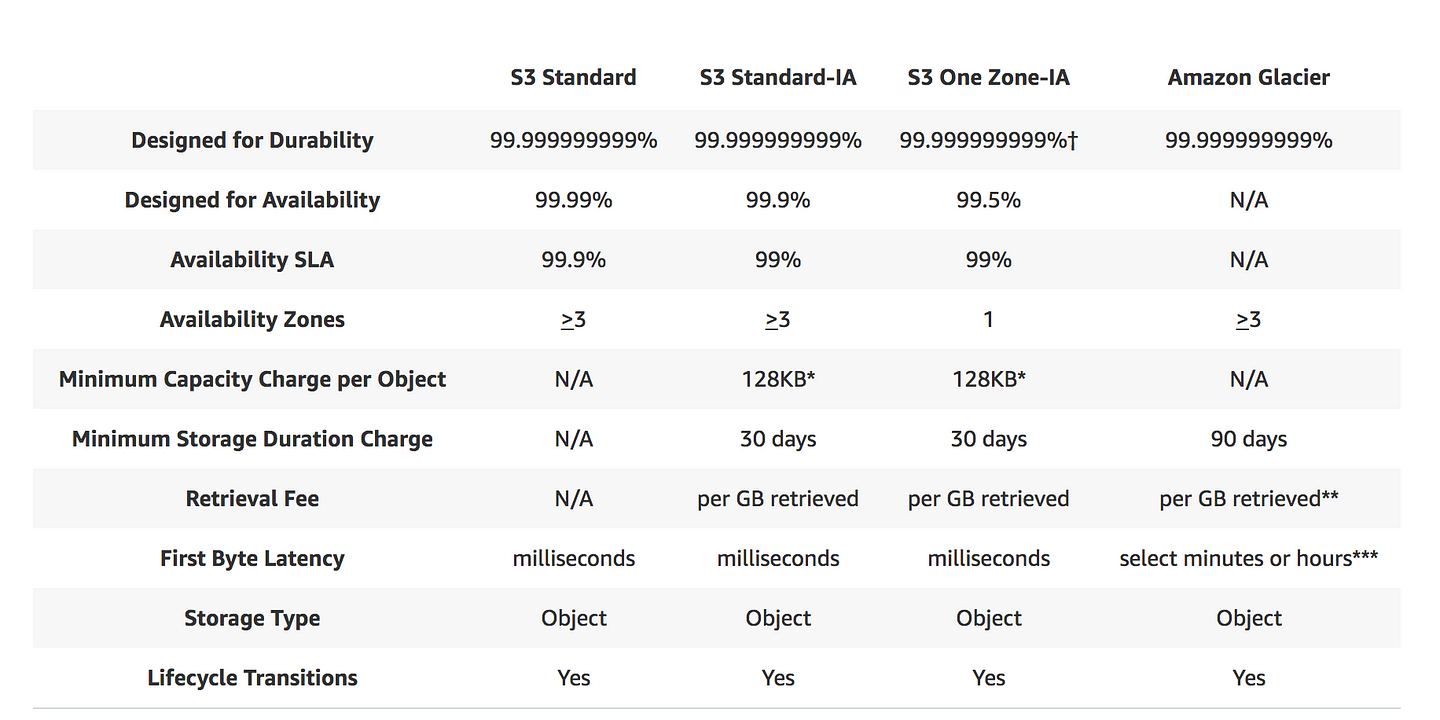
S3
This table is the key to understand different S3 storage classes. Make sure you understand
* Durability and Availibility of each class
* In which situation you are going to use specific class
* It provides CSV and Apache Optimized Row Columnar(ORC) outputs files that lists objects and corresponding metadata
* You can query AWS Inventory using standard SQL by using Amazon Athena, Amazon Redshift Spectrum
AWS Storage Gateway
Difference between different storage gateway and which one to use under which situation(Especially when they ask migrating services from on-premises data center to AWS cloud and how to keep data in sync)
Pay special emphasis to Dedicated Hosts(Look for Keyword like compliance requirements /server-bound software licenses)
Understand the difference between Instance Store Volumes vs EBS(Look for Keyword shutdown as in case of Instance Store Volumes your data will be Wiped)
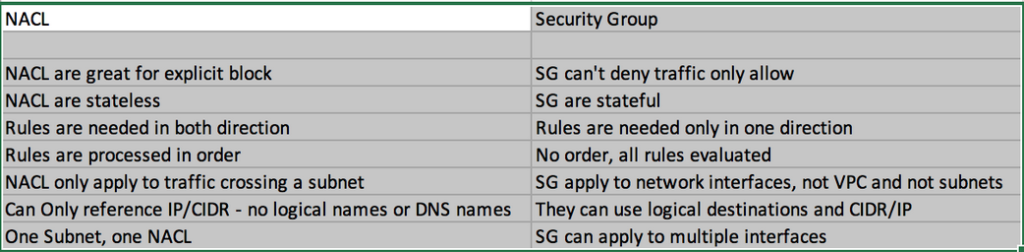
Security Group(They are not going to ask you this question directly but mostly scenario based questions like multi-tier environment where you have web frontend vs MySQL as database and which port you are going to open in your backend DB(MySQL), As you only need a connection from the web frontend, you only need to specify Mysql DB security group)
LoadBalancer
Difference between Application vs Network Load Balancer and in which scenario you are going to use which one
Elastic File System(EFS): Look for a key term like the instance need to be simultaneously mounted on the bunch of EC2 instances(Choice between S3/EBS/EFS)
Pay special emphasis to a latency based(key word user in specific region facing latency, so key choice is between Route53 vs CloudFront)and failover routing policy
Autoscaling: Just a brief idea about how auto-scaling works
Databases
For RDS MySQL understand the difference between read-only replication(performance gain) vs HA(in case of failover)
AWS is paying special emphasis on Aurora, so in case if they ask migrating on-premises MySql/Postgres to AWS Cloud then Aurora is the best bet
IAM
Make sure you understand the purpose of roles and use roles to communicate to different AWS Service, rather than using Public Internet Route
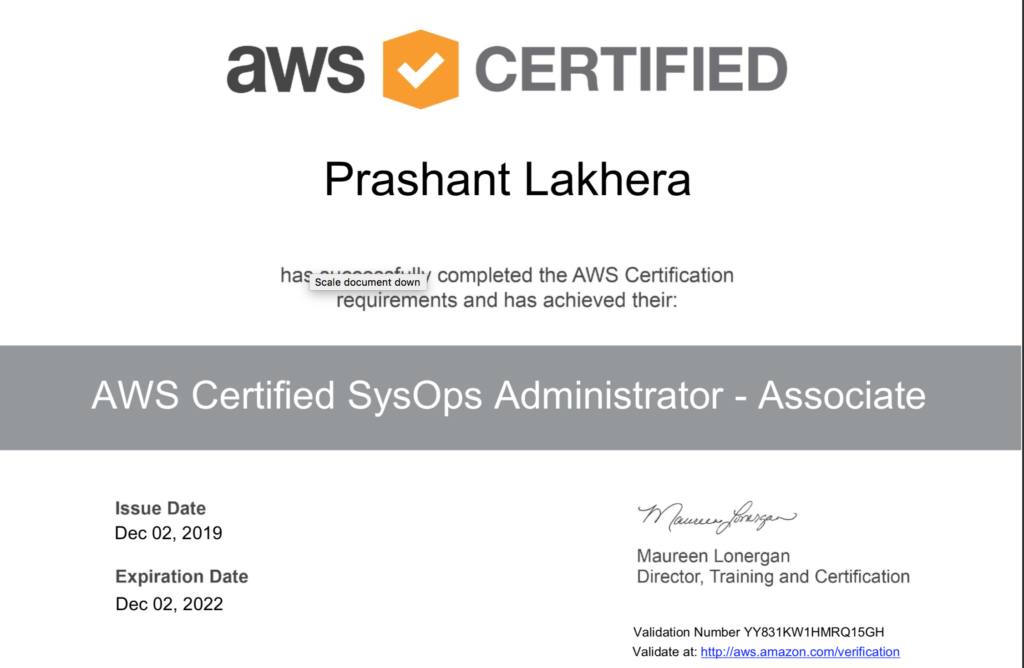
This is the continuation of my earlier post My road to AWS Certified Solution Architect, AWS Certified Security - Specialty Certification and now AWS SysOps exam.
WARNING: Some House Keeping task, before reading this blog
1: As everyone needs to sign NDA with AWS, I can’t tell you the exact question asked during the exam neither I have GB of memory, but I can give you the pointers what to expect in the exam.
2: As we all know AWS infrastructure updates everyday, so some of the stuff might not be relevant after a few days/weeks/months.
3: Please don’t ask for any exam dumps or question, that defeats the whole purpose of the exam.
Exam Preparation
I highly recommend acloudguru course to everyone, this is specific to the exam and cover most of the topics
AWS Re: Invent Videos: I highly recommend going through these videos, as they will give you enough in-depth knowledge about each service.
AWS Documentation: Best documentation ever provided by any service provider. Don’t miss the FAQ regarding each service (especially for CloudWatch, CloudFormation and Route53 ).
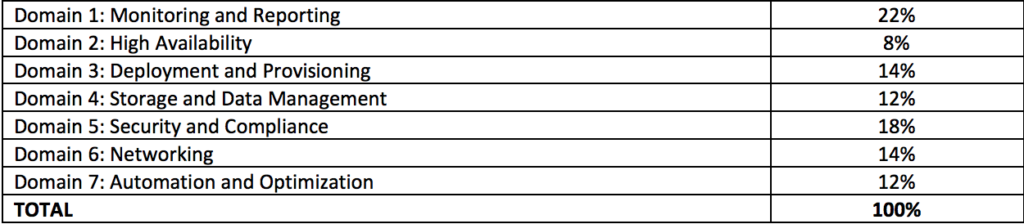
Now coming back to the exam, the entire exam is divided into seven main topics.
Based on my experience, you must need to know these three services to clear this exam.
CloudWatch
CloudFormation
ALB
Surprise Package: Not much question related to RDS
Domain 1: Monitoring and Reporting
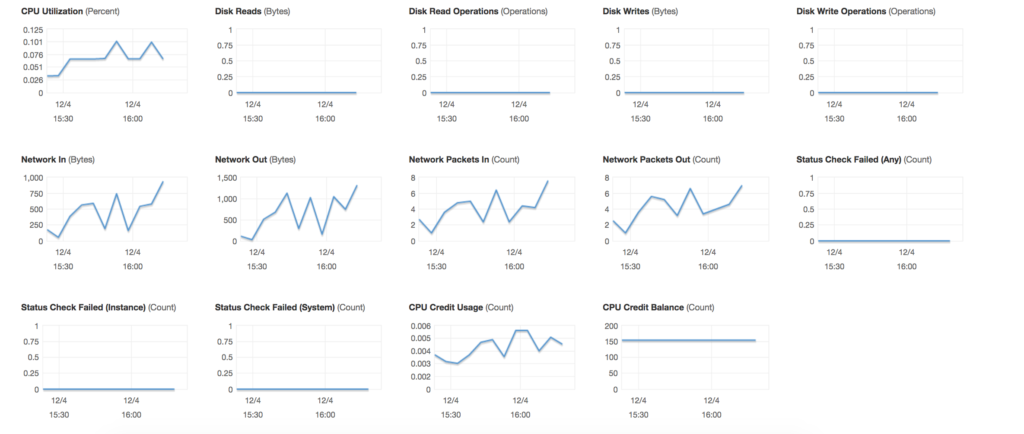
Which metrics cloudwatch monitors by default
Atleast have rough idea about CloudWatch monitoring dashboard, the way I memorize it(CDNS –> Content Delivery Network Status)
* C --> CPU
* D --> Disk
* N --> Network
* S --> Status Check
Learn this by heart memory and disk utilization is a custom metric(Don’t confuse with the above disk read and write, here AWS is asking about how much disk space consumed by VM) and how to configure it using cloudwatch agent to push custom metrics memory and disk utilziation to cloudwatch.
AWS Organization (You will expect 2-3 question related to this topic)
Domain 2: High Availability
How to encrypt existing RDS instance(make sure you understand there is no way you can encrypt existing DB eg:MySql , you need to take a snapshot and then create a copy and that copy you can be encrypted)
Some use cases of Route53(eg: How to use it with CloudFront and Load Balancer hint is Alias record)
Domain 7: Automation and Optimization
This is one Domain which I lagged because I am not using much of the tool needed for this domain eg: CloudFormation, OpsWork and Elastic Bean Stalk
CloudFormation Delete Stack
https://www.youtube.com/watch?v=bVmsS8rjuwk
One question related to OpsWork
One question related to ElasticBean Stalk
Final Words
The key take away from this exam is, you can easily clear this exam if you know CloudWatch, CloudFormation and Load Balancer
The last exam I wrote was the AWS Security Specialist Exam where a question was scenario-based and some of them are almost one page long, here most of the questions are too the point.
So keep calm and write this exam and let me know in case if you have any questions.
Please join me with my journey by following any of the below links
Welcome to Day 21 of 21 Days of AWS using Terraform
Thanks, everyone for joining 21 Days of AWS using Terraform, I learned a lot and I believe you guys also got a chance to learn something out of my blogs.
his is a very common question asked by any terraform beginner
I have a bunch of existing cloud resources(AWS in this case) created either
Manually(AWS GUI)
Boto3
CloudFormation
How to make those resources as a part of Terraform Configuration(tf and state file)?
Unfortunately, there is no good/better way to do that, I listed out a few options to make that thing possible but none of them is straightforward and requires a lot of manual effort. If you are aware of any other way to achieve this please let me know :-).
Solution 1: Terraform import command
Terraform import command is able to import existing infrastructure. This allows you to take resources you’ve created by some other means and bring it under Terraform management.
This is a great way to slowly transition infrastructure to terraform.
To import a resource (eg: instance i-082efb265ed372cc5) , which is created manually using AWS Console, first write a resource block for it in your own terraform configuration establishing the name by which it will be known to Terraform
main.tf
provider "aws" {
  region = "us-west-2"
}

resource "aws_instance" "import_test" {
  ami = "${var.aws_ami}"
  instance_type = "${var.instance_type}"
  key_name = "${var.key_name}"
  tags {
    name = "test-instance"
  }
}
The resources that were imported are shown above. These resources are now in your Terraform state and will henceforth be managed by Terraform.
What this command will do is locate the AWS instance with instance id i-082efb265ed372cc5(which has been created outside terraform) and attach its existing settings as described by the EC2 API to the name aws_instance.import_test in the Terraform state.
As a result of the above command, the resource is recorded in the state file. We can now run a terraform plan to see how the configuration compares to the imported resource, and make any adjustments to the configuration to align with the current (or desired) state of the imported object.
$ terraform plan Refreshing Terraform state in-memory prior to plan... The refreshed state will be used to calculate this plan, but will not be persisted to local or remote state storage.
Note: You didn't specify an "-out" parameter to save this plan, so Terraform can't guarantee that exactly these actions will be performed if "terraform apply" is subsequently run.
State – terraform.tfstate
Terraform must store state about your managed infrastructure and configuration. This state is used by Terraform to map real world resources to our configuration, keep track of metadata, and to improve performance for large infrastructures.
This state is stored by default in a local file named terraform.tfstate.
Terraform uses this local state to create plans and make changes to our infrastructure. Before any terraform operation, Terraform does a refresh to update the state with the real infrastructure.
One of the major drawbacks with the above solution is that terraform does not support how to generate the resource code automatically. We will have to manually define them before performing the import command. It’s time-consuming and might cause a problem by human error such as writing invalid syntax, putting wrong object id, etc.
To make our life easier there is a tool called Terraforming it’s a free and open-source tool written in Ruby. It helps you to export existing AWS resources to Terraform style (tf, tfstate).
Currently, Terraforming requires Ruby 2.3 and supports Terraform v0.9.3 or higher. You can install Terraforming by gem command.
Installation
gem install terraforming
Terraforming command usage
Terraforming supports to export many types of AWS resource. For example EC2 instances, Security Group, Route53, VPC, IAM, etc. You can see the full list of supported options by running
$ terraforming
Commands:
  terraforming alb             # ALB
  terraforming asg             # AutoScaling Group
  terraforming cwa             # CloudWatch Alarm
  terraforming dbpg            # Database Parameter Group
  terraforming dbsg            # Database Security Group
  terraforming dbsn            # Database Subnet Group
  terraforming ddb             # DynamoDB
  terraforming ec2             # EC2
  terraforming ecc             # ElastiCache Cluster
  terraforming ecsn            # ElastiCache Subnet Group
  terraforming efs             # EFS File System
  terraforming eip             # EIP
  terraforming elb             # ELB
  terraforming help [COMMAND]  # Describe available commands or one specific command
  terraforming iamg            # IAM Group
  terraforming iamgm           # IAM Group Membership
  terraforming iamgp           # IAM Group Policy
  terraforming iamip           # IAM Instance Profile
  terraforming iamp            # IAM Policy
  terraforming iampa           # IAM Policy Attachment
  terraforming iamr            # IAM Role
  terraforming iamrp           # IAM Role Policy
  terraforming iamu            # IAM User
  terraforming iamup           # IAM User Policy
  terraforming igw             # Internet Gateway
  terraforming kmsa            # KMS Key Alias
  terraforming kmsk            # KMS Key
  terraforming lc              # Launch Configuration
  terraforming nacl            # Network ACL
  terraforming nat             # NAT Gateway
  terraforming nif             # Network Interface
  terraforming r53r            # Route53 Record
  terraforming r53z            # Route53 Hosted Zone
  terraforming rds             # RDS
  terraforming rs              # Redshift
  terraforming rt              # Route Table
  terraforming rta             # Route Table Association
  terraforming s3              # S3
  terraforming sg              # Security Group
  terraforming sn              # Subnet
  terraforming snss            # SNS Subscription
  terraforming snst            # SNS Topic
  terraforming sqs             # SQS
  terraforming vgw             # VPN Gateway
  terraforming vpc             # VPC

Options:
  [--merge=MERGE]                                # tfstate file to merge
  [--overwrite], [--no-overwrite]                # Overwrite existing tfstate
  [--tfstate], [--no-tfstate]                    # Generate tfstate
  [--profile=PROFILE]                            # AWS credentials profile
  [--region=REGION]                              # AWS region
  [--assume=ASSUME]                              # Role ARN to assume
  [--use-bundled-cert], [--no-use-bundled-cert]  # Use the bundled CA certificate from AWS SDK
Export AWS resource into tf
Following is an example of exporting existing EC2 instances
The resources that were imported are shown above. These resources are now in your Terraform state and will henceforth be managed by Terraform.
Now we can confirm the new resource definition by running terraform plan.
$ terraform plan Refreshing Terraform state in-memory prior to plan... The refreshed state will be used to calculate this plan, but will not be persisted to local or remote state storage.
This means that Terraform did not detect any differences between your configuration and real physical resources that exist. As a result, no actions need to be performed.
NOTE: If terraform doesn’t show any changes to AWS infrastructure, it means our imported resource is successful.
The same step needs to be performed for any other resources
$ aws cloudformation describe-stacks --stack-name Cloudformation-to-terraform
{
 "Stacks": [
 {
 "StackId": "arn:aws:cloudformation:us-west-2:188140964824:stack/Cloudformation-to-terraform/1c3b5ad0-9eb2-11e9-b9f3-0242fa89e25c",
 "DriftInformation": {
 "StackDriftStatus": "NOT_CHECKED"
 },
 "Description": "AWS CloudFormation Sample Template EC2InstanceWithSecurityGroupSample: Create an Amazon EC2 instance running the Amazon Linux AMI. The AMI is chosen based on the region in which the stack is run. This example creates an EC2 security group for the instance to give you SSH access. **WARNING** This template creates an Amazon EC2 instance. You will be billed for the AWS resources used if you create a stack from this template.",
 "Parameters": [
 {
 "ParameterValue": "terraform-plakhera",
 "ParameterKey": "KeyName"
 },
 {
 "ParameterValue": "0.0.0.0/0",
 "ParameterKey": "SSHLocation"
 },
 {
 "ParameterValue": "t2.small",
 "ParameterKey": "InstanceType"
 }
 ],
 "Tags": [],
 "Outputs": [
 {
 "Description": "InstanceId of the newly created EC2 instance",
 "OutputKey": "InstanceId",
 "OutputValue": "i-0723c8aa2ca4385eb"
 },
 {
 "Description": "Public IP address of the newly created EC2 instance",
 "OutputKey": "PublicIP",
 "OutputValue": "54.184.166.37"
 },
 {
 "Description": "Availability Zone of the newly created EC2 instance",
 "OutputKey": "AZ",
 "OutputValue": "us-west-2c"
 },
 {
 "Description": "Public DNSName of the newly created EC2 instance",
 "OutputKey": "PublicDNS",
 "OutputValue": "ec2-54-184-166-37.us-west-2.compute.amazonaws.com"
 }
 ],
 "EnableTerminationProtection": false,
 "CreationTime": "2019-07-04T23:19:02.785Z",
 "StackName": "Cloudformation-to-terraform",
 "NotificationARNs": [],
 "StackStatus": "CREATE_COMPLETE",
 "DisableRollback": false,
 "RollbackConfiguration": {
 "RollbackTriggers": []
 }
 }
 ]
}
Save the output to a file Cloudformation-to-terraform
NOTE: It does not generate terraform configuration for the individual resource CloudFormation provisions, it generates an aws_cloudformation_stack resource so that you can manage your existing CloudFormation stacks with Terraform instead of or in conjunction with the AWS Console and CLI.
In case if you are getting this error “I get the error unable to parse JSON: 1:13: illegal char illegal"
NOTE: I found this tool buggy as it doesn’t import all of my resources
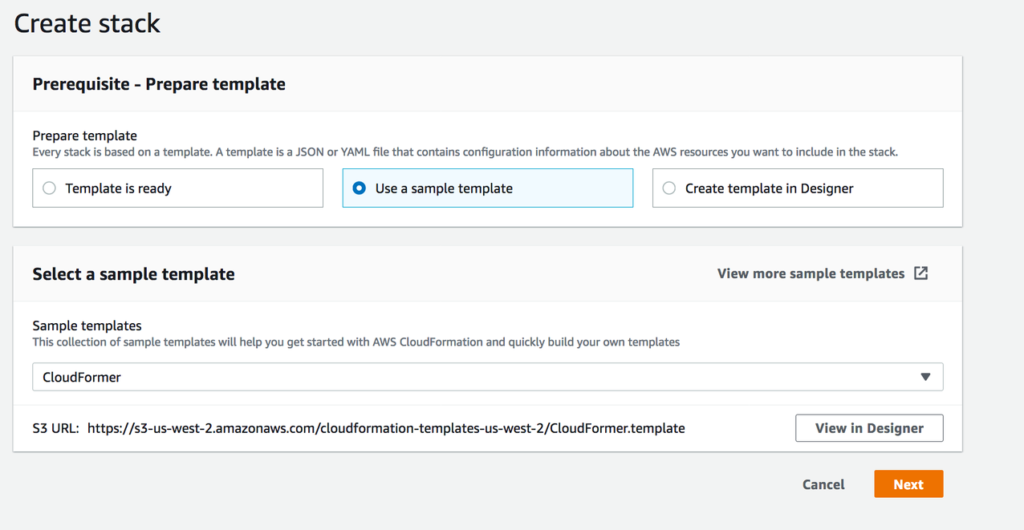
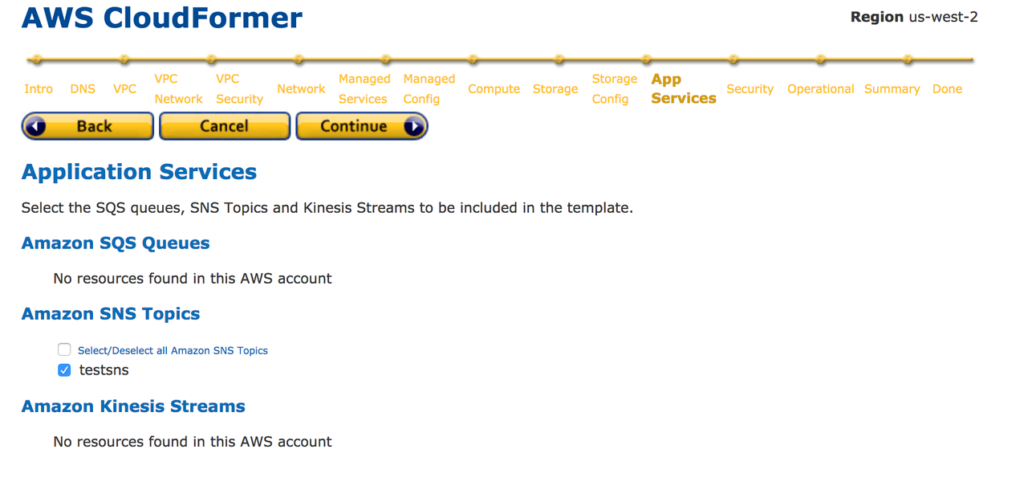
CloudFormer is not a Solution it’s just a one more tool I want to mention if anyone is already aware of CloudFormation.
Cloudformer
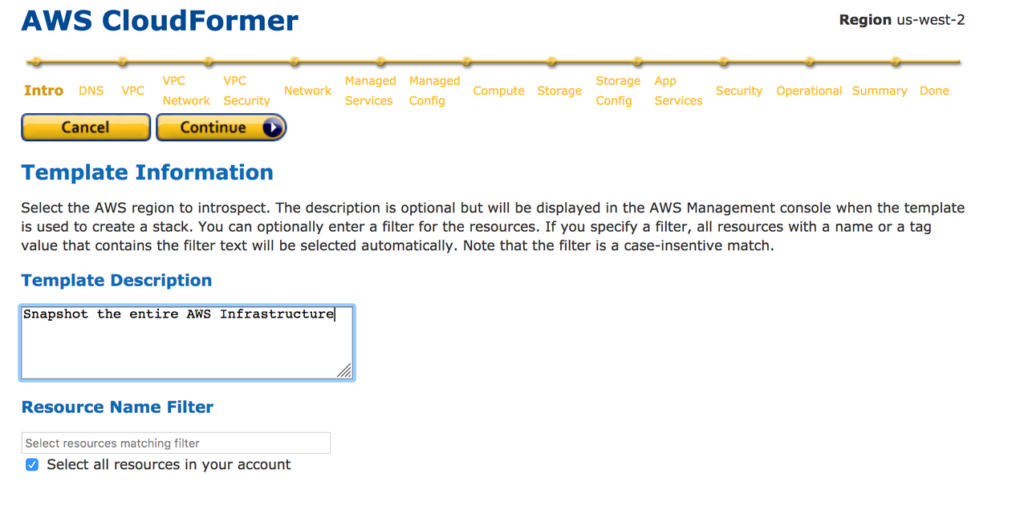
What is AWS CloudFormer ?
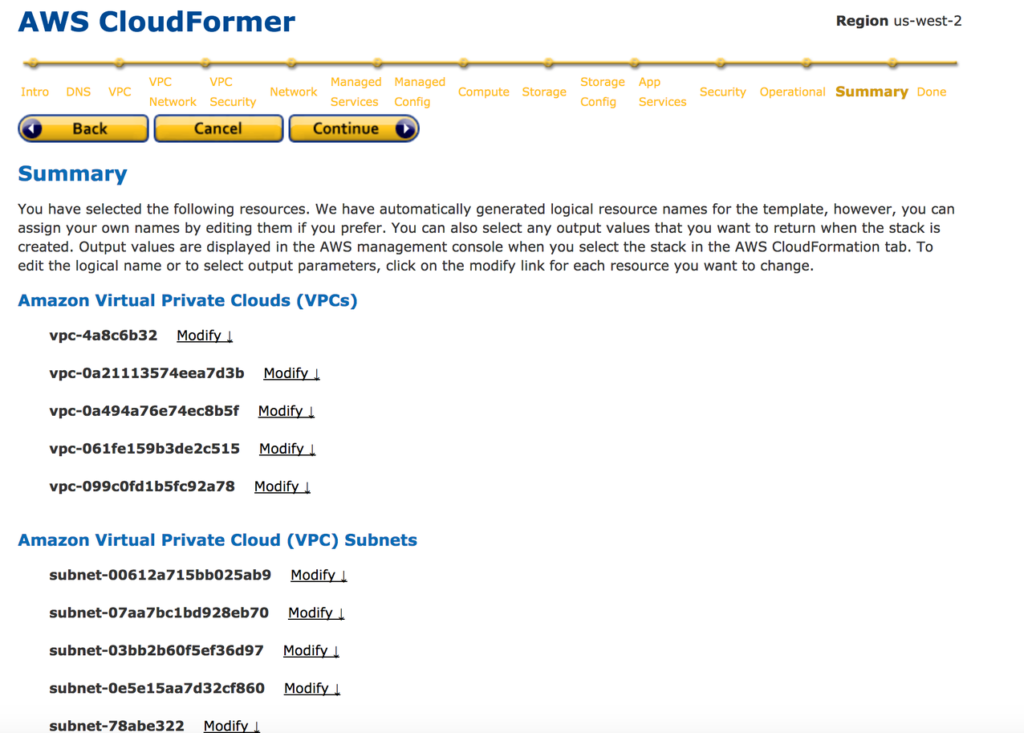
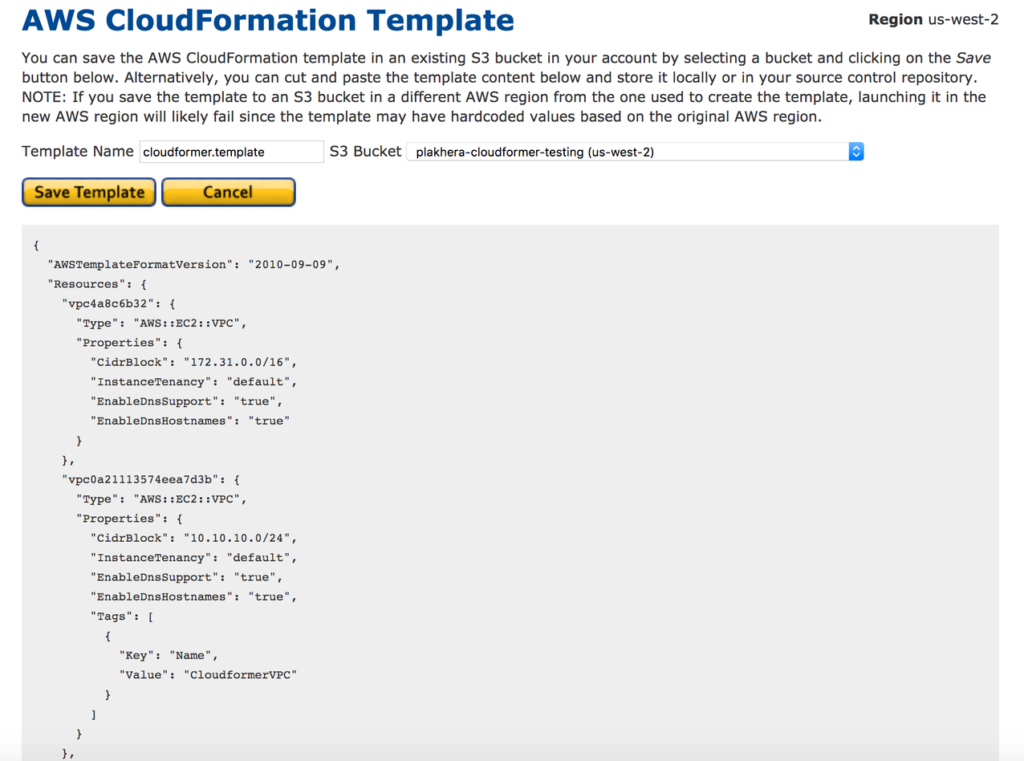
AWS CloudFormer is a template creation tool and it creates AWS CloudFormation template from your existing resources in AWS account. We can select any supported AWS resources that are running in our account, and CloudFormer creates a template in an Amazon S3 bucket.
01. Go to AWS management console which is these resources reside.
02. Go to CloudFormation service in AWS management console and click on Launch CloudFormer.
03. Choose select a sample template and select CloudFormer from the drop down. Go Next
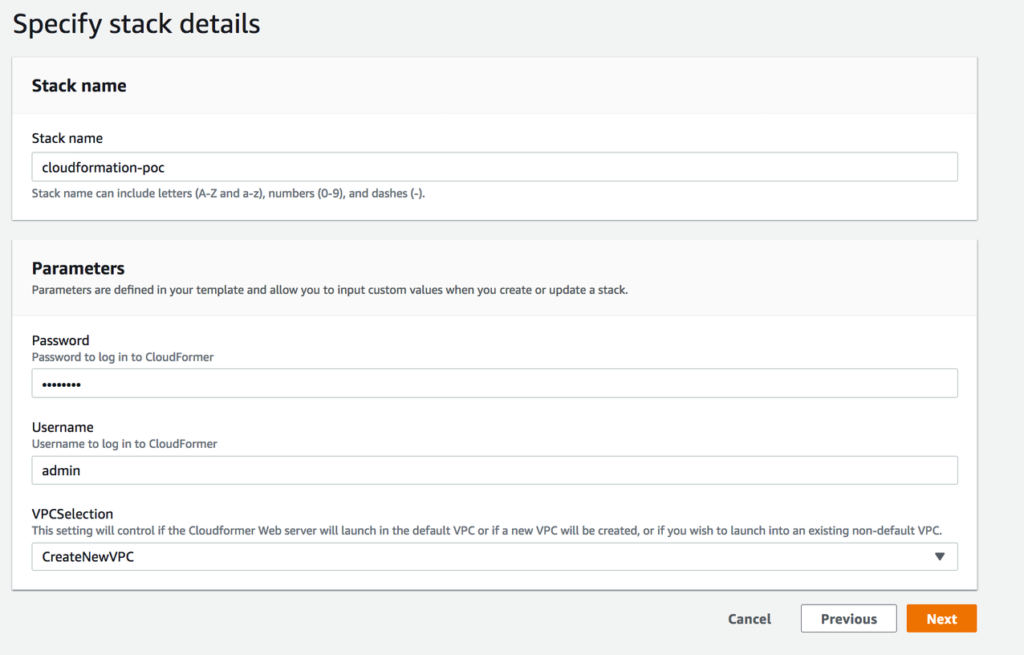
04. Give a Name, User name and Password and select CreateNewVPC from VPC Selection drop down list.
05. Keep remaining values as default in the wizard and complete with review.
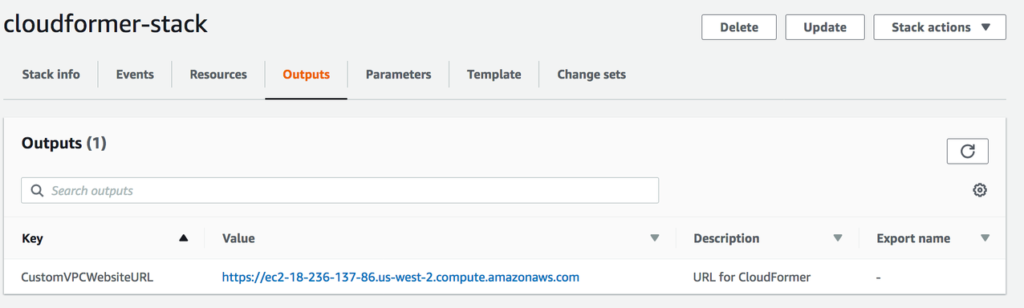
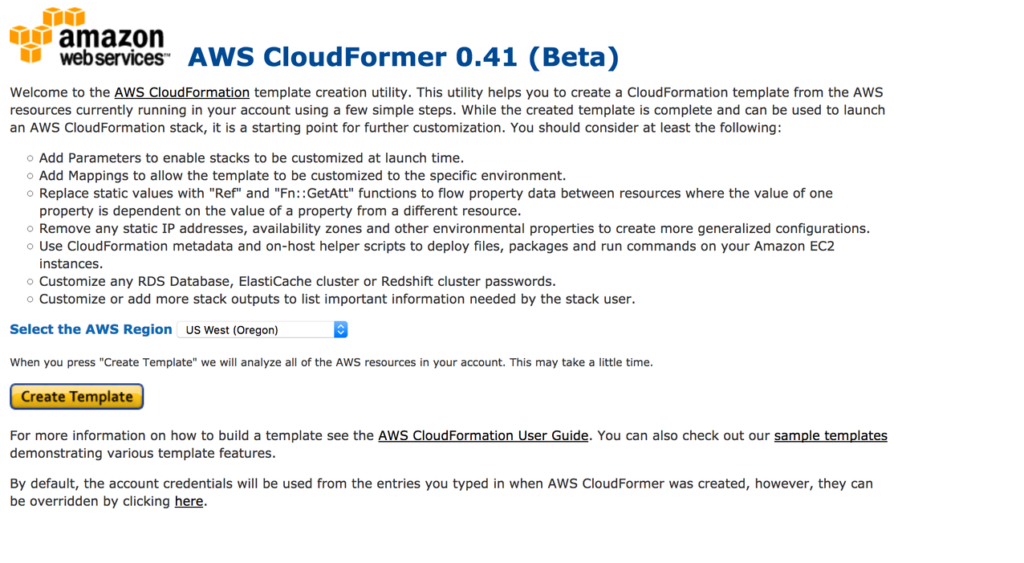
Now You can see new EC2 instance is creating under EC2 service dashboard. Your CloudFormer template will be implement inside the EC2 instance. Once EC2 creation is completed, You can access the template using public DNS of EC2.
06. Select the cloudFormer EC2 instance and copy the public DNS. paste into your browser with https://<publicDNS>. You will redirect to this page. Then select your AWS region from the drop down and click on Create Template.
7: In the next window called Template Information, You have to enter Template info like Template description. Enter those details and click continue.
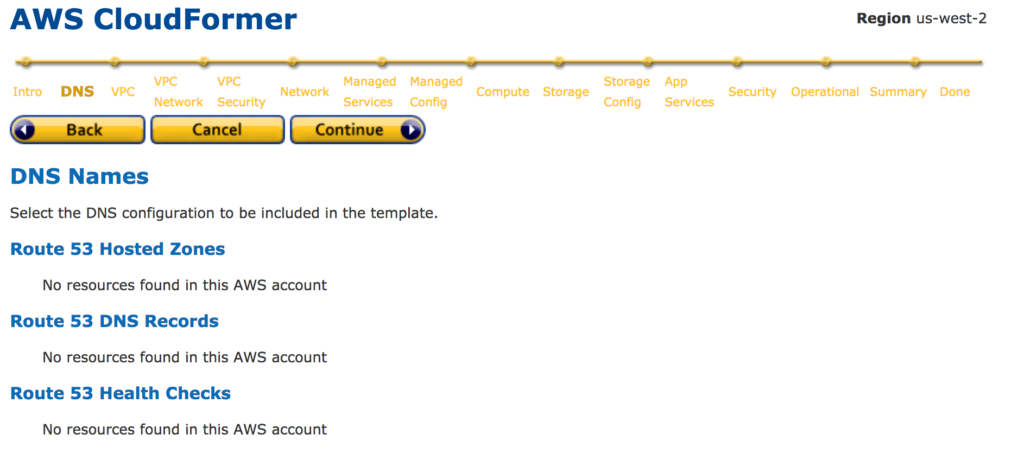
08. Select DNS Name if you have them in your VPC in the next window.
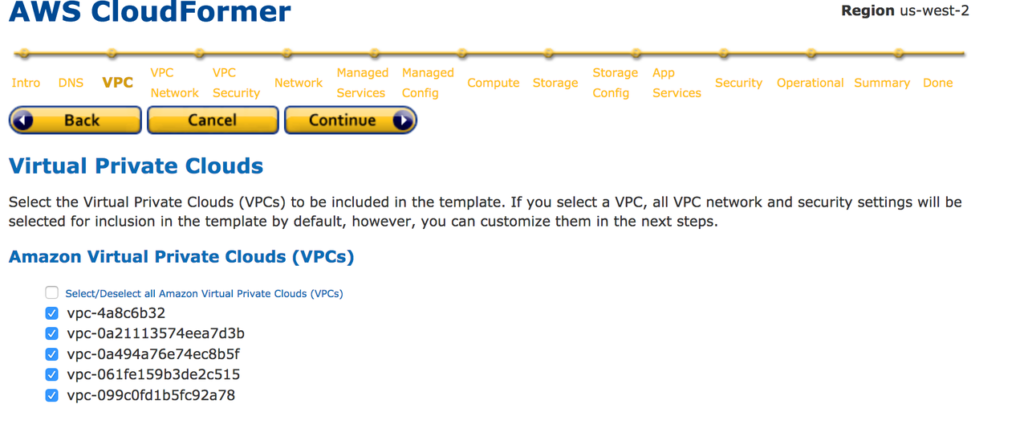
09. Select the VPC which you need to include in CloudFormation Template. Here onwards you will see only resources belong to the selected VPCs.
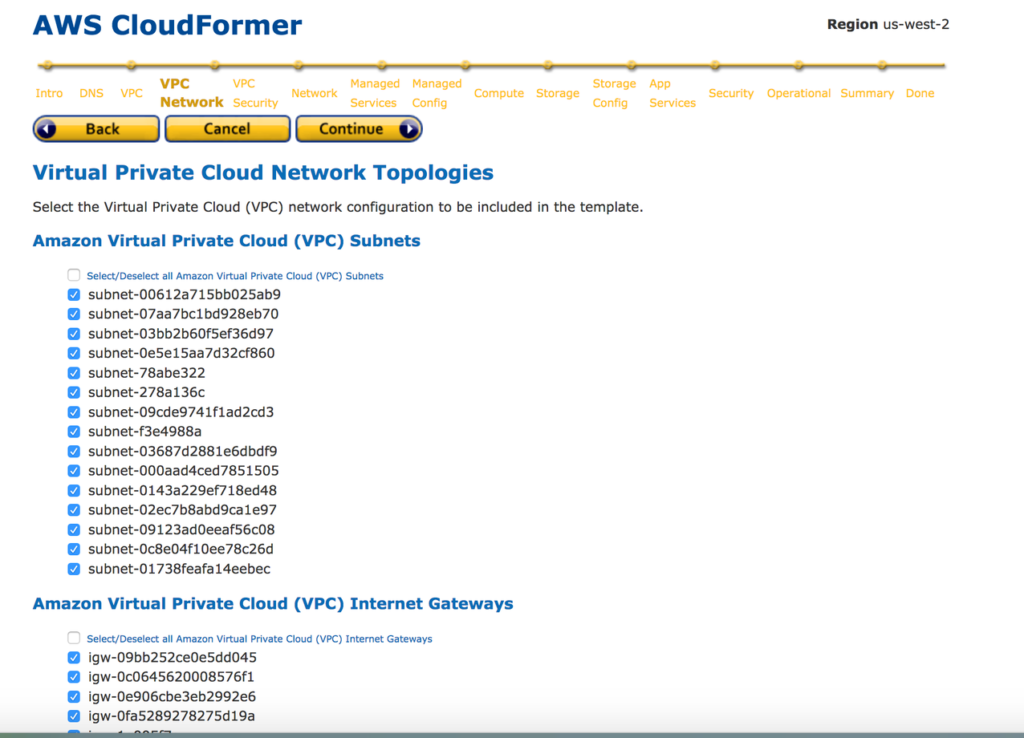
10. Select Subnets and Internet Gateway you need to add to the cloud formation template.
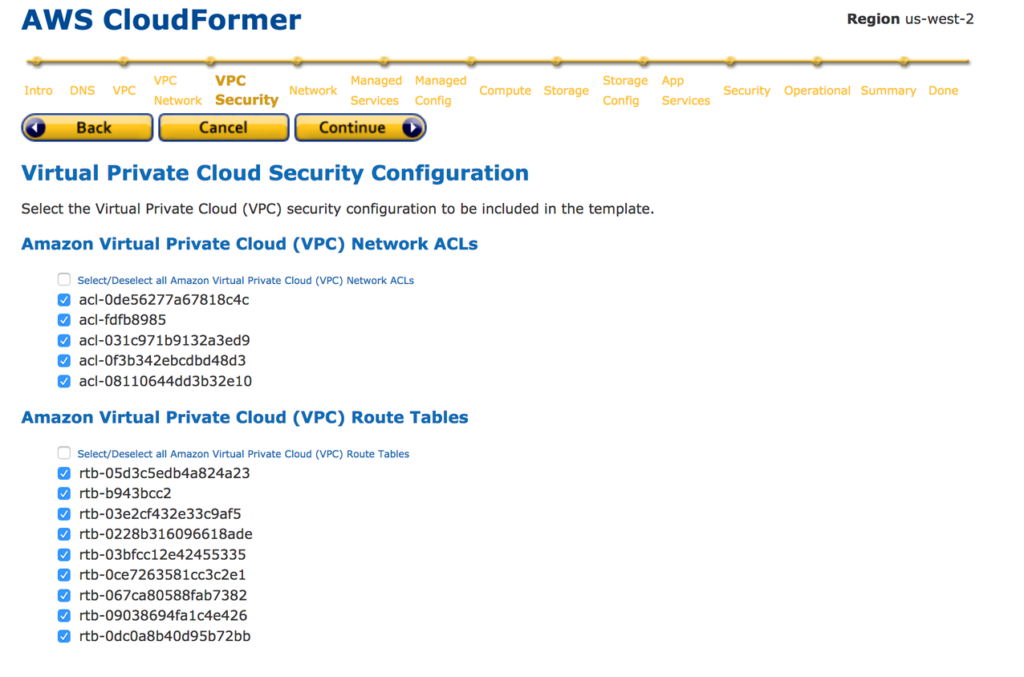
11. Select Access Control Lists(ACL) and Route tables you need to include CloudFormation template.
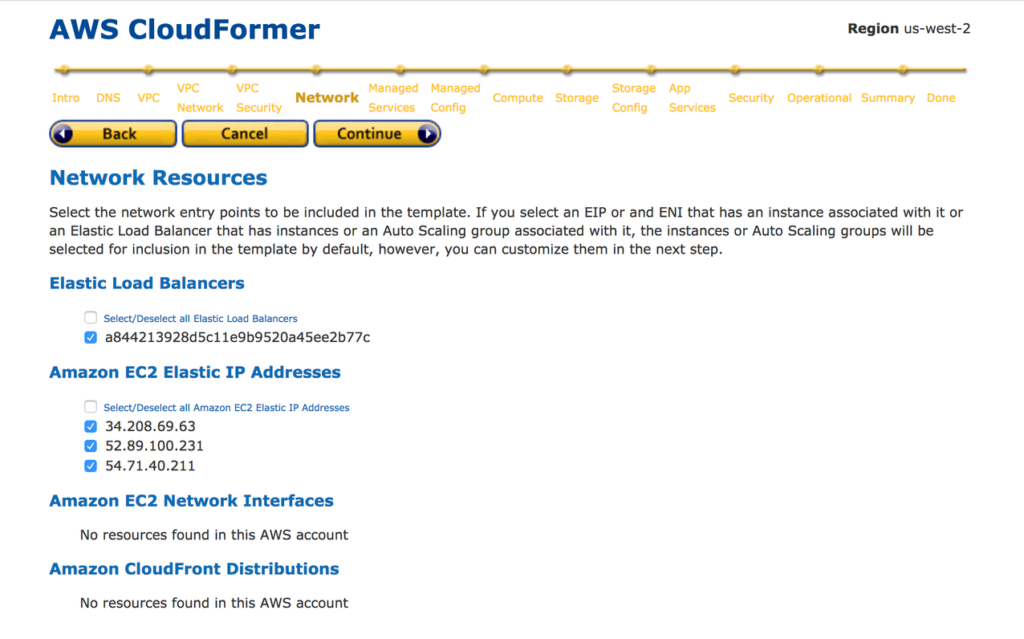
12. Select Elastic IPs and other managed services you need to add into the CloudFormation template
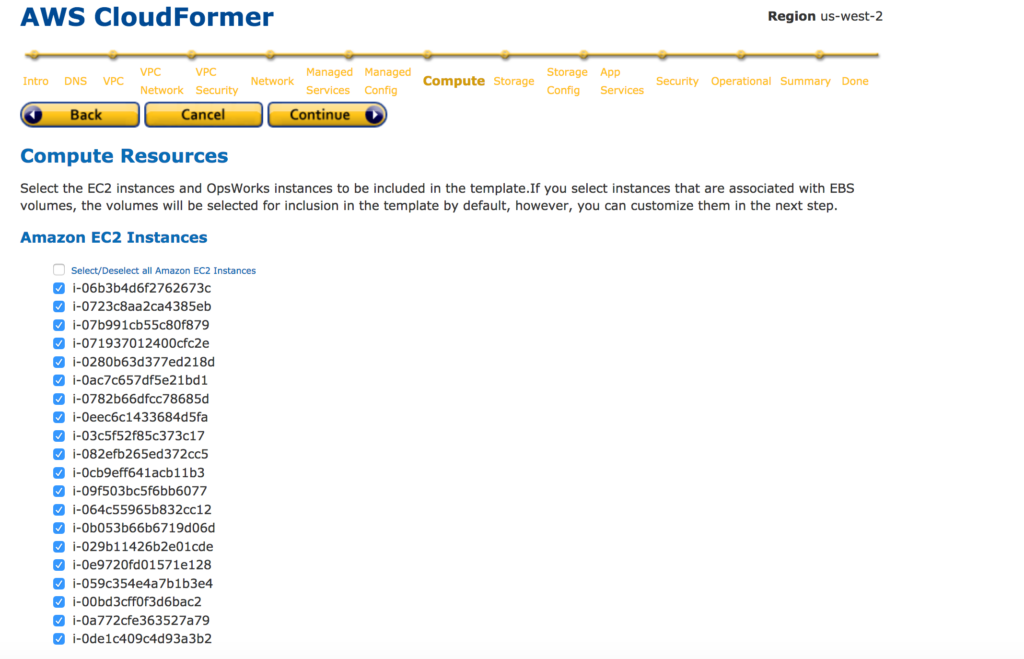
13: Select EC2 instances you need to add to the CloudFormation template.
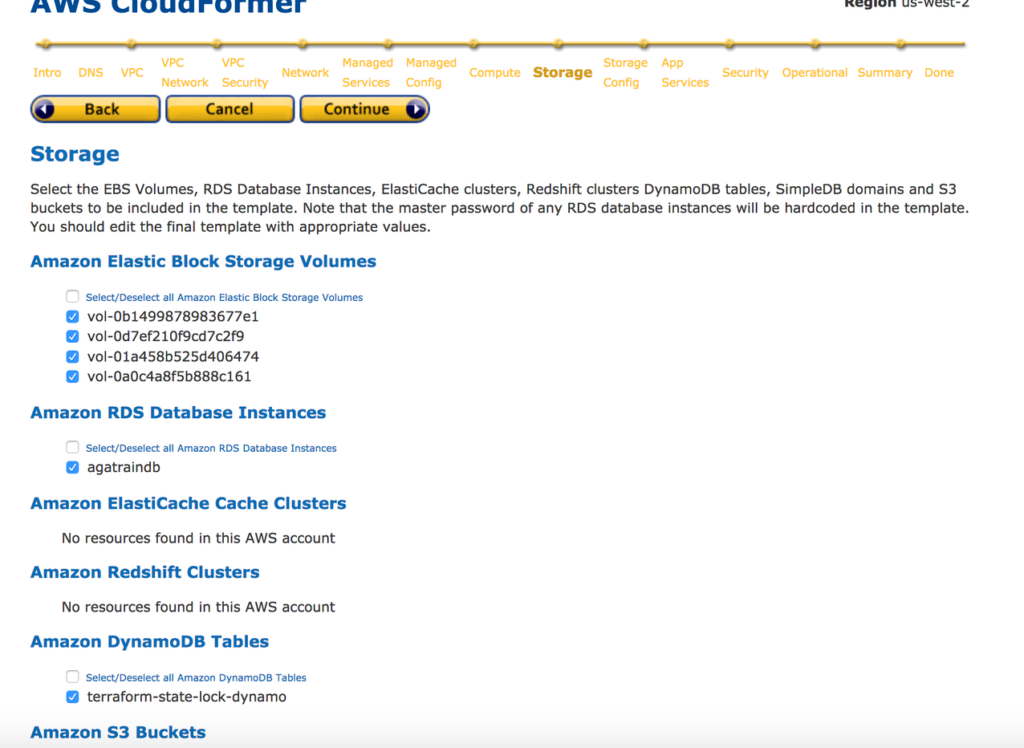
14. Select Storage related services and application services from the next steps.
16: Select the Security Groups and Operational Resources you need to insert into the CloudFormation template from the next two windows.
17: Now you are selected all the resources you need to include with CloudFormer template. Provide a Name for CloudFormer Template. Create S3 bucket inside S3 service and select it from the drop down list. Your CloudFormer template will save in this S3 bucket.Save CloudFormer Template.
18: You can access CloudFormer template from the S3 location when you need to deploy it. Also you can change the details in the template according to your requirement.
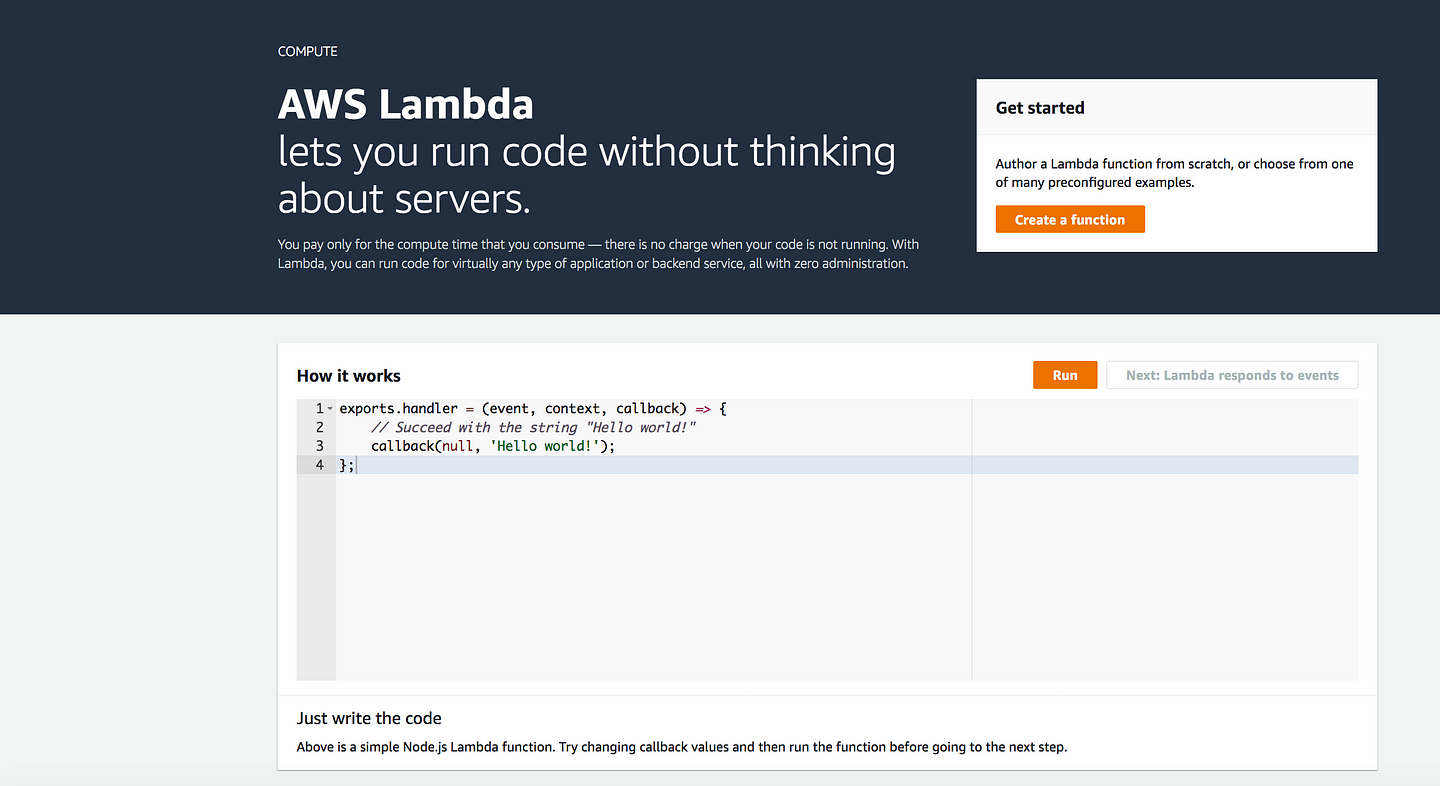
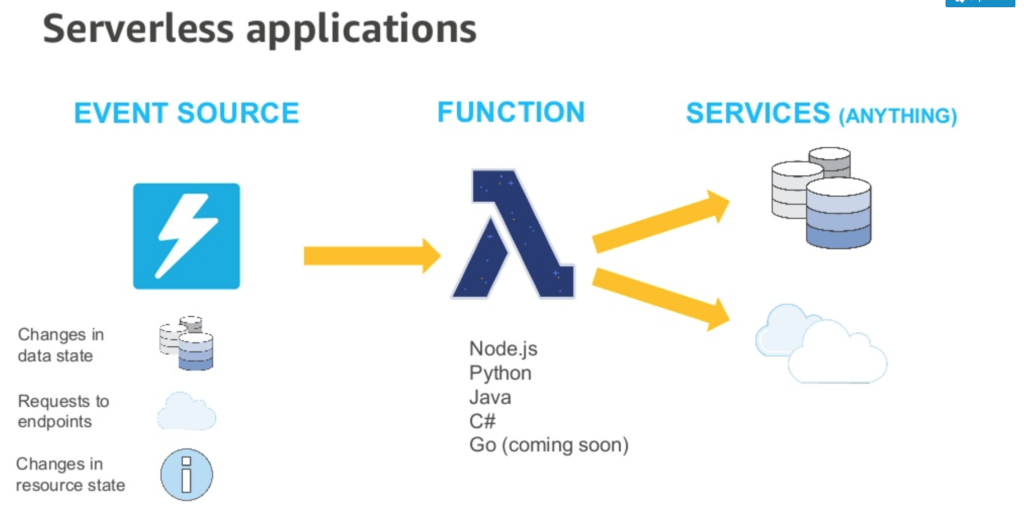
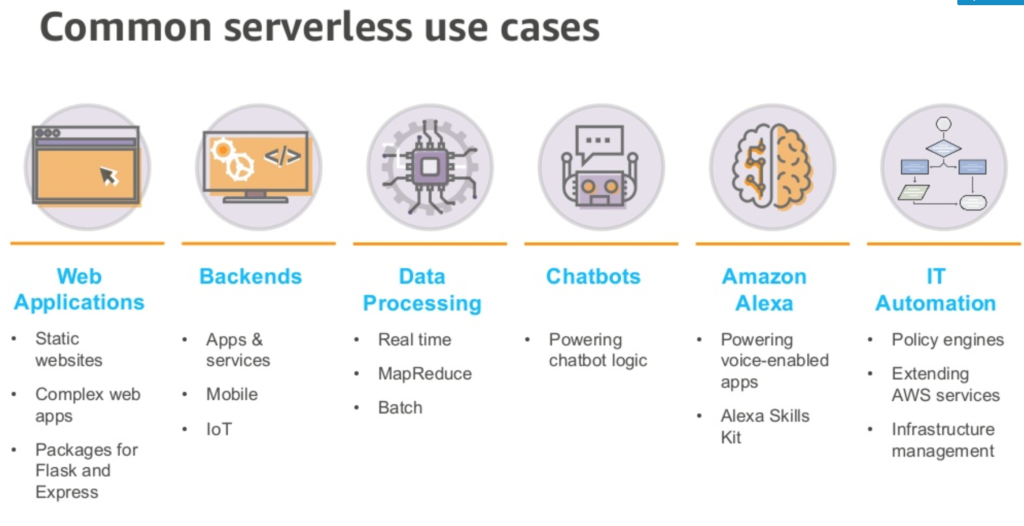
With AWS Lambda, you can run code without provisioning or managing servers. You pay only for the compute time that you consume — there’s no charge when your code isn’t running. You can run code for virtually any type of application or backend service — all with zero administration. Just upload your code and Lambda takes care of everything required to run and scale your code with high availability. You can set up your code to automatically trigger from other AWS services or call it directly from any web or mobile app.
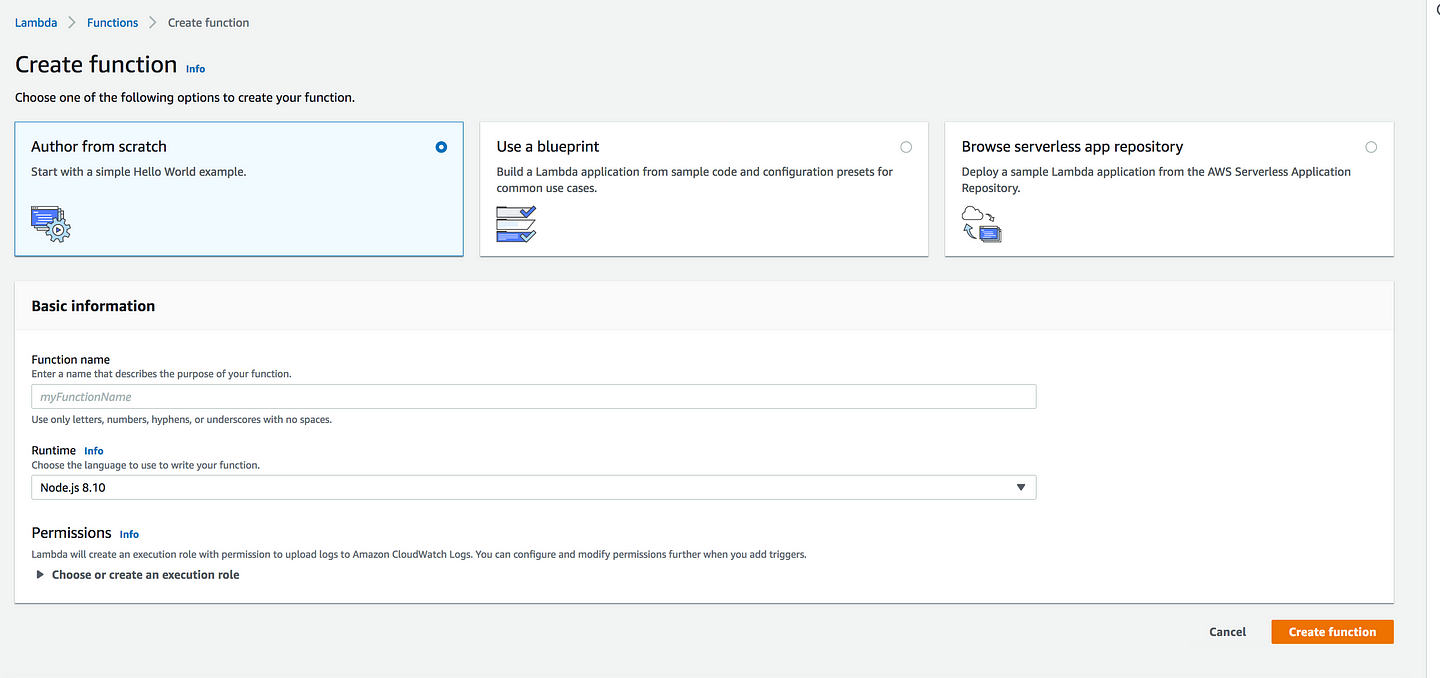
* Author from scratch: Which is self explanatory, i.e you are writing your own function
* Use a blueprint: Build a lambda application from sample code and configuration preset for common use cases(Provided by AWS)
* Browse serverless app repository: Deploy a sample lambda application from the AWS Serverless Application Repository(Published by other developers and AWS Patners)
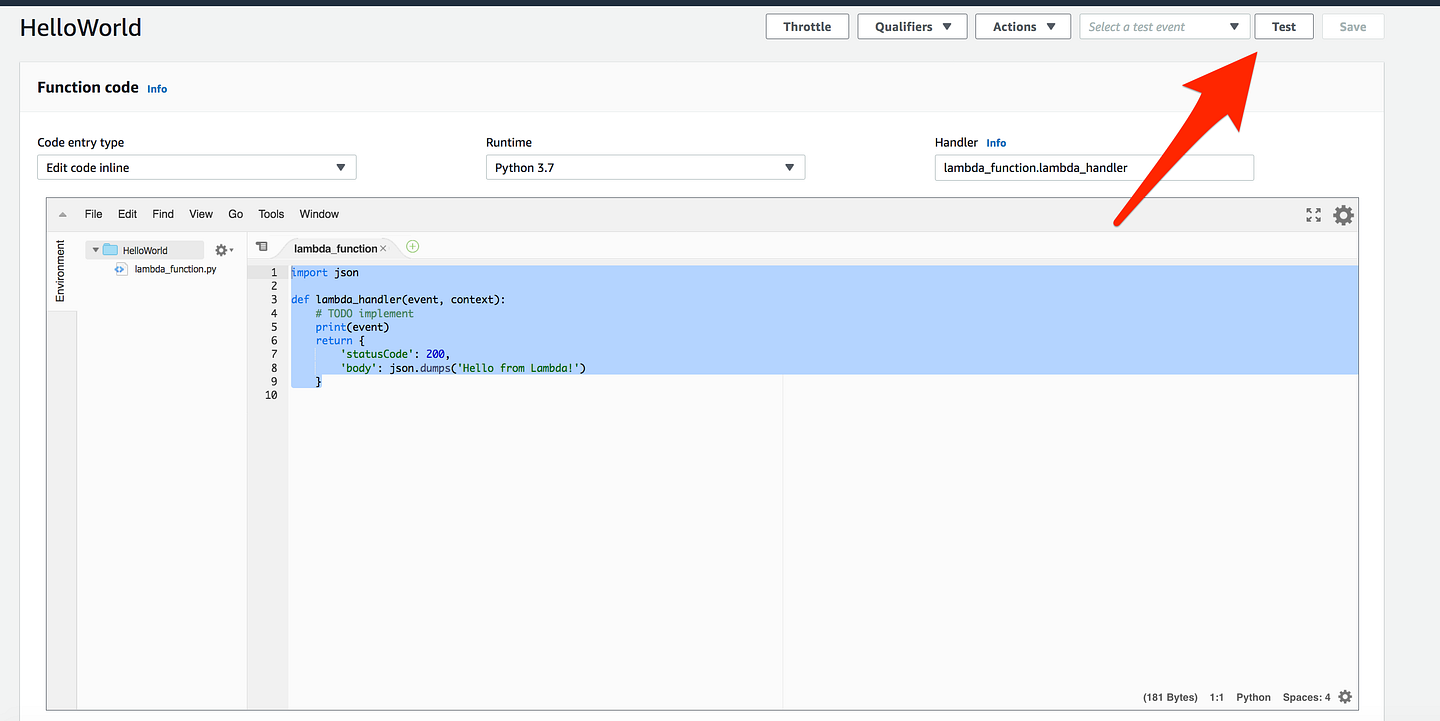
Function name: HelloWorld
Runtime: Choose Python3.7 from the dropdown
Permission: For the time being choose the default permission
Click Create Function
Invoking Lambda Function
When building applications on AWS Lambda the core components are Lambda functions and event sources. An event source is the AWS service or custom application that publishes events, and a Lambda function is the custom code that processes the events
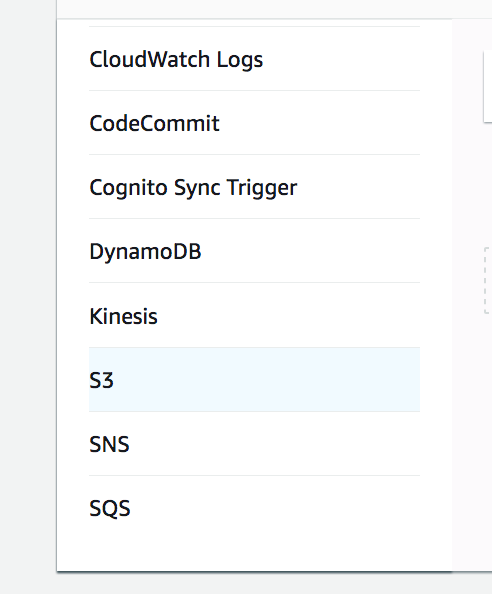
* Amazon S3 Pushes Events
* AWS Lambda Pulls Events from a Kinesis Stream
* HTTP API requests through API Gateway
* CloudWatch Schedule Events
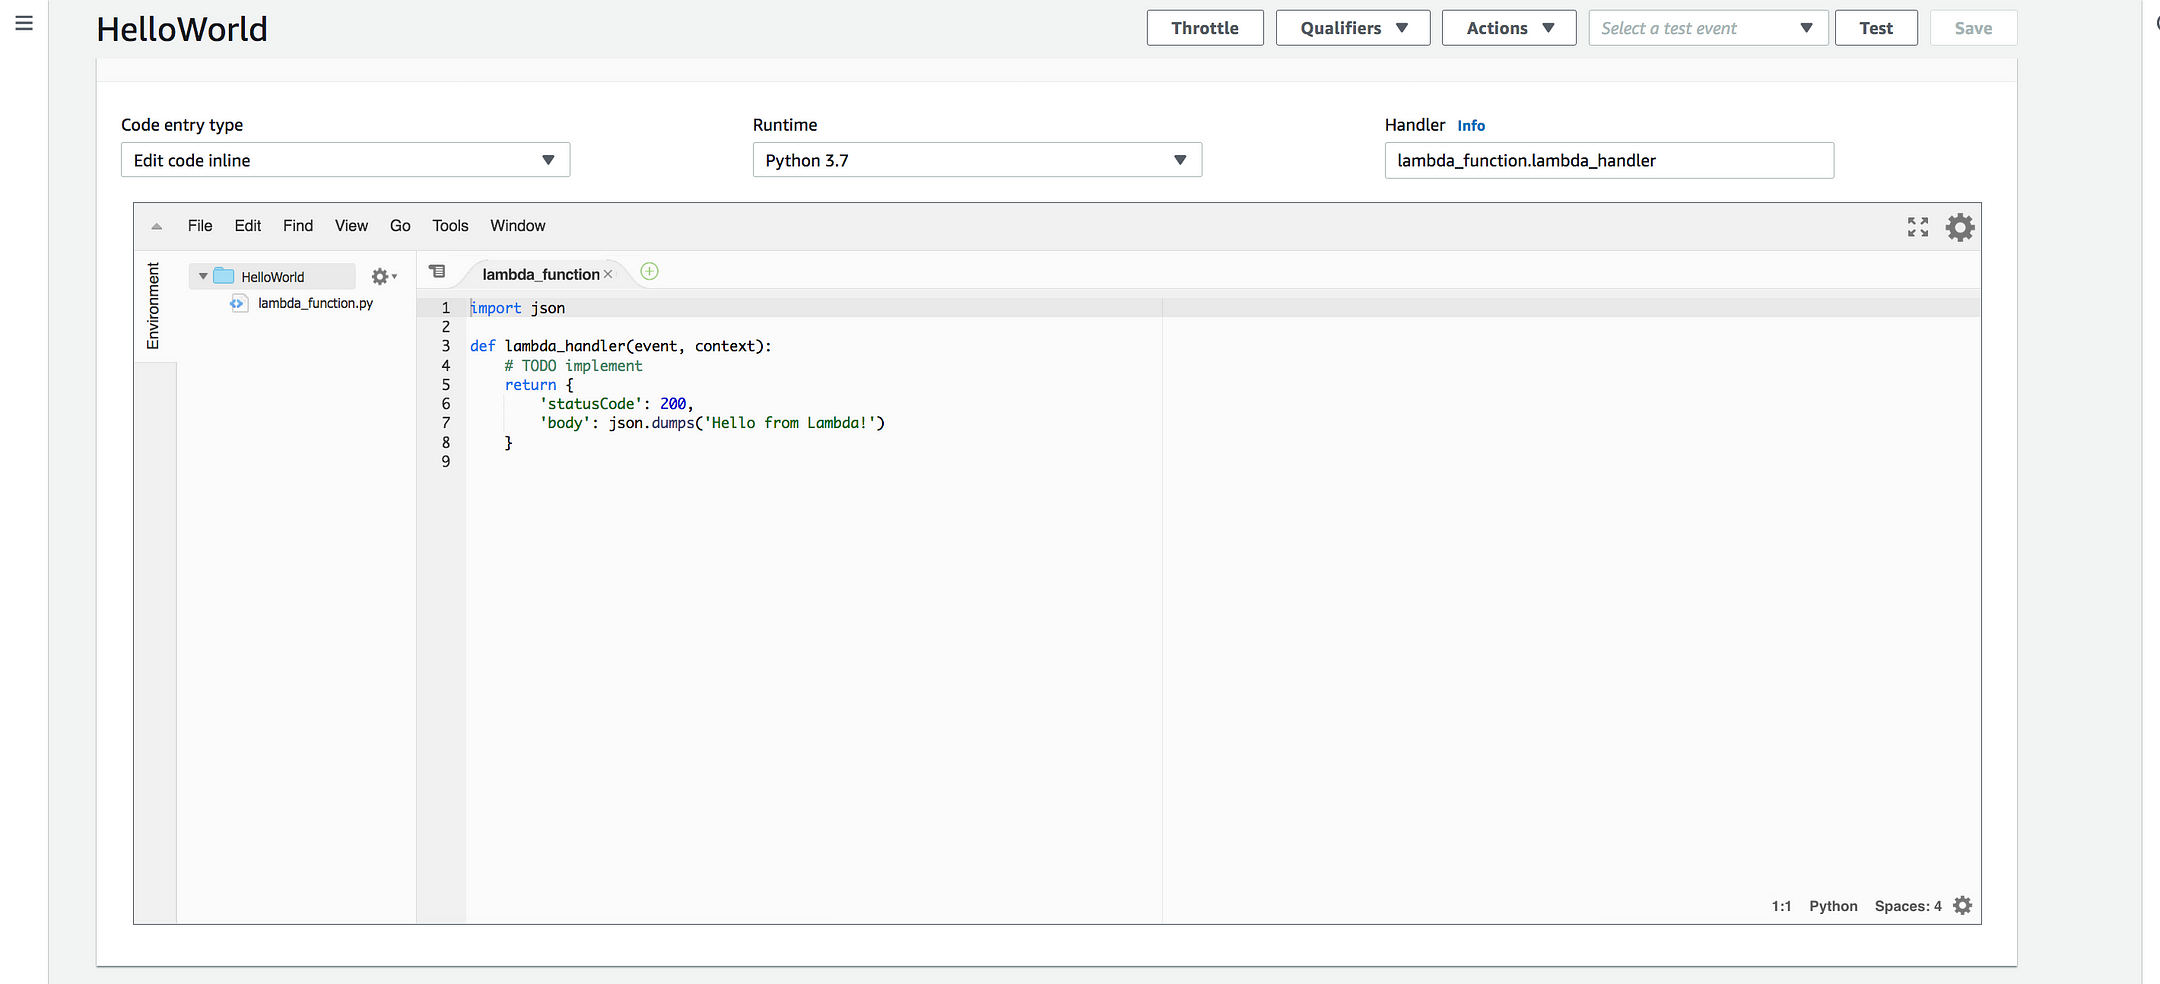
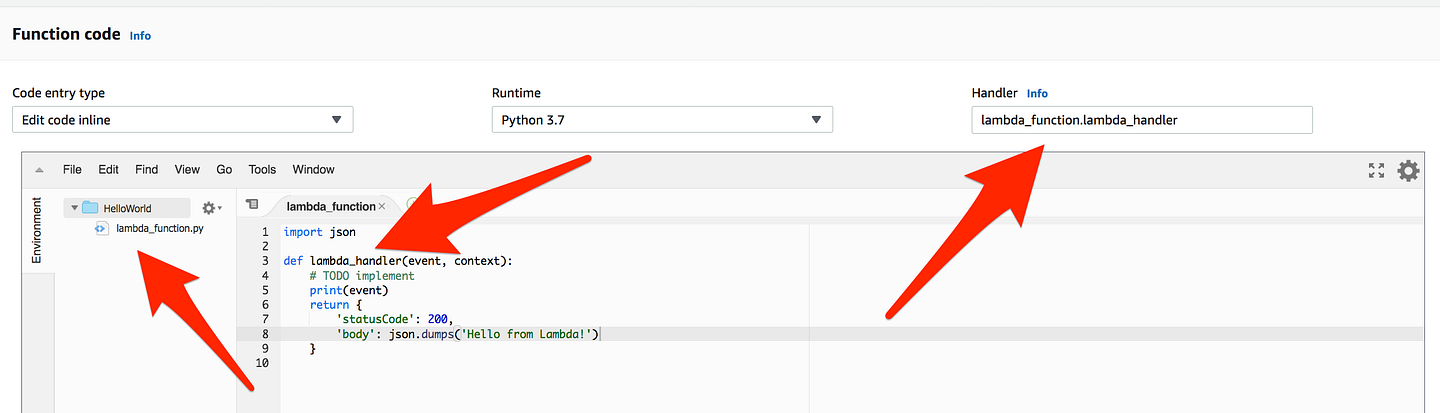
def lambda_handler(event, context):
    # TODO implement
    print(event) <--------
    return {
        'statusCode': 200,
        'body': json.dumps('Hello from Lambda!')
    }
Add this entry, which simply means we are trying to print the event
Again save it
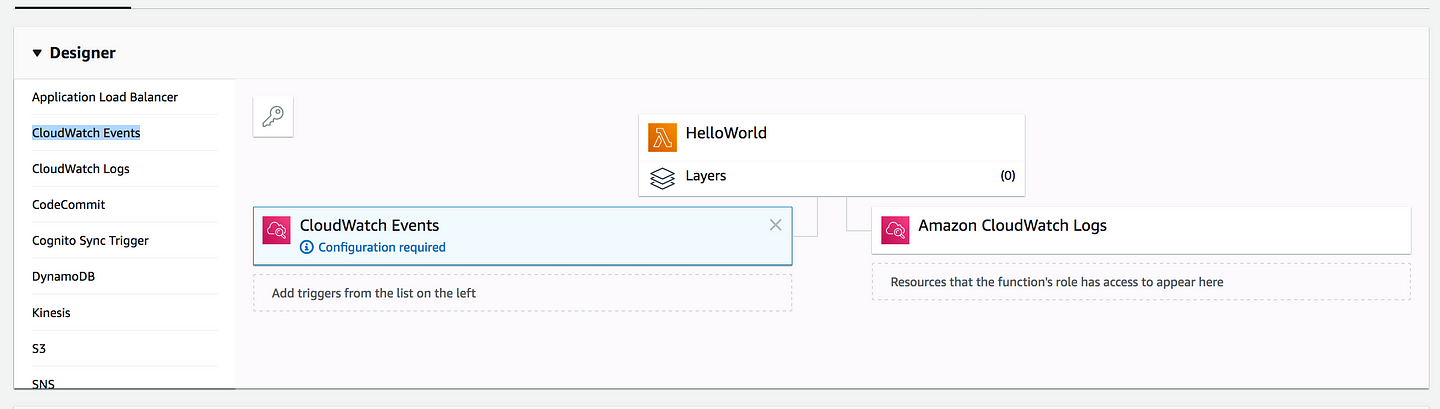
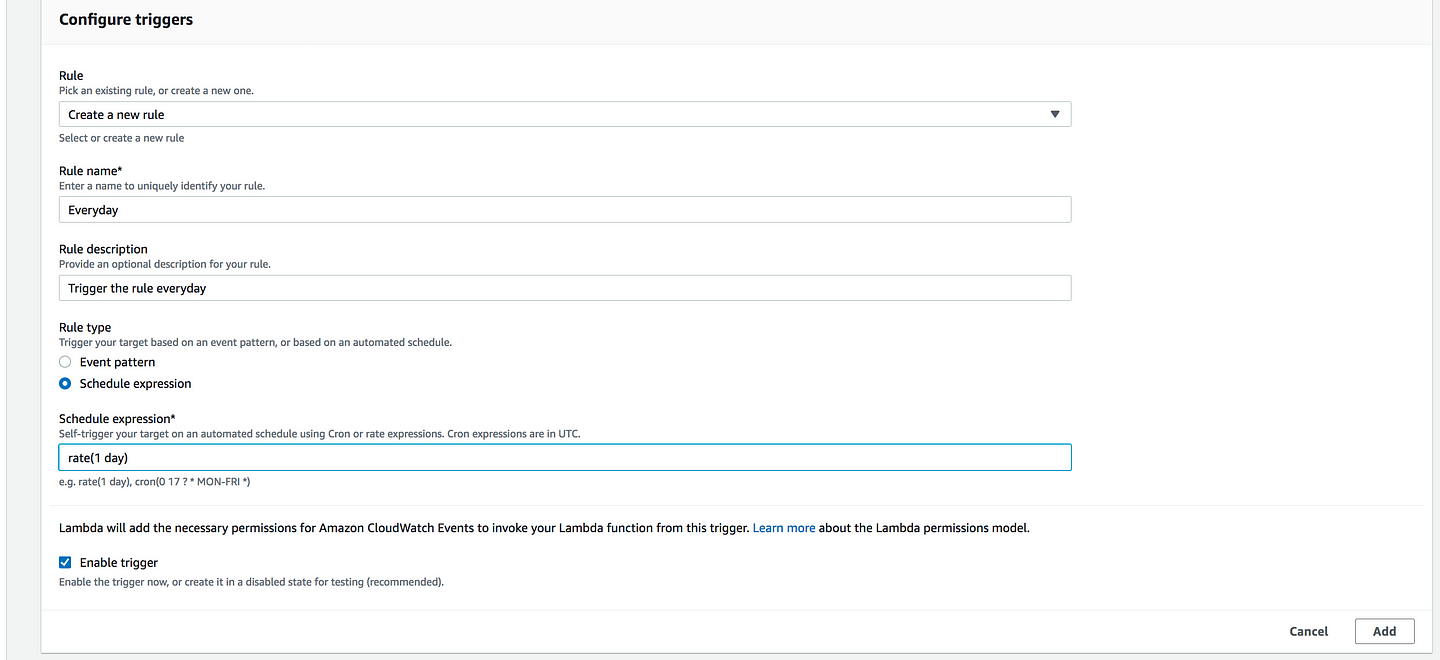
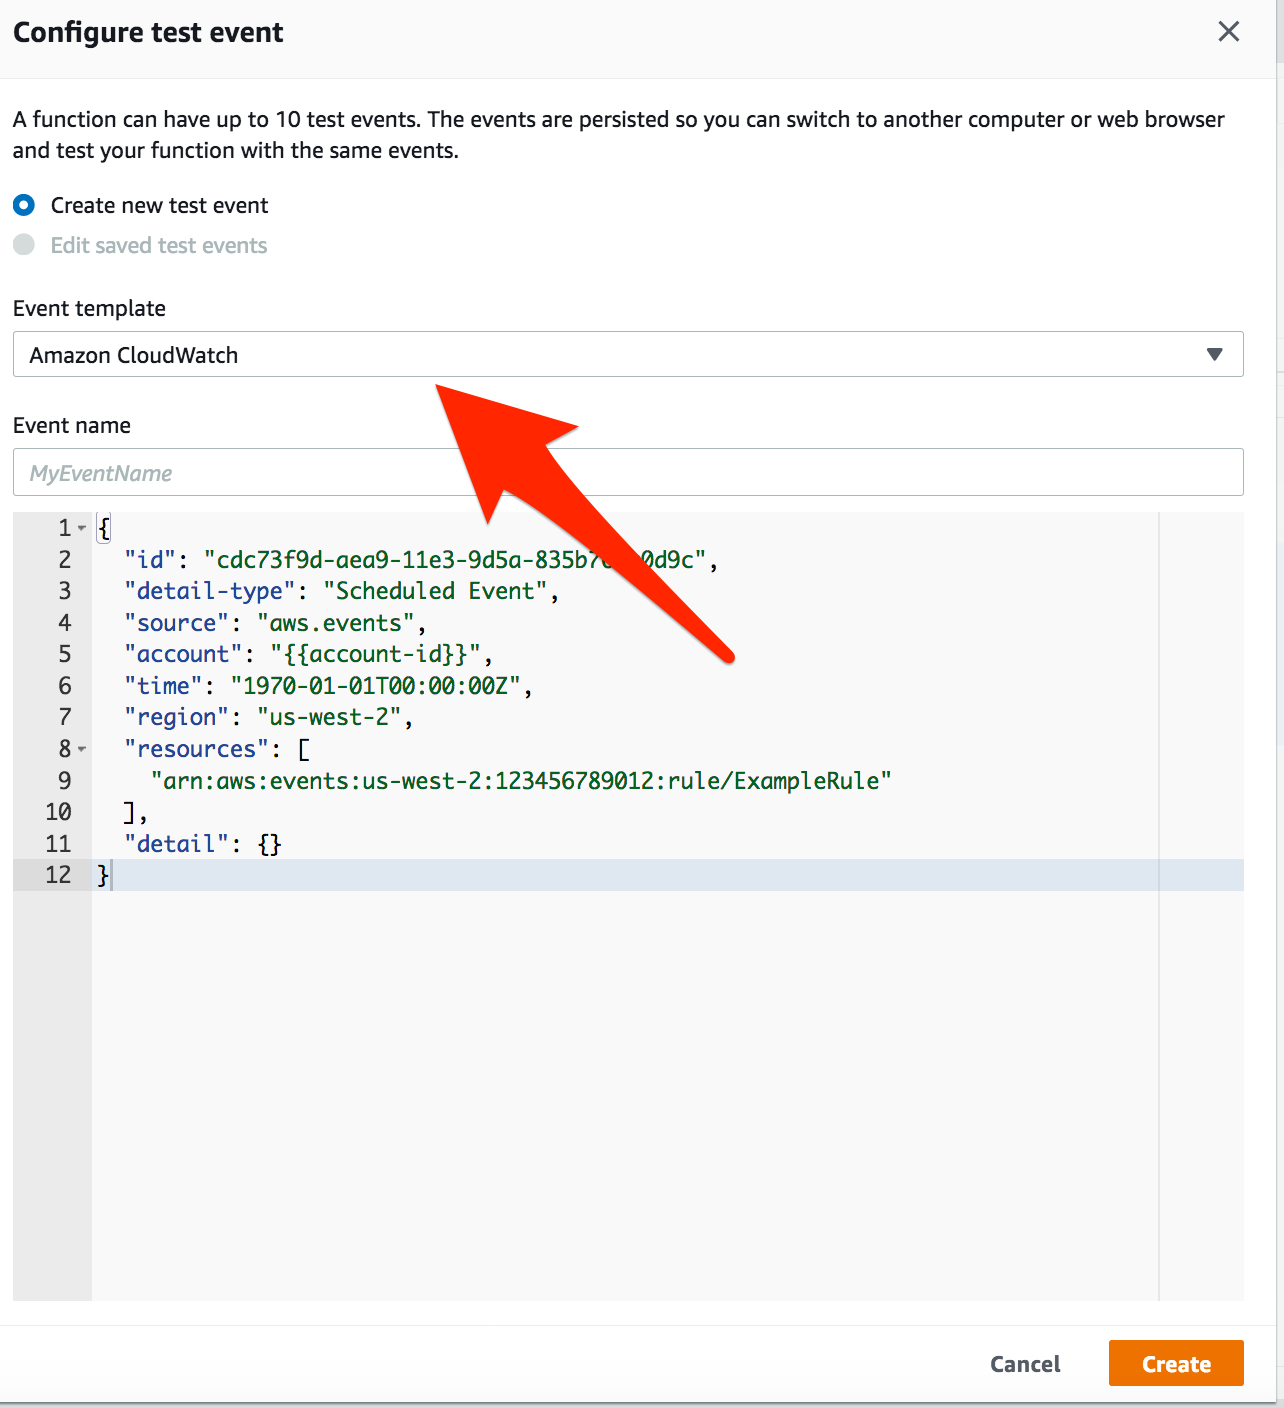
Let’s try to set a simple test event, Click on Test
Under Event template, search for Amazon CloudWatch
Event Name: Give your event some name and test it
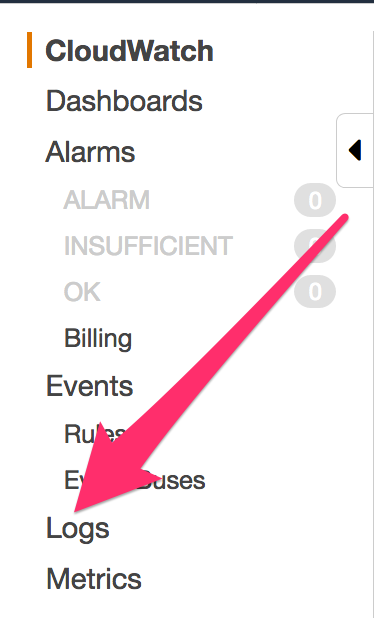
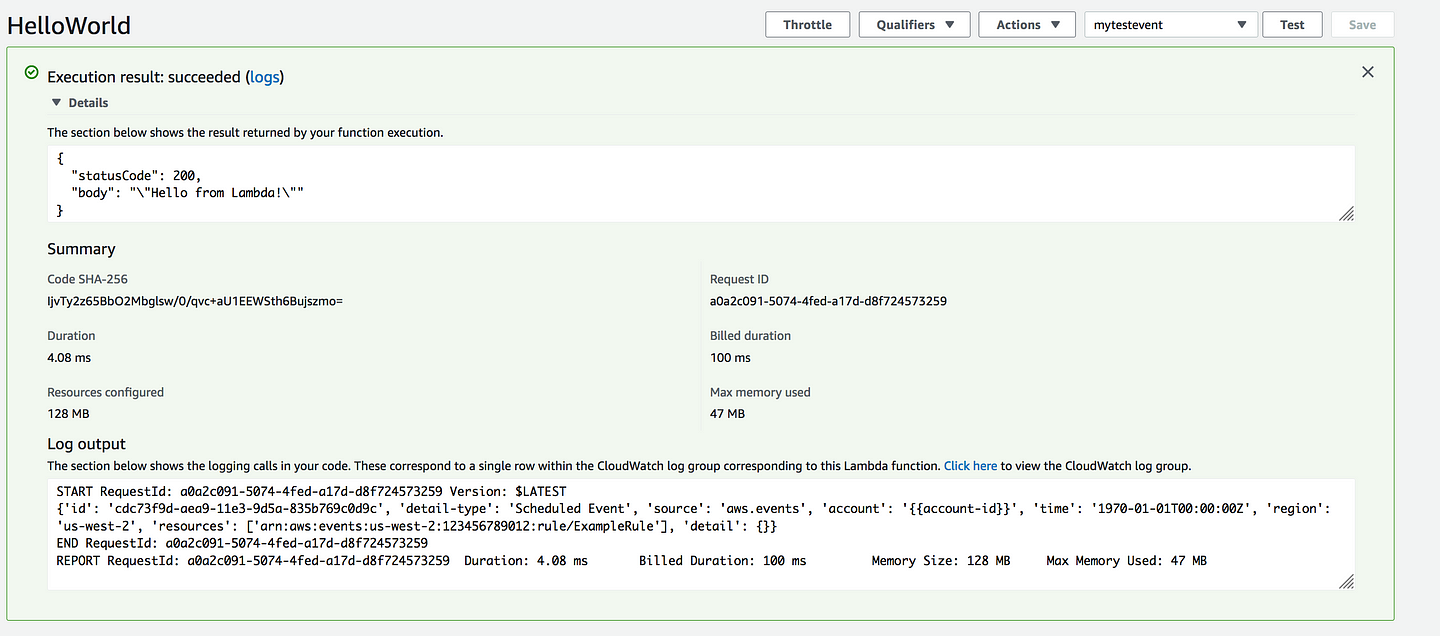
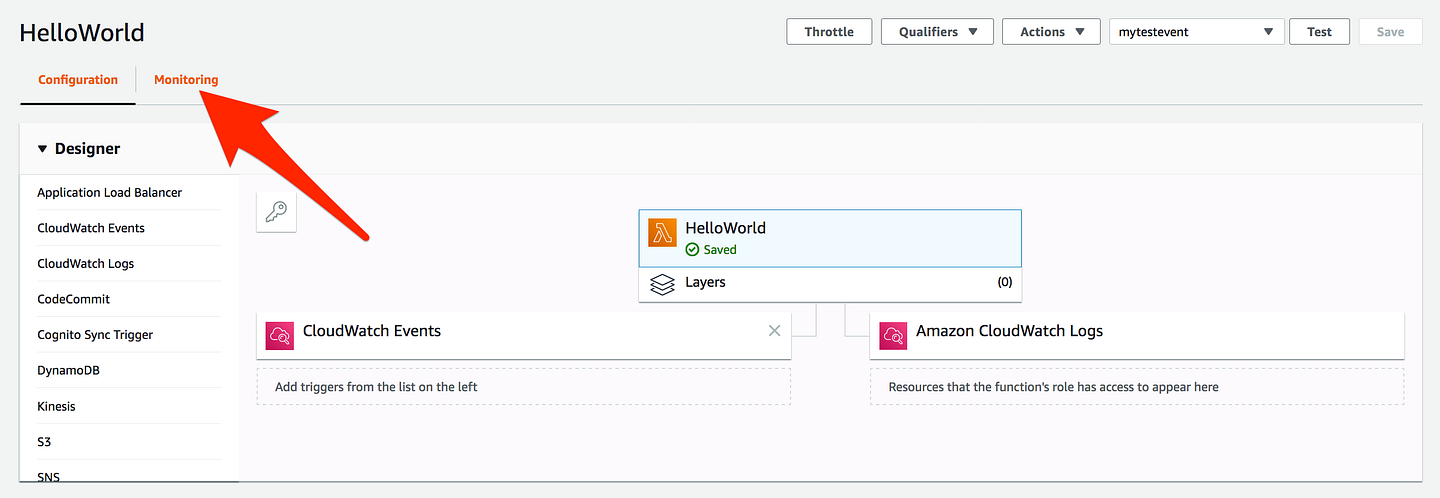
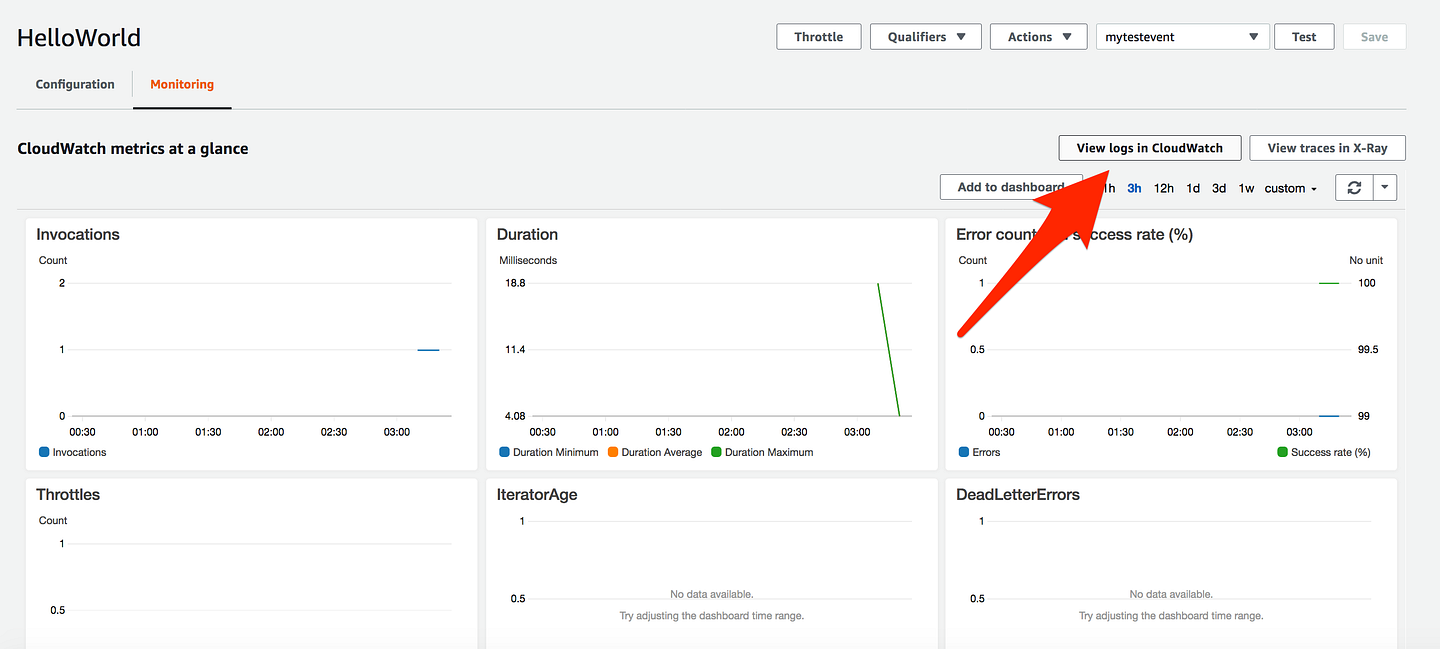
Go back and this time Click on Monitoring
Click on View logs in CloudWatch
Click on the log stream and you will see the same logs you see in Lambda console
Lambda Programming Model
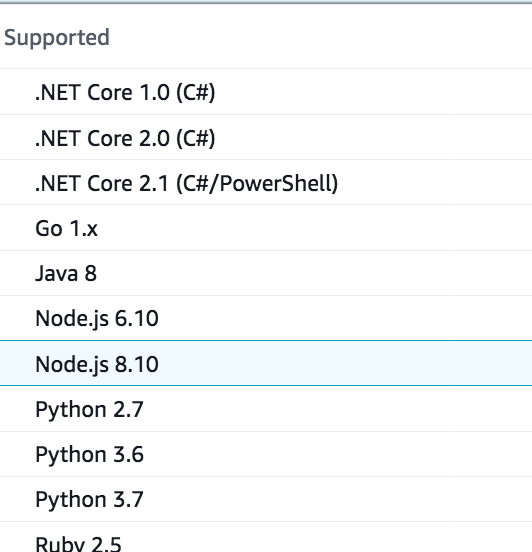
Lambda supports a bunch of programming languages
You write code for your Lambda function in one of the languages AWS Lambda supports. Regardless of the language you choose, there is a common pattern to writing code for a Lambda function that includes the following core concepts.
* Handler: Handler is the function AWS Lambda calls
to start execution of your Lambda function, it act
as an entry point.
As you can see handle start with lambda_function which is a Python Script Name and then lambda_handler which is a function and act as an entry point for event and context
Event: We already saw in the previous example where we passed the CloudWatch Event to our code
Context — AWS Lambda also passes a context object to the handler function, as the second parameter. Via this context object, your code can interact with AWS Lambda. For example, your code can find the execution time remaining before AWS Lambda terminates your Lambda function.
Logging — Your Lambda function can contain logging statements. AWS Lambda writes these logs to CloudWatch Logs.
Exceptions — Your Lambda function needs to communicate the result of the function execution to AWS Lambda. Depending on the language you author your Lambda function code, there are different ways to end a request successfully or to notify AWS Lambda an error occurred during the execution.
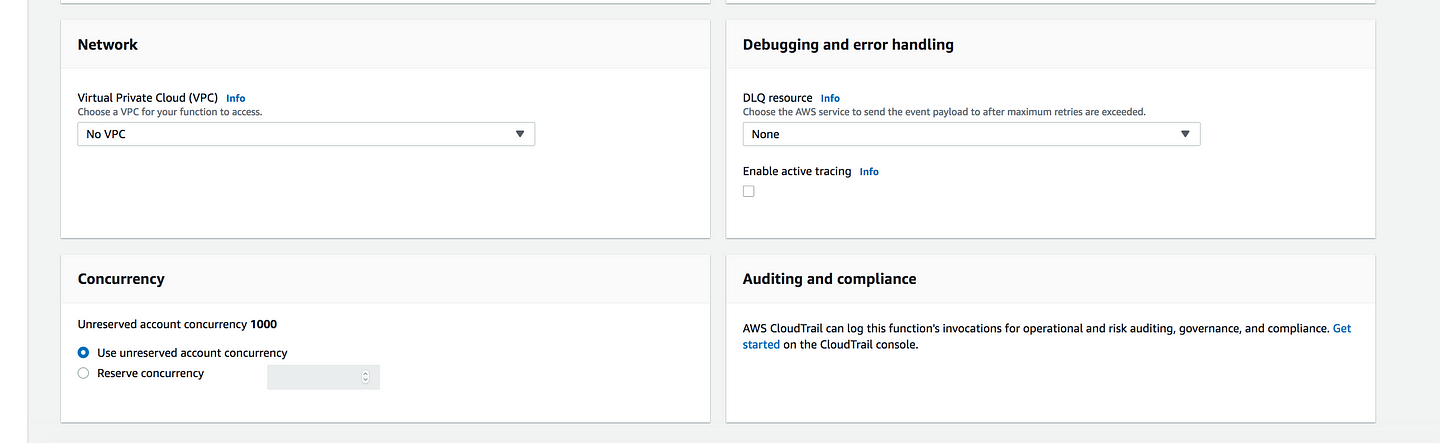
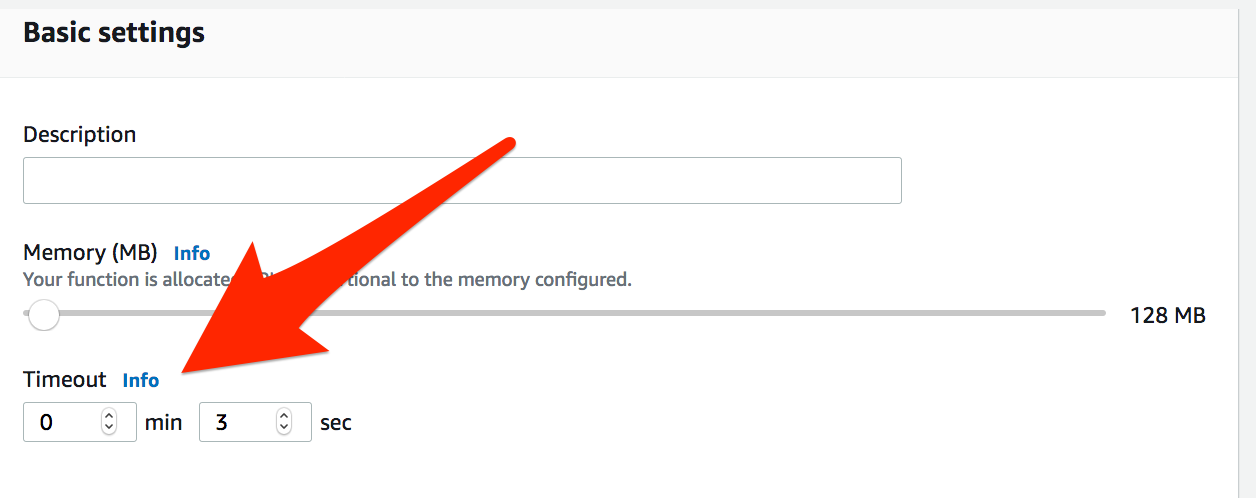
One more thing, I want to highlight is the timeout
You can now set the timeout value for a function to any value up to 15 minutes. When the specified timeout is reached, AWS Lambda terminates execution of your Lambda function. As a best practice, you should set the timeout value based on your expected execution time to prevent your function from running longer than intended.
Common Use case of Lambda
Terraform Code
All the steps we have performed manually. let’s try to automate it using terraform
Step1: Create your test Python function
def lambda_handler(event, context):
    print ("Hello from terraform world")
    return "hello from terraform world"
Now let’s zip it up
$ zip lambda.zip lambda.py
  adding: lambda.py (deflated 27%)
Step2: Define your Lambda resource
resource "aws_lambda_function" "test_lambda" {
  filename      = "lambda.zip"
  function_name = "lambda_handler"
  role          = "${aws_iam_role.iam_for_lambda.arn}"
  handler       = "lambda.lambda_handler"

  # The filebase64sha256() function is available in Terraform 0.11.12 and later
  # For Terraform 0.11.11 and earlier, use the base64sha256() function and the file() function:
  # source_code_hash = "${base64sha256(file("lambda_function_payload.zip"))}"
  source_code_hash = "${base64sha256("lambda.zip")}"
  runtime = "python2.7"
}
filename: Is the name of the file, you zipped in the previous step
function name: Is the name of the function you defined in your python code
role: IAM role attached to the Lambda Function. This governs both who / what can invoke your Lambda Function, as well as what resources our Lambda Function has access to
handler: Function entry point in our code(python code filename.method name) (filename: lambda.py we don’t need to include file extension) and (lambda function is lambda_handler def lambda_handler(event, context))
source_code_hash: Used to trigger updates. Must be set to a base64-encoded SHA256 hash of the package file specified with either filename or s3_key. The usual way to set this is filebase64sha256("file.zip") (Terraform 0.11.12 and later) or base64sha256(file("file.zip")) (Terraform 0.11.11 and earlier), where “file.zip” is the local filename of the lambda function source archive.
Step4: Terraform Init: Initialize a Terraform working directory, containing Terraform configuration files. This is the first command that should be run after writing a new Terraform configuration or cloning an existing one from version control.
$ terraform init

Initializing provider plugins...
- Checking for available provider plugins on https://releases.hashicorp.com...
- Downloading plugin for provider "aws" (2.23.0)...

The following providers do not have any version constraints in configuration,
so the latest version was installed.

To prevent automatic upgrades to new major versions that may contain breaking
changes, it is recommended to add version = "..." constraints to the
corresponding provider blocks in configuration, with the constraint strings
suggested below.

* provider.aws: version = "~> 2.23"

Terraform has been successfully initialized!

You may now begin working with Terraform. Try running "terraform plan" to see
any changes that are required for your infrastructure. All Terraform commands
should now work.

If you ever set or change modules or backend configuration for Terraform,
rerun this command to reinitialize your working directory. If you forget, other
commands will detect it and remind you to do so if necessary.
Step5: Terraform plan: The terraform plan command is used to create an execution plan. Terraform performs a refresh, unless explicitly disabled, and then determines what actions are necessary to achieve the desired state specified in the configuration files.
$ terraform plan
Refreshing Terraform state in-memory prior to plan...
The refreshed state will be used to calculate this plan, but will not be
persisted to local or remote state storage.


------------------------------------------------------------------------

An execution plan has been generated and is shown below.
Resource actions are indicated with the following symbols:
  + create

Terraform will perform the following actions:

  + aws_cloudwatch_log_group.example
      id:                             <computed>
      arn:                            <computed>
      name:                           "/aws/lambda/lambda_handler"
      retention_in_days:              "14"

  + aws_iam_policy.lambda_logging
      id:                             <computed>
      arn:                            <computed>
      description:                    "IAM policy for logging from a lambda"
      name:                           "lambda_logging"
      path:                           "/"
      policy:                         "{\n  \"Version\": \"2012-10-17\",\n  \"Statement\": [\n    {\n      \"Action\": [\n        \"logs:CreateLogStream\",\n        \"logs:PutLogEvents\"\n      ],\n      \"Resource\": \"arn:aws:logs:*:*:*\",\n      \"Effect\": \"Allow\"\n    }\n  ]\n}\n"

  + aws_iam_role.iam_for_lambda
      id:                             <computed>
      arn:                            <computed>
      assume_role_policy:             "{\n  \"Version\": \"2012-10-17\",\n  \"Statement\": [\n    {\n      \"Action\": \"sts:AssumeRole\",\n      \"Principal\": {\n        \"Service\": \"lambda.amazonaws.com\"\n      },\n      \"Effect\": \"Allow\",\n      \"Sid\": \"\"\n    }\n  ]\n}\n"
      create_date:                    <computed>
      force_detach_policies:          "false"
      max_session_duration:           "3600"
      name:                           "iam_for_lambda"
      path:                           "/"
      unique_id:                      <computed>

  + aws_iam_role_policy_attachment.lambda_logs
      id:                             <computed>
      policy_arn:                     "${aws_iam_policy.lambda_logging.arn}"
      role:                           "iam_for_lambda"

  + aws_lambda_function.test_lambda
      id:                             <computed>
      arn:                            <computed>
      filename:                       "lambda.zip"
      function_name:                  "lambda_handler"
      handler:                        "lambda.lambda_handler"
      invoke_arn:                     <computed>
      last_modified:                  <computed>
      memory_size:                    "128"
      publish:                        "false"
      qualified_arn:                  <computed>
      reserved_concurrent_executions: "-1"
      role:                           "${aws_iam_role.iam_for_lambda.arn}"
      runtime:                        "python2.7"
      source_code_hash:               "Gpu07NPcj26NrKv0Ne6BbZkfDRuM3ozHHqCFUWH9Sqg="
      source_code_size:               <computed>
      timeout:                        "3"
      tracing_config.#:               <computed>
      version:                        <computed>


Plan: 5 to add, 0 to change, 0 to destroy.

------------------------------------------------------------------------

Note: You didn't specify an "-out" parameter to save this plan, so Terraform
can't guarantee that exactly these actions will be performed if
"terraform apply" is subsequently run.
Step6: terraform apply: The terraform apply command is used to apply the changes required to reach the desired state of the configuration, or the pre-determined set of actions generated by a terraform plan execution plan.
$ terraform apply

An execution plan has been generated and is shown below.
Resource actions are indicated with the following symbols:
  + create

Terraform will perform the following actions:

  + aws_cloudwatch_log_group.example
      id:                             <computed>
      arn:                            <computed>
      name:                           "/aws/lambda/lambda_handler"
      retention_in_days:              "14"

  + aws_iam_policy.lambda_logging
      id:                             <computed>
      arn:                            <computed>
      description:                    "IAM policy for logging from a lambda"
      name:                           "lambda_logging"
      path:                           "/"
      policy:                         "{\n  \"Version\": \"2012-10-17\",\n  \"Statement\": [\n    {\n      \"Action\": [\n        \"logs:CreateLogStream\",\n        \"logs:PutLogEvents\"\n      ],\n      \"Resource\": \"arn:aws:logs:*:*:*\",\n      \"Effect\": \"Allow\"\n    }\n  ]\n}\n"

  + aws_iam_role.iam_for_lambda
      id:                             <computed>
      arn:                            <computed>
      assume_role_policy:             "{\n  \"Version\": \"2012-10-17\",\n  \"Statement\": [\n    {\n      \"Action\": \"sts:AssumeRole\",\n      \"Principal\": {\n        \"Service\": \"lambda.amazonaws.com\"\n      },\n      \"Effect\": \"Allow\",\n      \"Sid\": \"\"\n    }\n  ]\n}\n"
      create_date:                    <computed>
      force_detach_policies:          "false"
      max_session_duration:           "3600"
      name:                           "iam_for_lambda"
      path:                           "/"
      unique_id:                      <computed>

  + aws_iam_role_policy_attachment.lambda_logs
      id:                             <computed>
      policy_arn:                     "${aws_iam_policy.lambda_logging.arn}"
      role:                           "iam_for_lambda"

  + aws_lambda_function.test_lambda
      id:                             <computed>
      arn:                            <computed>
      filename:                       "lambda.zip"
      function_name:                  "lambda_handler"
      handler:                        "lambda.lambda_handler"
      invoke_arn:                     <computed>
      last_modified:                  <computed>
      memory_size:                    "128"
      publish:                        "false"
      qualified_arn:                  <computed>
      reserved_concurrent_executions: "-1"
      role:                           "${aws_iam_role.iam_for_lambda.arn}"
      runtime:                        "python2.7"
      source_code_hash:               "Gpu07NPcj26NrKv0Ne6BbZkfDRuM3ozHHqCFUWH9Sqg="
      source_code_size:               <computed>
      timeout:                        "3"
      tracing_config.#:               <computed>
      version:                        <computed>


Plan: 5 to add, 0 to change, 0 to destroy.

Do you want to perform these actions?
  Terraform will perform the actions described above.
  Only 'yes' will be accepted to approve.

  Enter a value: yes

aws_iam_policy.lambda_logging: Creating...
  arn:         "" => "<computed>"
  description: "" => "IAM policy for logging from a lambda"
  name:        "" => "lambda_logging"
  path:        "" => "/"
  policy:      "" => "{\n  \"Version\": \"2012-10-17\",\n  \"Statement\": [\n    {\n      \"Action\": [\n        \"logs:CreateLogStream\",\n        \"logs:PutLogEvents\"\n      ],\n      \"Resource\": \"arn:aws:logs:*:*:*\",\n      \"Effect\": \"Allow\"\n    }\n  ]\n}\n"
aws_iam_role.iam_for_lambda: Creating...
  arn:                   "" => "<computed>"
  assume_role_policy:    "" => "{\n  \"Version\": \"2012-10-17\",\n  \"Statement\": [\n    {\n      \"Action\": \"sts:AssumeRole\",\n      \"Principal\": {\n        \"Service\": \"lambda.amazonaws.com\"\n      },\n      \"Effect\": \"Allow\",\n      \"Sid\": \"\"\n    }\n  ]\n}\n"
  create_date:           "" => "<computed>"
  force_detach_policies: "" => "false"
  max_session_duration:  "" => "3600"
  name:                  "" => "iam_for_lambda"
  path:                  "" => "/"
  unique_id:             "" => "<computed>"
aws_iam_policy.lambda_logging: Still creating... (10s elapsed)
aws_iam_role.iam_for_lambda: Still creating... (10s elapsed)
aws_iam_role.iam_for_lambda: Creation complete after 10s (ID: iam_for_lambda)
aws_lambda_function.test_lambda: Creating...
  arn:                            "" => "<computed>"
  filename:                       "" => "lambda.zip"
  function_name:                  "" => "lambda_handler"
  handler:                        "" => "lambda.lambda_handler"
  invoke_arn:                     "" => "<computed>"
  last_modified:                  "" => "<computed>"
  memory_size:                    "" => "128"
  publish:                        "" => "false"
  qualified_arn:                  "" => "<computed>"
  reserved_concurrent_executions: "" => "-1"
  role:                           "" => "arn:aws:iam::XXXXXX:role/iam_for_lambda"
  runtime:                        "" => "python2.7"
  source_code_hash:               "" => "Gpu07NPcj26NrKv0Ne6BbZkfDRuM3ozHHqCFUWH9Sqg="
  source_code_size:               "" => "<computed>"
  timeout:                        "" => "3"
  tracing_config.#:               "" => "<computed>"
  version:                        "" => "<computed>"
aws_iam_policy.lambda_logging: Creation complete after 11s (ID: arn:aws:iam::355622012945:policy/lambda_logging)
aws_iam_role_policy_attachment.lambda_logs: Creating...
  policy_arn: "" => "arn:aws:iam::XXXXXX:policy/lambda_logging"
  role:       "" => "iam_for_lambda"
aws_iam_role_policy_attachment.lambda_logs: Creation complete after 0s (ID: iam_for_lambda-20190814010350932300000001)
aws_lambda_function.test_lambda: Still creating... (10s elapsed)
aws_lambda_function.test_lambda: Still creating... (20s elapsed)
aws_lambda_function.test_lambda: Still creating... (30s elapsed)
aws_lambda_function.test_lambda: Still creating... (40s elapsed)
aws_lambda_function.test_lambda: Creation complete after 41s (ID: lambda_handler)
aws_cloudwatch_log_group.example: Creating...
  arn:               "" => "<computed>"
  name:              "" => "/aws/lambda/lambda_handler"
  retention_in_days: "" => "14"
aws_cloudwatch_log_group.example: Still creating... (10s elapsed)
aws_cloudwatch_log_group.example: Creation complete after 11s (ID: /aws/lambda/lambda_handler)

Apply complete! Resources: 5 added, 0 changed, 0 destroyed.
Please join me with my journey by following any of the below links
Welcome to Day 18 of 21 Days of AWS using Terraform. The topic for today is Introduction to AWS VPC Peering using Terraform.
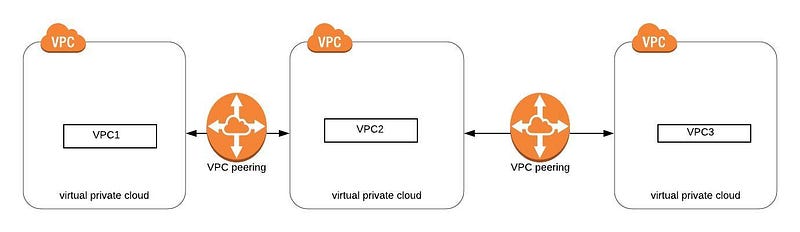
What is VPC Peering?
Let say two VPC want to communicate with each other or share service between them, the best way to do that with the help of VPC Peering
VPC Peering connection is a networking connection between two VPCs that allow us to route traffic between them using private IPv4 addresses.
Instances in either VPC can communicate with each other as if they are part of the same network
AWS uses the existing infrastructure of a VPC to create a VPC peering connection
It’s neither a gateway nor a VPN connection and doesn’t rely on a separate piece of physical hardware
There is no single point of failure or a bandwidth bottleneck i.e bandwidth between instances in peered VPC is no different than bandwidth between instances in the same VPC.
VPC Peering doesn’t support transitive peering i.e VPC1 can talk to VPC 2, VPC 2 can talk to VPC3 but VPC1 can’t talk to VPC3. This is because of the security reason so if VPC1 want to communicate with VPC3 we need to establish one more peering connection between VPC1 and VPC3.
Once VPC Peering is established instance in two VPC can communicate with each other using Private IP(no need to communicate via Internet Gateway)
Inter-region VPC is supported
VPC Peering is even supported between two different accounts
Make sure there is no over-lapping IP between two VPC’s
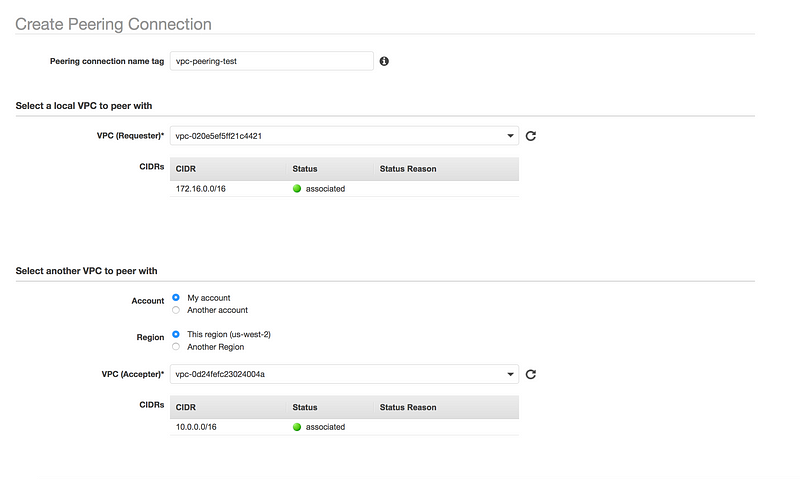
Go to your VPC Dashboard and look for Peering Connections → Create Peering Connection
Give some meaningful name to Peering connection name tag(eg: vpc-peering-test)
Select Requester VPC
As mentioned in the first part of the series, we can create VPC Peering between different account as well as between different region
Select Acceptor VPC(As you can see Acceptor VPC has complete different CIDR region, as overlapping CIDR is not supported)
Even I am creating VPC Peering between the same account, I still need to accept peering connection
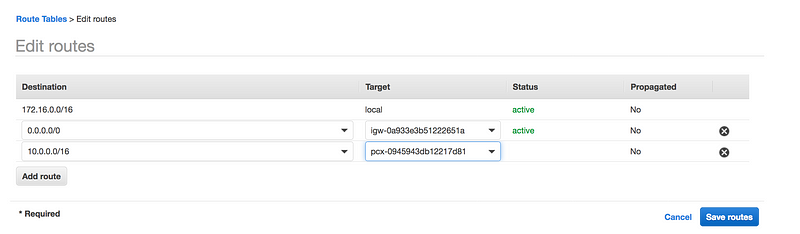
The final step is to update the individual VPC route table with the peering connection
Terraform Code
Please join me with my journey by following any of the below links
Welcome to Day 17 of 21 Days of AWS using Terraform. The topic for today is Introduction to AWS VPC Endpoint using Terraform.
What is VPC EndPoint?
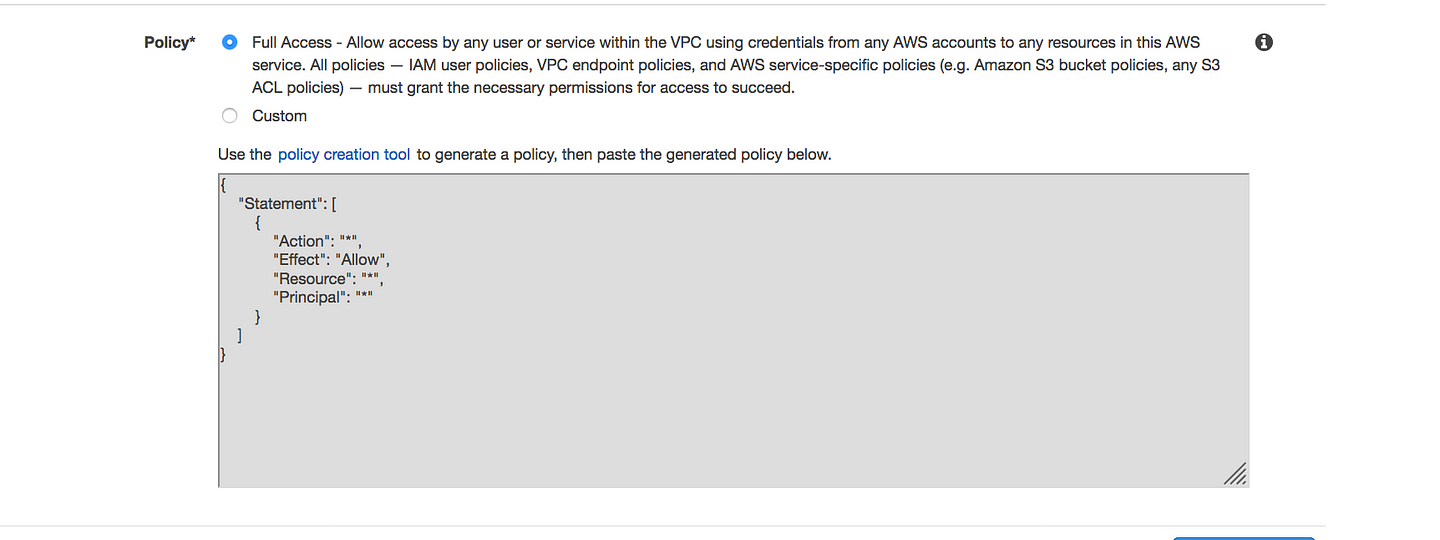
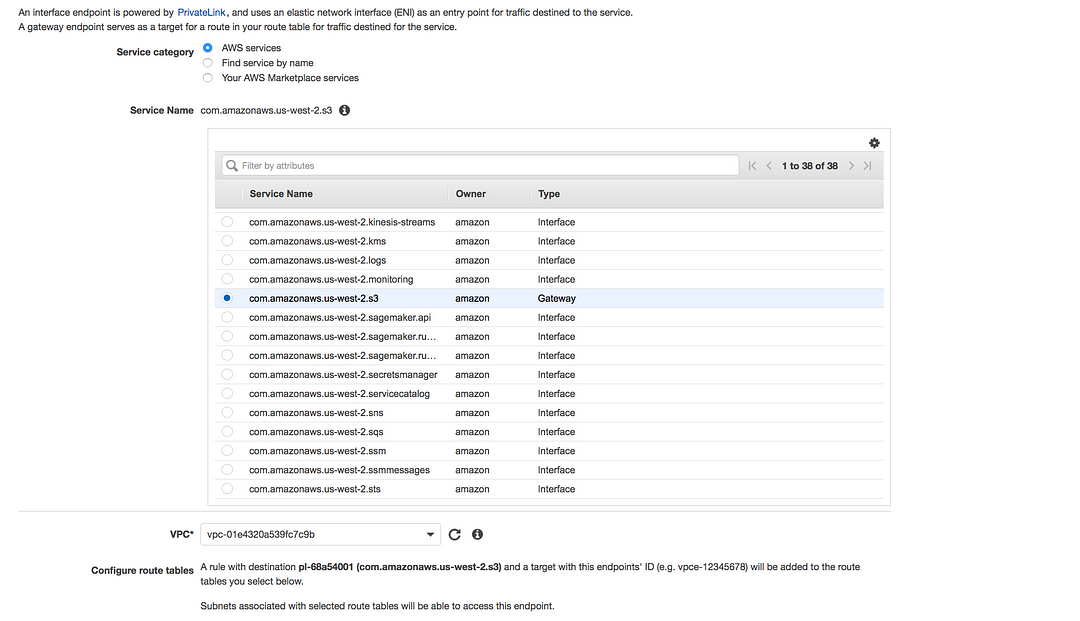
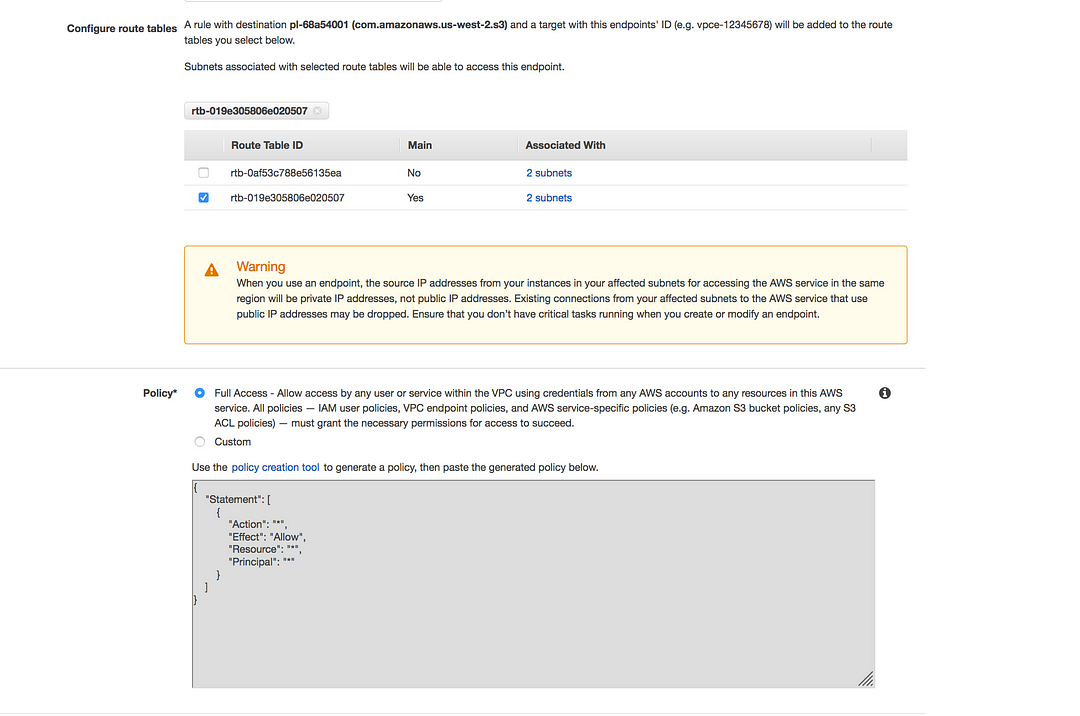
A VPC endpoint enables you to privately connect your VPC to supported AWS services and VPC endpoint services powered by PrivateLink without requiring an internet gateway, NAT device, VPN connection, or AWS Direct Connect connection. Instances in your VPC do not require public IP addresses to communicate with resources in the service. Traffic between your VPC and the other service does not leave the Amazon network.
Endpoints are virtual devices. They are horizontally scaled, redundant, and highly available VPC components that allow communication between instances in your VPC and services without imposing availability risks or bandwidth constraints on your network traffic.
There are two types of VPC endpoints:
Interface endpoints(using private links): An interface endpoint is an elastic network interface with a private IP address that serves as an entry point for traffic destined to a supported service
Gateway endpoints: A gateway endpoint is a gateway that is a target for a specified route in your route table, used for traffic destined to a supported AWS service
# Supported Services
* Amazon S3
* DynamoDB
Scenario1: I want to push logs from EC2 private instance(running on Private IP)to CloudWatch Logs.
Once the endpoint is created you will see an elastic network interface with a private IP address which acts as an entry point for traffic destined to a supported service
Here we need a little modification to our VPC module, here the output of route table act as an input to VPC endpoint s3 module
output "route_table" {
  value = "${aws_default_route_table.private_route.id}"
}
Limitations
Only Support IPv4
Support only for the same region
Interface endpoints cannot only be accessible via VPC Peering or VPN connection only via Direct Connect.
You cannot use an IAM policy or bucket policy to allow access from a VPC IPv4 CIDR range (the private IPv4 address range). VPC CIDR blocks can be overlapping or identical, which may lead to unexpected results. Therefore, you cannot use the aws:SourceIp condition in your IAM policies for requests to Amazon S3 through a VPC endpoint. This applies to IAM policies for users and roles, and any bucket policies. If a statement includes the aws:SourceIp condition, the value fails to match any provided IP address or range
Please join me with my journey by following any of the below links
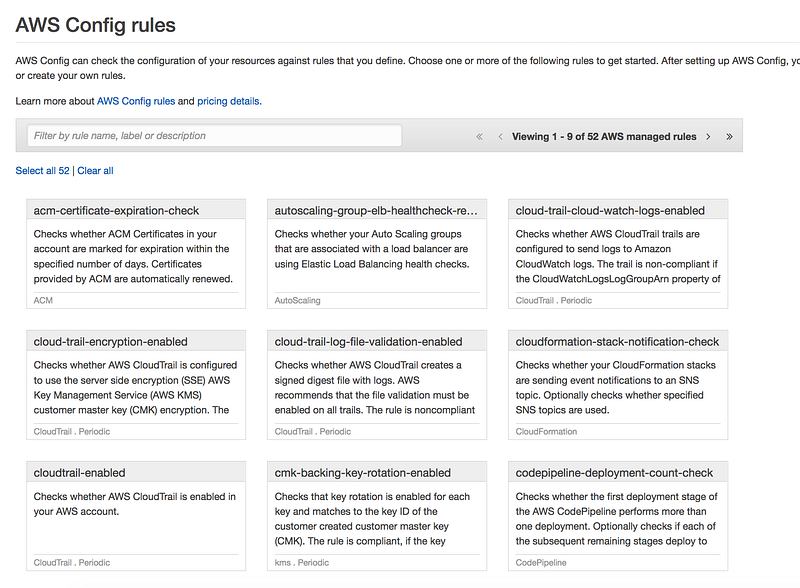
Welcome to Day 16 of 21 Days of AWS using Terraform. The topic for today is Introduction to AWS Config using Terraform.
What Is AWS Config?
AWS Config provides a detailed view of the configuration of AWS resources in your AWS account. This includes how the resources are related to one another and how they were configured in the past so that you can see how the configurations and relationships change over time.
Features
Track state of all resources(OS level too — Windows/Linux)
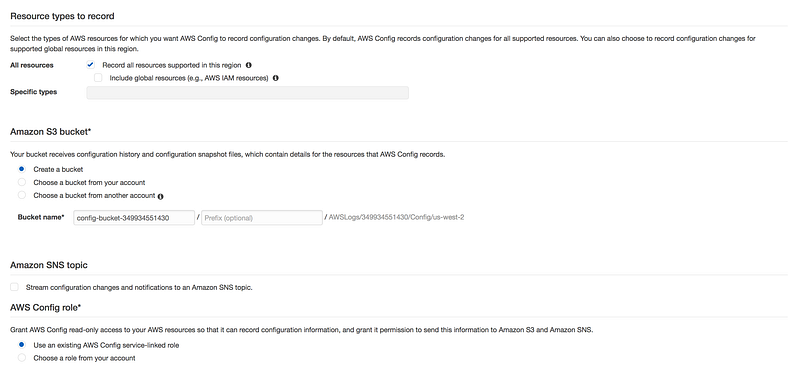
* All resources: You can check on, Record all rsources supported in this region
OR
Global resources like IAM
OR
We can even check specific resources eg: EC2
* Amazin S3 bucket: This bucket will recieve configuration history and configuration snapshot files
* Amazon SNS topic(Optional): We can send config changes to S3 bucket
* AWS Config role: It give AWS config read-only access(IAM Role)to AWS resource
* Skip this for the time being
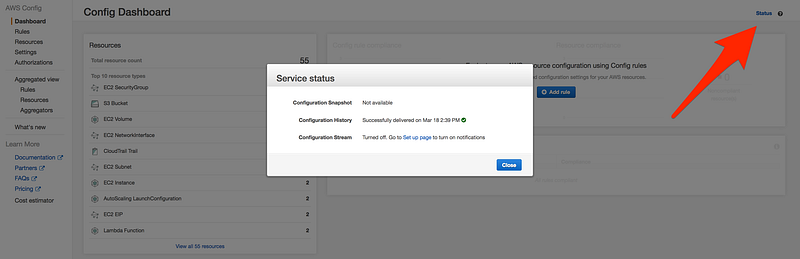
Confirm and AWS Config setup for us.
Check the status of AWS config, by click on the status icon on the top of the page
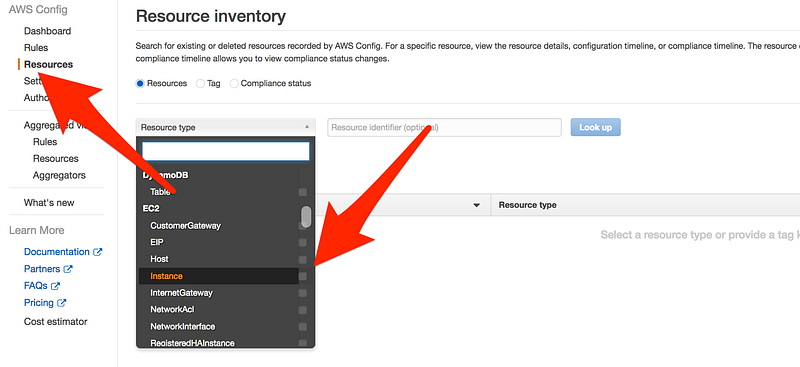
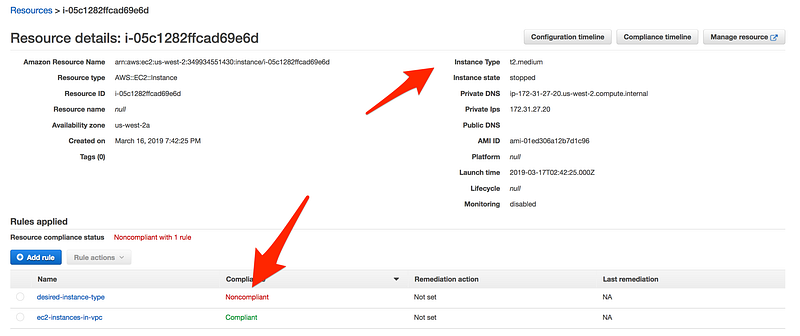
Now click on Resource and then Instance
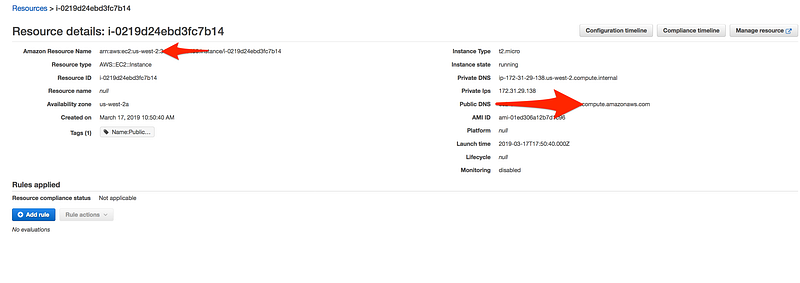
Click on the Configuration timeline
Scroll down and click on changes
Scenario: Last time we skipped the rule section, this time let add all the config rule, our task for today to make sure for an account is compliant
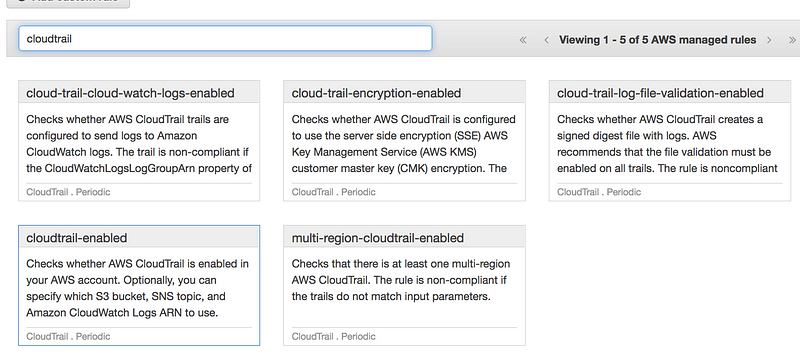
CloudTrail must be enabled
S3 bucket versioning must be enabled
EC2 instance must be a part of VPC
We are only using instance type as t2.micro
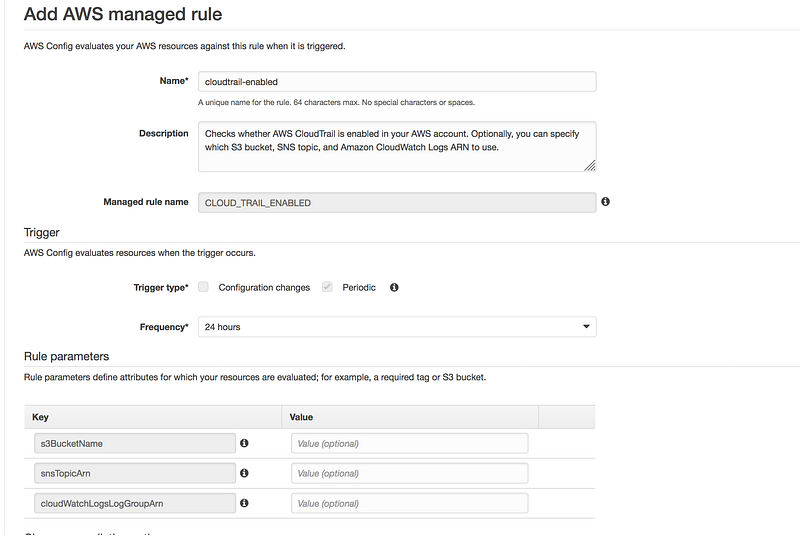
Search for CloudTrail and select cloudtrail-enabled
You don’t need to change any of the default value and click on save
Same way search for S3 bucket versioning enabled
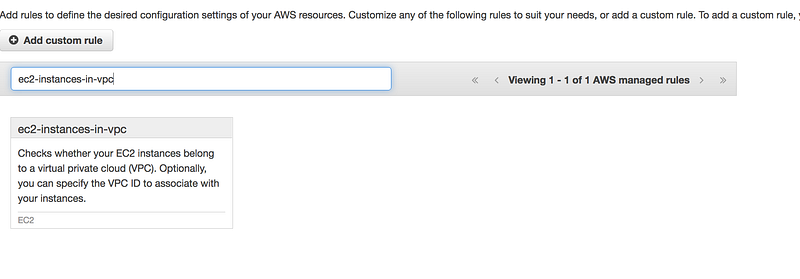
Search for ec2-instances-in-vpc
This requires some changes as you need to specify your VPC id
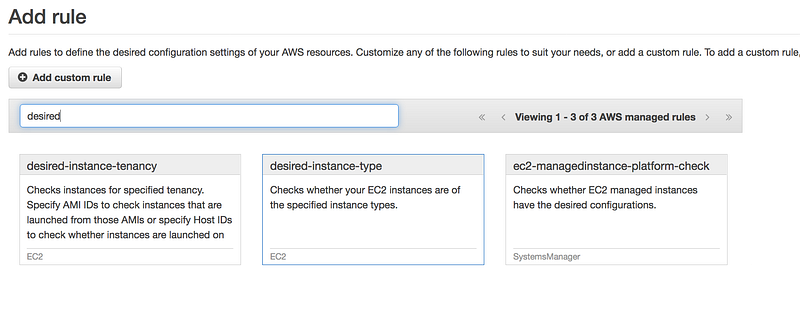
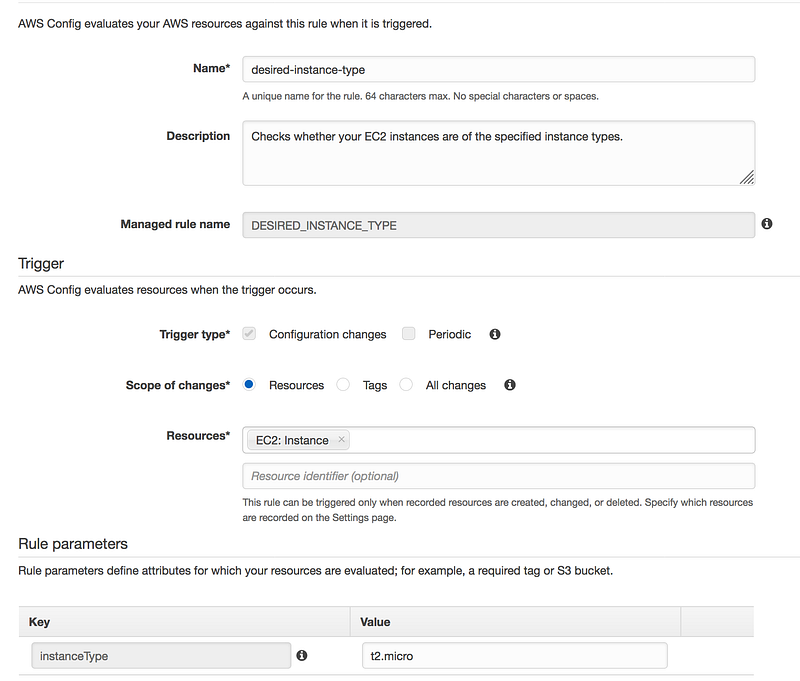
Search for desired-instance-type
Add the instanceType Value to t2.micro
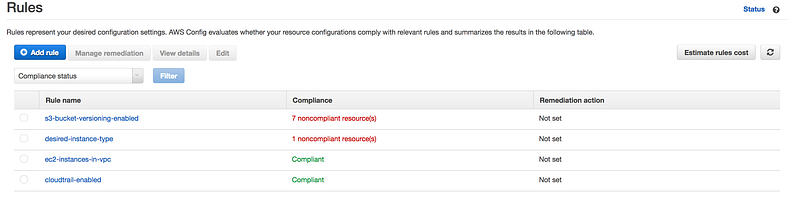
Finally, you will see something like this
If you further drill down, as you can see this instance is using t2.medium while in config rule for the desired-instance-type we choose t2.micro
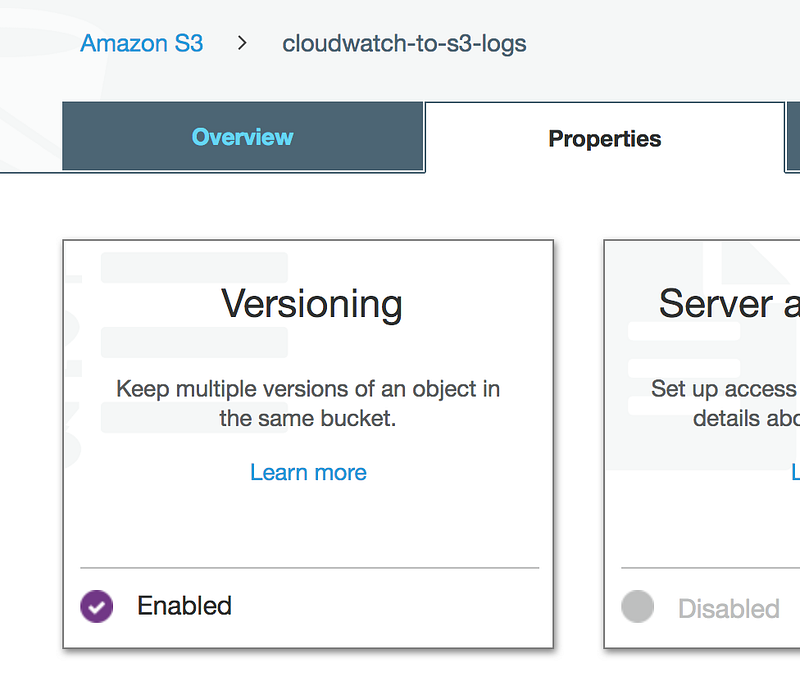
One more example, as you can see in this case S3 bucket is non-compliant
If we can go to the S3 bucket and enabled versioning
As we remediated the issue, to see the immediate effect
We are back in business
Terraform Code
Now we need to automate the entire process and then is no better tool other then terraform to do a job for us.
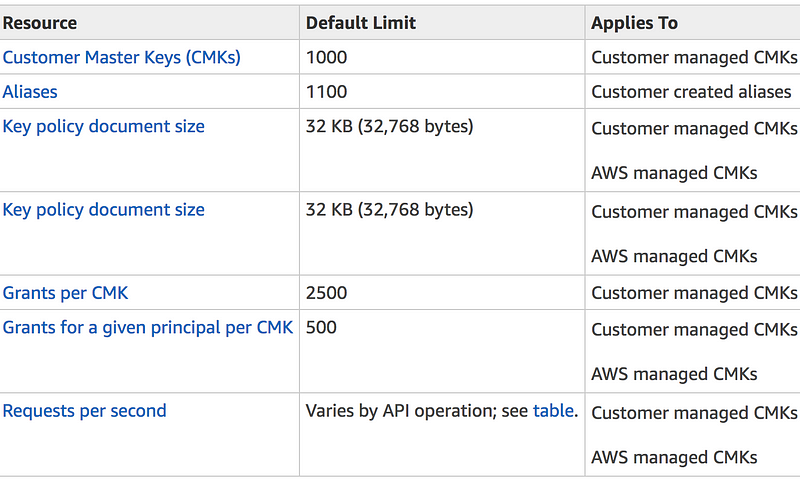
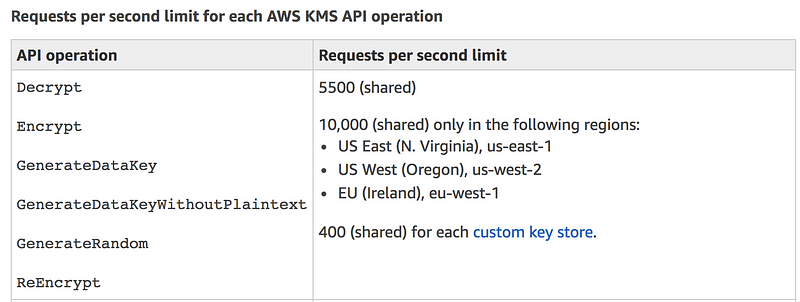
Welcome to Day 15 of 21 Days of AWS using Terraform. The topic for today is Introduction to KMS using Terraform.
What is KMS?
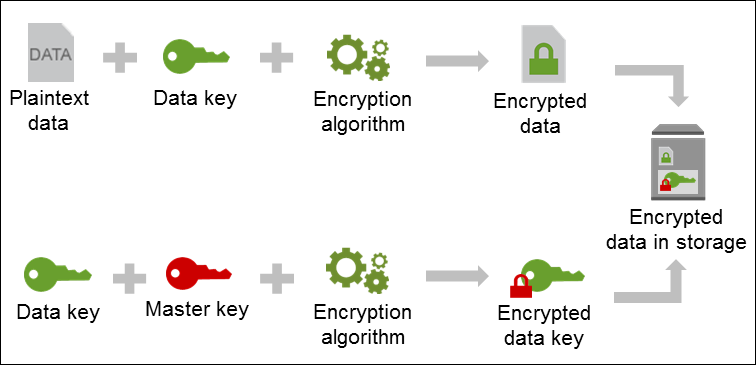
AWS Key Management Service (AWS KMS) is a managed service that makes it easy for you to create and control the encryption keys used to encrypt your data.
We start with the plain text and then uses data keys along with an algorithm and come up with encrypted data.
Encrypted data is finally stored in a storage that can be anything(eg:EBS, EFS, S3…)
KMS then took data key, Encrypt it with a master key along with an encryption algorithm, resulted in it an encrypted data key, that stored alongside with data.
KMS in action
# To access KMS
Go to AWS Console --> Security, Identity, & Compliance --> Key Management Service --> Create a key
NOTE: YAY!!!, Now Key Management Service got its a new home but you can still access it via old way i.e
AWS Console --> IAM --> Encryption keys
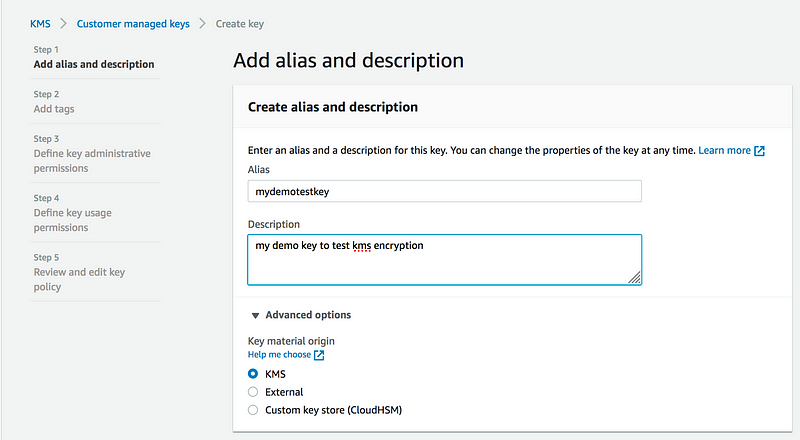
Step1:
* Alias: Enter an alias and descrption for the key(eg: Alias: mydemotestkey, similarly Descrption)
* Key material origin: Choose KMS(External: You can bring your own Key(BUOY),CloudHSM(More about it later)
Step2:
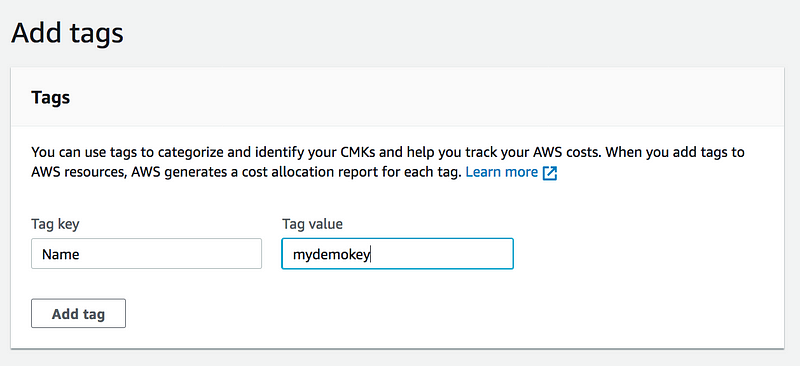
* Adding Tag is Optional but its a good practice
resource "aws_kms_key" "my-kms-key" {
  description         = "My KMS Keys for Data Encryption"
  enable_key_rotation = true

  tags = {
    Name = "my-kms-keys"
  }

resource "aws_kms_alias" "smc-kms-alias" {
  target_key_id = "${aws_kms_key.my-kms-key.key_id}"
  name          = "alias/my-terraform-final-encryption-key"
}
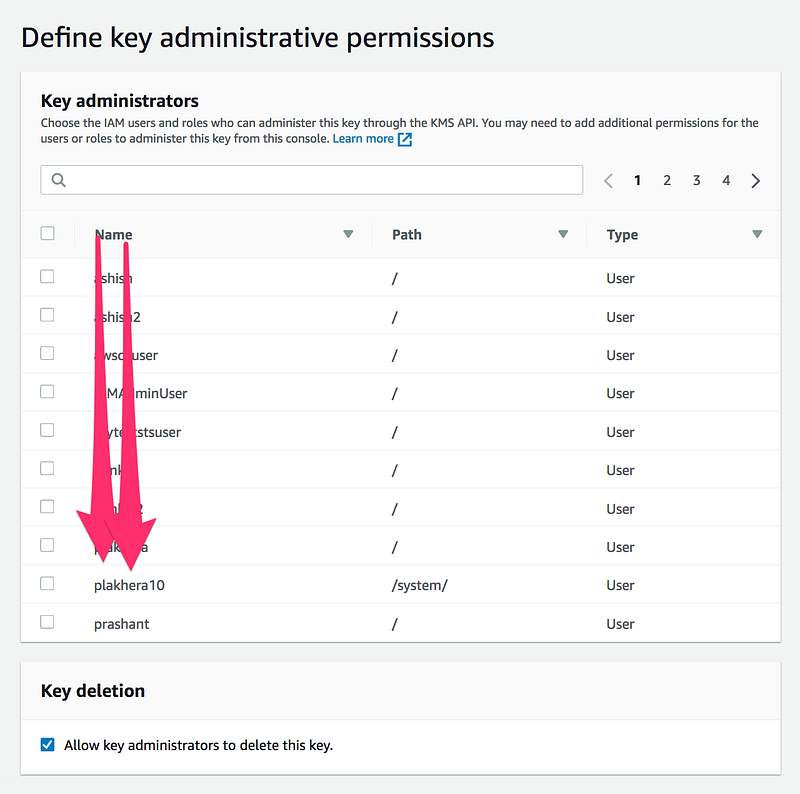
Step3:
Choose the users and roles who can administer this key.
This is critical as an administrator have right to delete these keys and after that, your data will become unusable
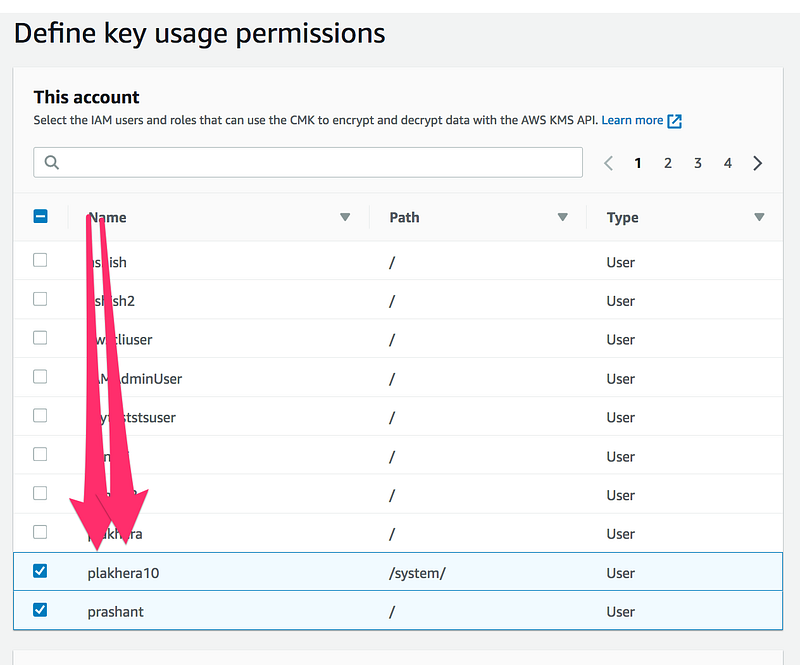
Step4: Define key usage permissions,select the IAM users and roles that can use the CMK to encrypt and decrypt data with the AWS KMS API
Step5: Review and edit key policy
Key Deletion
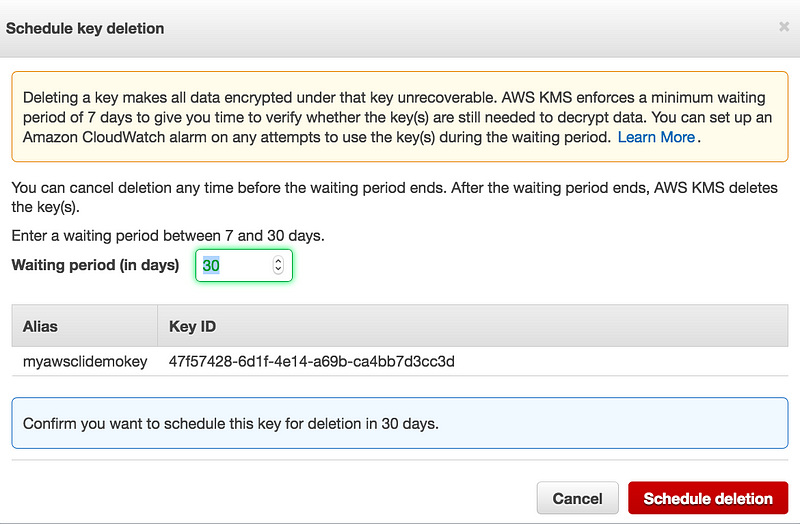
You can’t delete key immediately, rather then you need to schedule it
The waiting period is from 7–30 days, this is to make sure you understand that deleting a key makes all data encrypted under that key unrecoverable
AWS managed CMKs. You cannot manage key rotation for AWS managed CMKs. AWS KMS automatically rotates AWS managed keys every three years (1095 days).
When you enable automatic key rotation, AWS KMS rotates the CMK 365 days after the enable date and every 365 days thereafter.
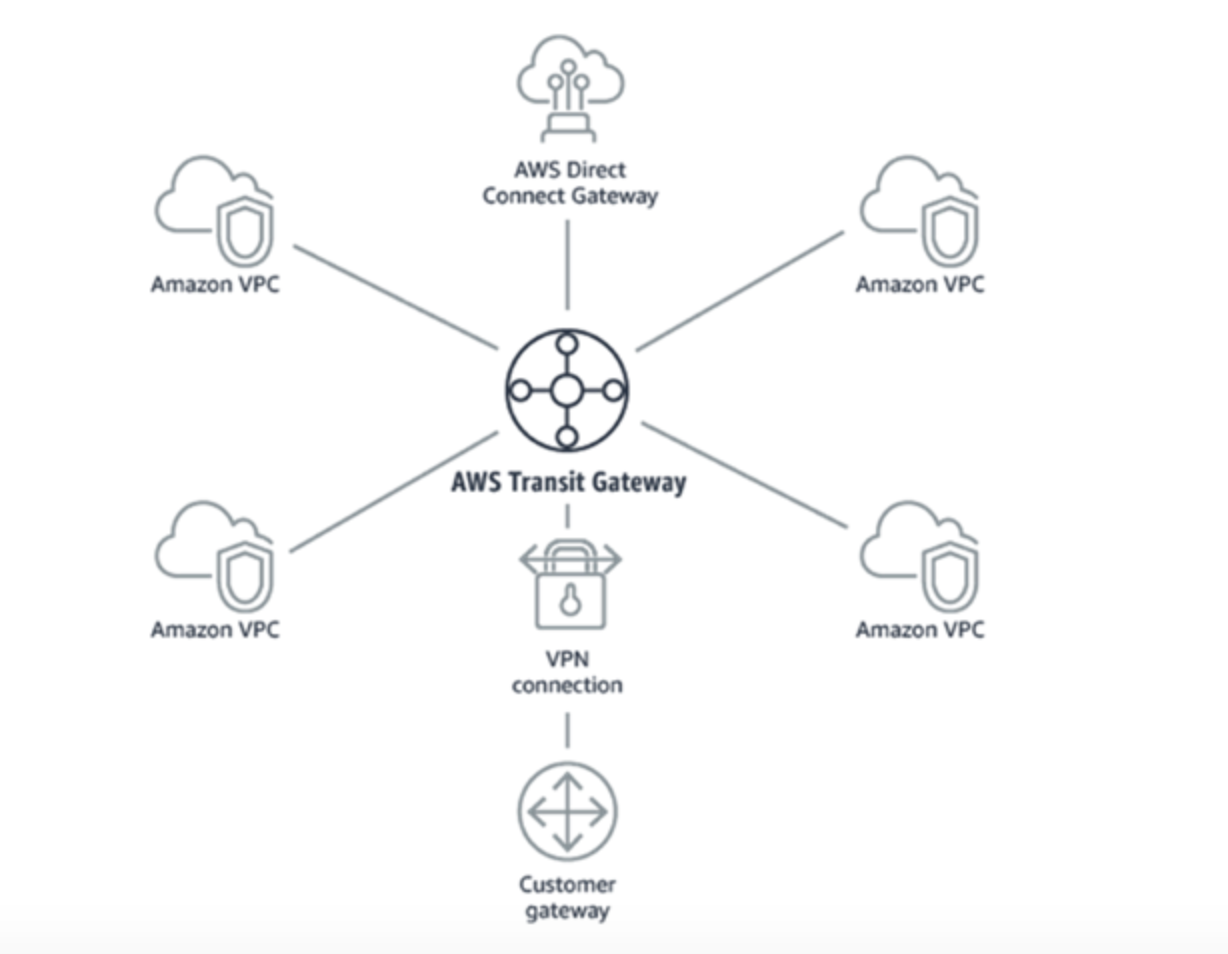
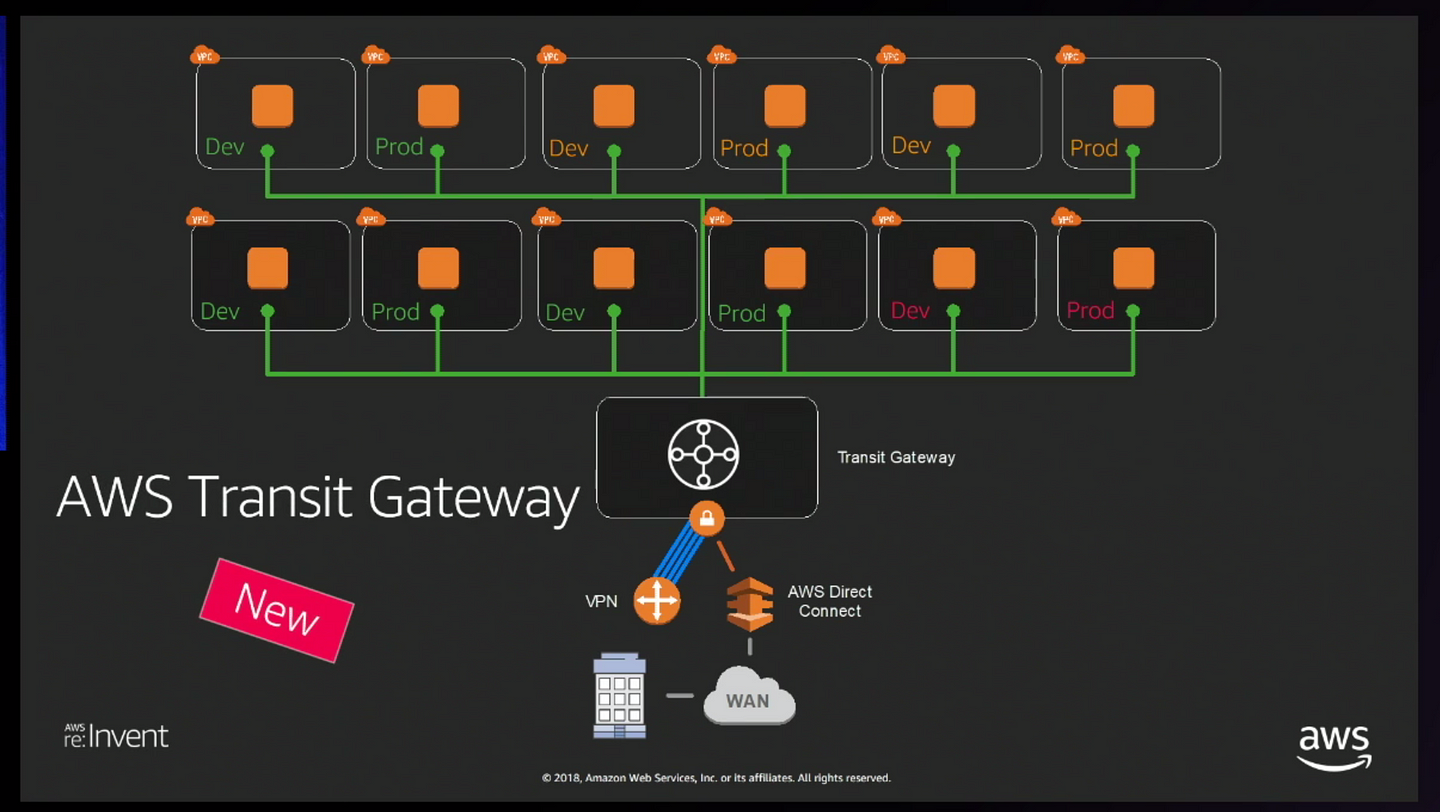
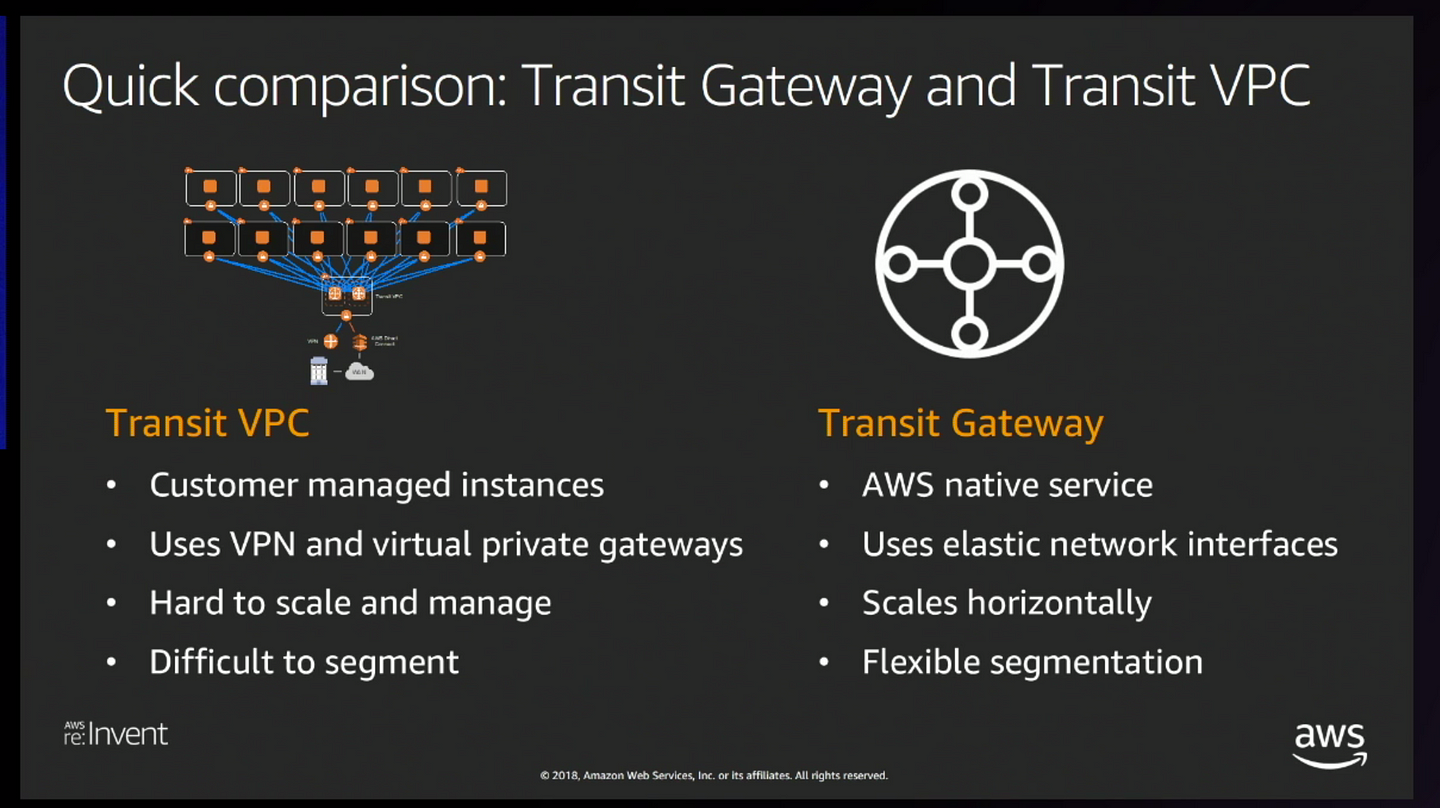
But if you ask me one product which stands out among these is Transit Gateway.
What is Transit Gateway?
AWS Transit Gateway is a service that enables customers to connect their Amazon Virtual Private Clouds (VPCs) and their on-premises networks to a single gateway
Features of Transit Gateway
Connect thousands of Amazon Virtual Private Clouds (VPCs) and on-premises networks using a single gateway
Hub and Spoke Network Topology
Scales up to 5000 VPCs
Spread traffic over many VPN connections (Scale horizontally eg: Now two VPN connection combined together give 2.5GBPS(1.25GBPS + 1.25GBPS)
Max throughput AWS tested so far is 50GBPS
Direct Connect is still not supported(In AWS 2019 Roadmap)
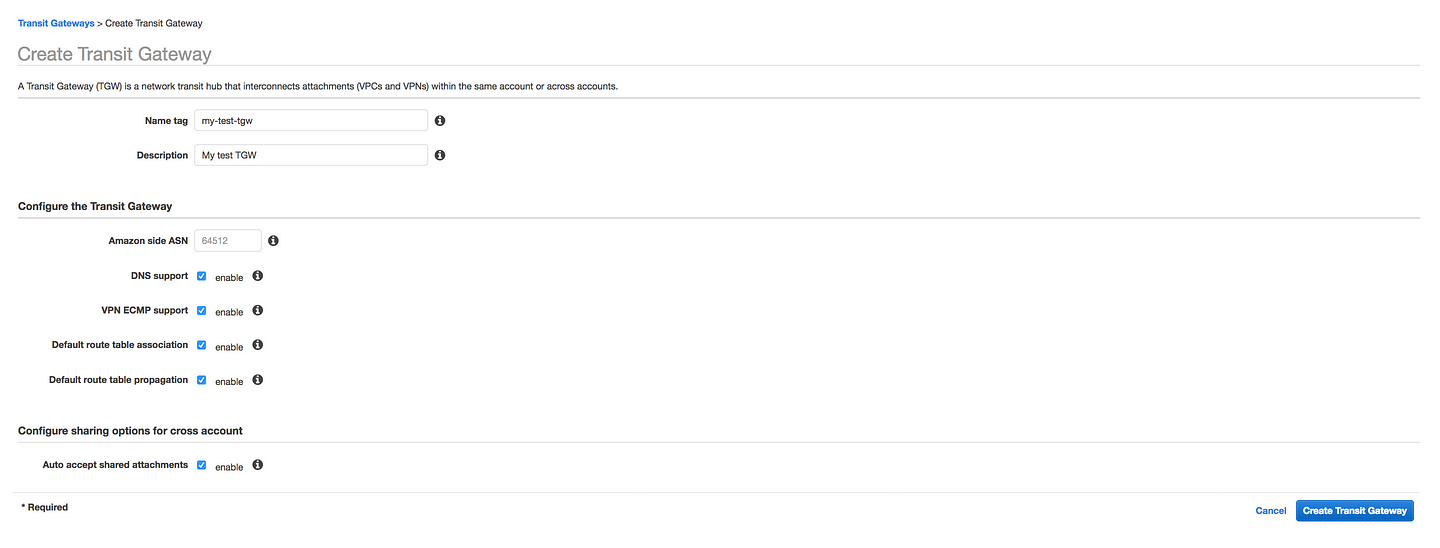
* Name tag and Description: Give some meaningful name to your Transit Gateway and Description
* Amazon side ASN: Autonomous System Number (ASN) of your Transit Gateway. You can use an  existing ASN assigned to your network. If you don't have one, you can  use a private ASN in the 64512-65534 or 4200000000-4294967294 range.
* DNS Support: Enable Domain Name System resolution for VPCs attached to this Transit Gateway(If you have multiple VPC, this will enable hostname resolution between two VPC)
*VPN ECMP support: Equal-cost multi-path routing for VPN Connections that are attached to this Transit Gateway.Equal Cost Multipath (ECMP) routing support between VPN connections. If connections advertise the same CIDRs, the traffic is distributed equally between them.
* Default route table association: Automatically associate Transit Gateway attachments with this Transit Gateway's default route table.
* Default route table propagation: Automatically propagate Transit Gateway attachments with this Transit Gateway's default route table
* Auto accept shared attachments: Automatically accept cross account attachments that are attached to this Transit Gateway.In case if you are planning to spread your TGW across multiple account.
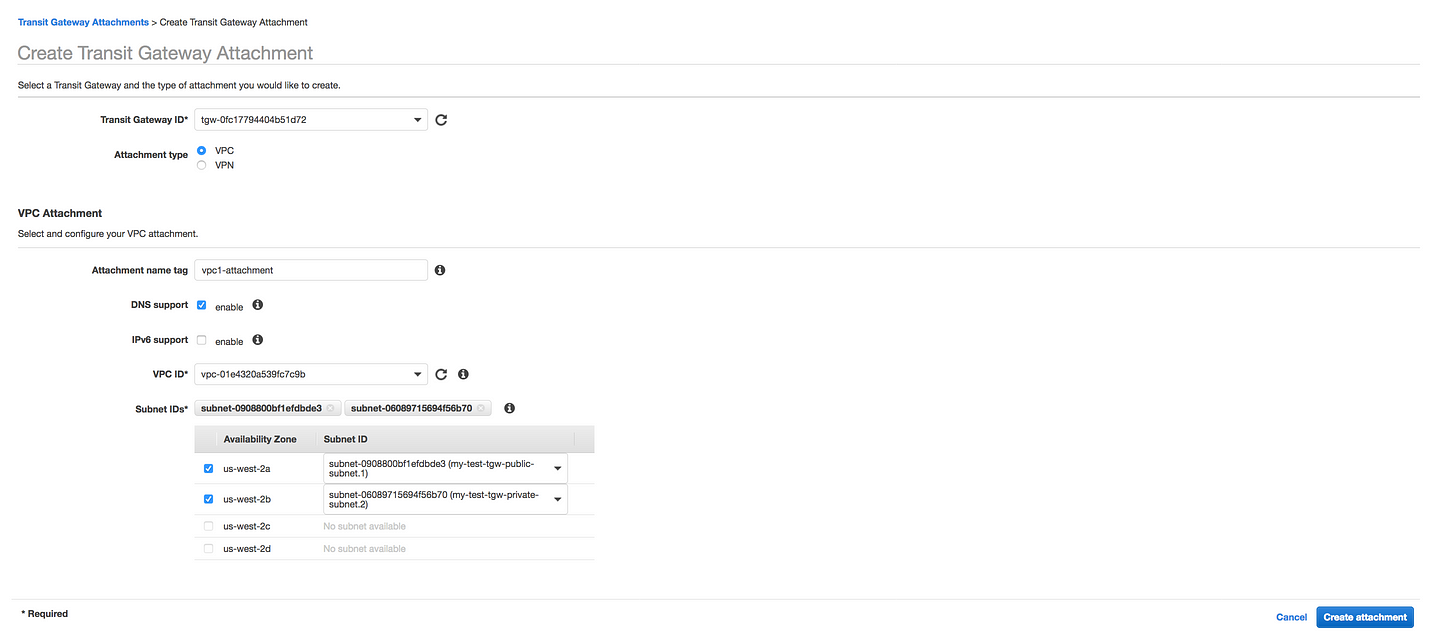
Go to Transit Gateways --> Transit Gateway Attachments --> Create Transit Gateway Attachment
* Select your TGW created in Step1
* Give your VPC attachment some name
* Enable DNS support
* Select your first VPC
Perform the same step for VPC2
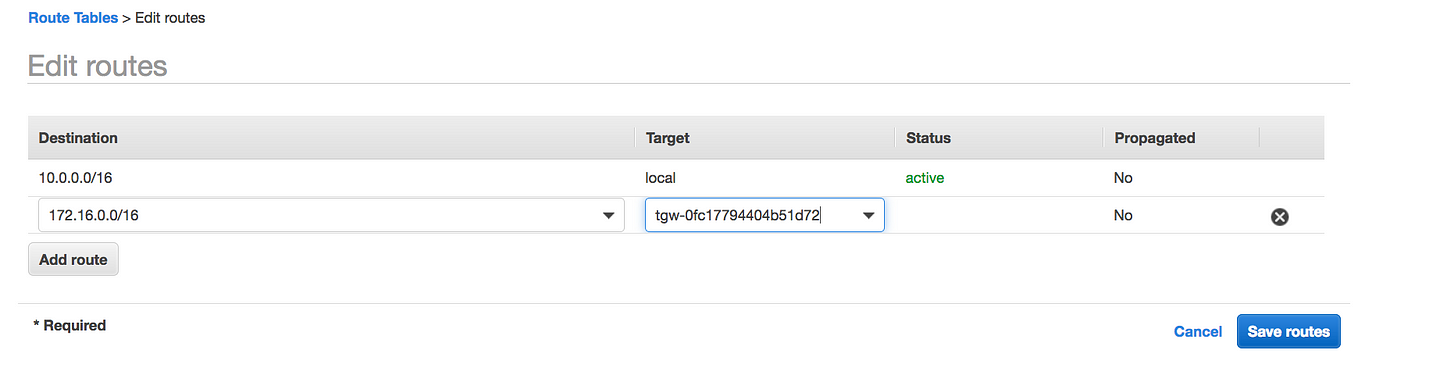
NOTE: When you attach a VPC or create a VPN connection on a transit gateway, the attachment is associated with the default route table of the transit gateway.
If you click on the Transit Gateway Route Table, you will see we have the patch from Transit Gateway to our VPC
We need a return path(i.e from our VPC to TGW), VPC1 route table needs to be updated to point to TGW to route to the second VPC and vice-versa(i.e 10.0.0.0/16 to tgw on the second VPC)