Docker Swarm is a clustering and scheduling tool for Docker containers. With Swarm, you can establish and manage a cluster of Docker nodes as a single virtual system.
Swarm Manager: Swarm manager purpose is to receive commands on behalf of the cluster and assign containers to Swarm nodes
Worker Node: is responsible for running container workload.
Service: To deploy your application to a swarm, we must need to submit a service definition to a manager node. Swarm manager node dispatches units of work called tasks to worker nodes.
Installing and Configuring Docker Swarm
Setup
One Swarm Manager
Two Worker Node
On all three servers, install Docker Community Edition.
# Update all the package listing
sudo apt-get update

# All Dependent Package
sudo apt-get -y install apt-transport-https ca-certificates \  curl gnupg-agent software-properties-common

# Download and Install GPG Key for Docker Repository
curl -fsSL https://download.docker.com/linux/ubuntu/gpg | sudo apt-key add -

# Add the Docker Repository
sudo add-apt-repository "deb [arch=amd64] https://download.docker.com/linux/ubuntu $(lsb_release -cs) \  stable"

# Update all the package listing based on new repository
sudo apt-get update

# Install Docker Package
sudo apt-get install -y docker-ce=5:18.09.5~3-0~ubuntu-bionic docker-ce-cli=5:18.09.5~3-0~ubuntu-bionic containerd.io
NOTE: Docker Swarm comes bundled with Docker, so we just need to install Docker Package.
Add non-root users to the Docker group so that you can run docker commands as non-root/normal users.
docker swarm init --advertise-addr <swarm manager private IP>;$ docker swarm init --advertise-addr 10.0.1.101Swarm initialized: current node (orkjv9q2gitaypqlnp93lq5dd) is now a manager.To add a worker to this swarm, run the following command:docker swarm join --token SWMTKN-1-2azpcn2q6gblghcrp1jmiqp5f4oi49jfr7g2yveezvginsodul-cykhommuu9w8vnsi6tcxe063b 10.0.1.101:2377To add a manager to this swarm, run 'docker swarm join-token manager' and follow the instructions.
In case if you missed this command, there are ways to retrieve it
$ docker swarm join-token worker
To add a worker to this swarm, run the following command:
docker swarm join --token SWMTKN-1-2azpcn2q6gblghcrp1jmiqp5f4oi49jfr7g2yveezvginsodul-cykhommuu9w8vnsi6tcxe063b 10.0.1.101:2377
Adding the Worker Node to the Cluster
Go to both the worker node and execute this command
$ docker swarm join --token SWMTKN-1-2azpcn2q6gblghcrp1jmiqp5f4oi49jfr7g2yveezvginsodul-cykhommuu9w8vnsi6tcxe063b 10.0.1.101:2377This node joined a swarm as a worker.
Go back to the swarm manager and list all the nodes
$ docker node ls
 ID                            HOSTNAME                      STATUS              AVAILABILITY        MANAGER STATUS      ENGINE VERSION
 w45sgx9gjpijtrq445avrd9wt *   plakhera12c.mylabserver.com   Ready               Active              Leader              19.03.4
 b5lyurguajincw1l9see0etr7     plakhera13c.mylabserver.com   Ready               Active                                  19.03.4
 x1v3x9ejsnpzgateb9xhbi431     plakhera14c.mylabserver.com   Ready               Active                                  19.03.4
* in front of plakhera12c.mylabserver.com shows its a manager/Leader node
Welcome to Day 13 of 21 days of Docker. In the first part of the series, we see all the issues that are been faced if you store the data inside the container, so you need a reliable place to store the data.
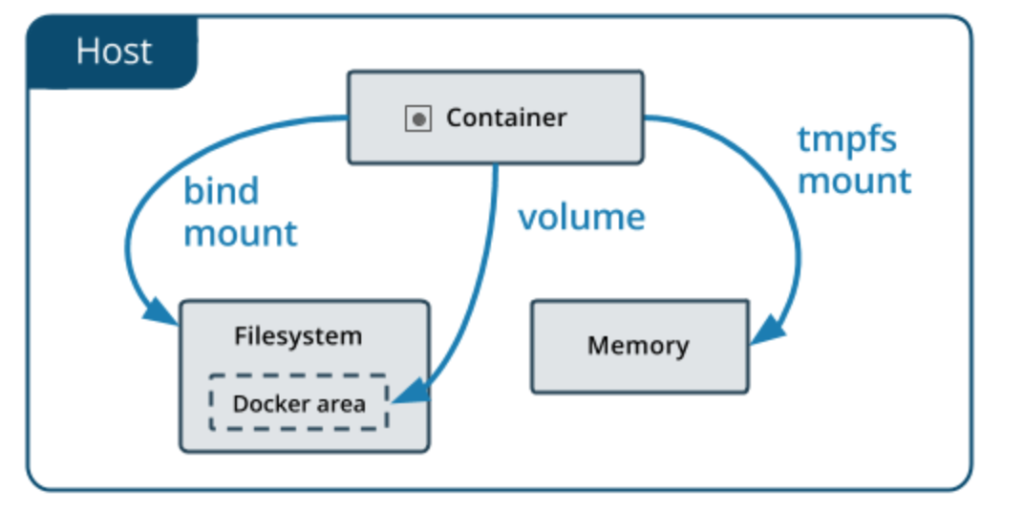
Docker has two options for containers to store files in the host machine so that the files are persisted even after the container stops:
volumes
bind mounts
tmpfs
Volumes are stored in a part of the host filesystem which is managed by Docker (/var/lib/docker/volumes/ on Linux). Non-Docker processes should not modify this part of the filesystem. Volumes are the best way to persist data in Docker.
Bind mounts may be stored anywhere on the host system. They may even be important system files or directories. Non-Docker processes on the Docker host or a Docker container can modify them at any time.
tmpfs mounts are stored in the host system’s memory only, and are never written to the host system’s filesystem.
One more issue I want to highlight, This extra abstraction reduces performance as compared to using data volumes, which write directly to the host filesystem.
Before digging deeper into volumes, let start with a simple example, up to this point we know that overlay2 is our default driver and docker storage directory location is /var/lib/docker
Let’s go one level down
cd /var/lib/docker/overlay2
brw------- 1 root root 202, 1 Oct 18 00:00 backingFsBlockDev
drwx------ 3 root root     47 Oct 18 00:15 7d3b75987d3723a085cb7c7482386f9a75bf2f4b40f7c8f0ba6f3450e9da14a2
drwx------ 2 root root     40 Oct 18 00:17 l
Let spin one container
# docker container run -dt alpine sh
6a315533797a336f1b5ee51140eb5dbc2b5d7bc28146ca0ad212ff23146cf5fa
Again run ls -l /var/lib/docker/overlay2
# ls -ltr
total 0
brw------- 1 root root 202, 1 Oct 18 00:00 backingFsBlockDev
drwx------ 3 root root     47 Oct 18 00:15 7d3b75987d3723a085cb7c7482386f9a75bf2f4b40f7c8f0ba6f3450e9da14a2
drwx------ 2 root root    108 Oct 18 00:20 l
drwx------ 4 root root     72 Oct 18 00:20 cbcaa1e4c60c97533105b5858ff220d72cc31258dea7456d9f789e369e721af2-init <---
drwx------ 5 root root     69 Oct 18 00:20 cbcaa1e4c60c97533105b5858ff220d72cc31258dea7456d9f789e369e721af2 <---
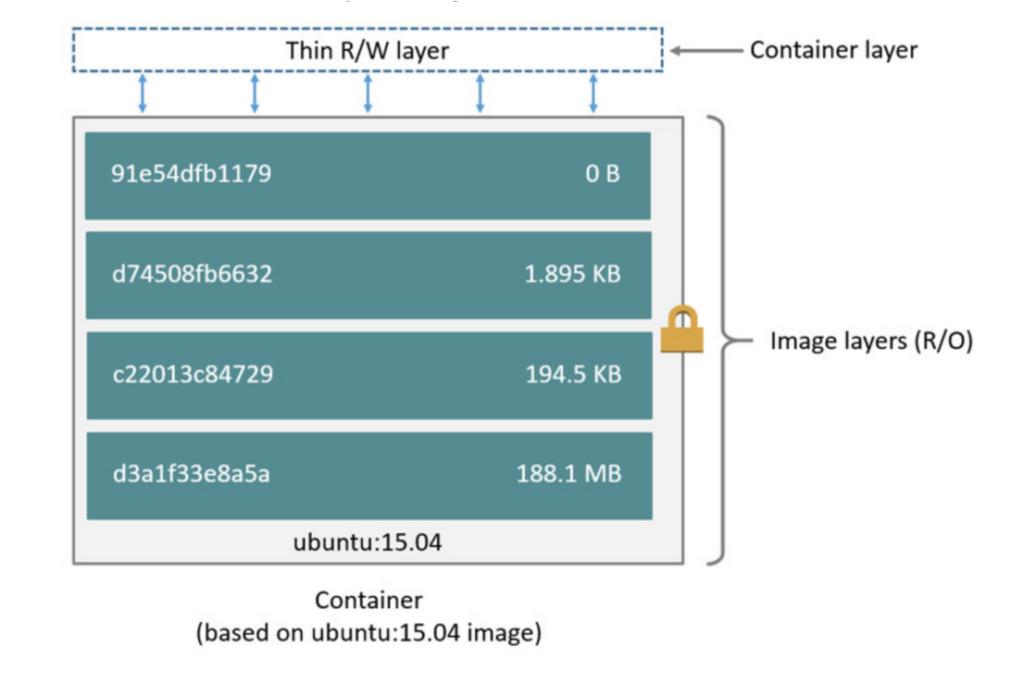
You will see to additional layer, which is container writable layer
If you remember this, I talked about container writable layer, which is the top layer, By default, all files created inside a container are stored on a writable container layer.
Now try to visualize the problem you will face if the container doesn’t exist
You will lose all the data
Now try to think who is responsible for managing these different imager layers as well as the top container writable layer?
Yes, you guessed it, right Storage Driver, Storage Driver put all these things together for you. The storage driver provides a union filesystem, using the Linux kernel.
To Check storage driver in your system
# docker info |grep Storage
 Storage Driver: overlay2
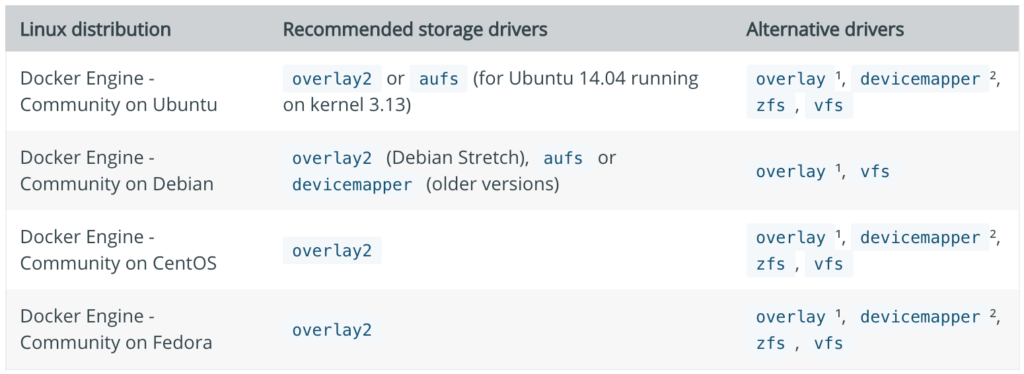
Storage drivers: Storage driver to use often depends on your operating system and other local configuration factors.
The overlay storage driver is deprecated in Docker Engine – Enterprise 18.09, and will be removed in a future release. It is recommended that users of the overlay storage driver migrate to overlay2.
The devicemapper storage driver is deprecated in Docker Engine 18.09, and will be removed in a future release. It is recommended that users of the devicemapper storage driver migrate to overlay2.
When possible, overlay2 is the recommended storage driver. When installing Docker for the first time, overlay2 is used by default. Previously, aufs was used by default when available, but this is no longer the case.
Docker networking subsystem is pluggable with the help of drivers and there are several drivers available by default which provides core networking functionality
The Host Network Driver allows containers to use the host’s network stack directly. It removes the network isolation between the docker host and the docker containers to use the hosts networking directly.
Limitation
No two containers can use the same port(s).
Use Cases
Simple and easy setup, one or only a few containers on a single host.
Go back to the host(not container)and try to access Nginx
$ curl localhost:80

 <!DOCTYPE html>
 <html>
 <head>
 <title>Welcome to nginx!</title>
 <style>
 body {
 width: 35em;
 margin: 0 auto;
 font-family: Tahoma, Verdana, Arial, sans-serif;
 }
 </style>
 </head>
 <body>
 <h1>Welcome to nginx!</h1>
 <p>If you see this page, the nginx web server is successfully installed and
 working. Further configuration is required.</p>
 <p>For online documentation and support please refer to
 <a href="http://nginx.org/">nginx.org</a>.<br/>
 Commercial support is available at
 <a href="http://nginx.com/">nginx.com</a>.</p>
 <p><em>Thank you for using nginx.</em></p>
 </body>
 </html>
$ docker network ls
NETWORK ID          NAME                DRIVER              SCOPE
45decc7a84de        bridge              bridge              local
18ab553b68ea        host                host                local
42ed6f1adc7a        my-network          bridge              local
b49ee4b5f50f        none                null                local
To get detailed info about the network we just created
Welcome to Day 9 of 21 Days of Docker, so far I discussed all the Docker basics, Building container, Images and your own customized image using Docker. Let shift gears and focus on networking.
Before going deeper into Docker Networking, have you ever think, how docker container talks to the internet or any user on the internet can talk back to these Docker containers
Let’ start with the absolute basics, when you install Docker on your system, did you notice that docker added a new interface in your system called docker0.
docker0 interface is the bridge device for Docker. If you don’t specify a different network when starting a container, the container is connected to the bridge and all traffic coming from and going to the container flows over the bridge to the Docker daemon, which handles routing on behalf of the container.
If you want more information about Bridge network, run docker inspect
Welcome to Day 8 of 21 days of Docker, let’s try to dig deeper into images and layers.
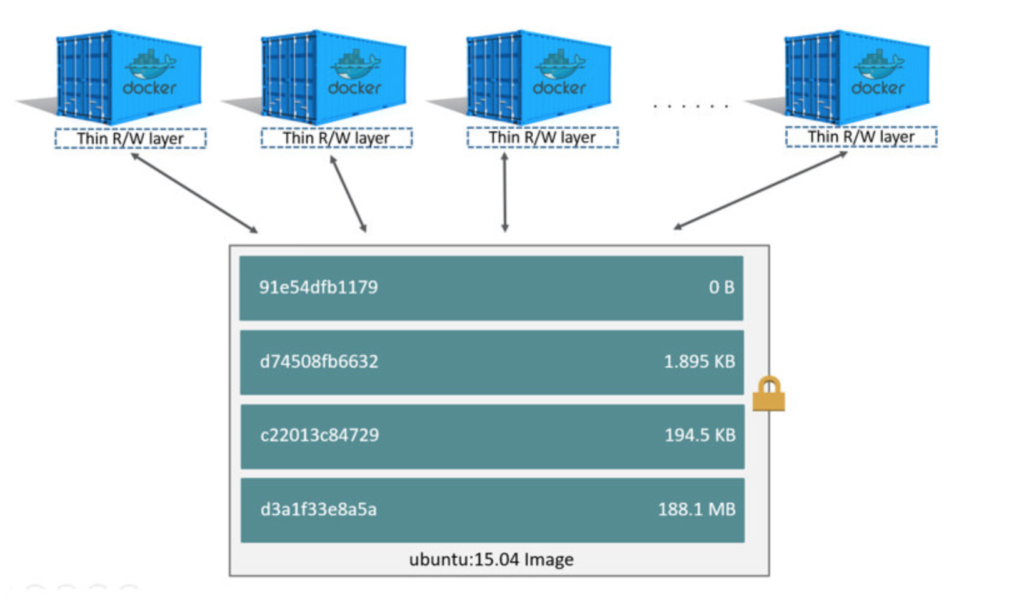
A Docker image is built up from a series of layers. Each layer represents an instruction in the image’s Dockerfile. Each layer except the very last one is read-only.
Consider the following Dockerfile
FROM ubuntu:15.04
RUN apt-get -y install nginx
COPY index.html /var/www/html
CMD ["nginx","-g","daemon off;"]
This Dockerfile contains four commands each of which creates a layer
FROM: statements starts out by creating a layer from the ubuntu 15.04 image
RUN: Command install nginx
COPY: add some files to nginx www directory
CMD: command specify which command to run within the container
Some points to keep in mind
Each layer is only a layer of differences from the layer before it.
The layers are stacked on top of each other
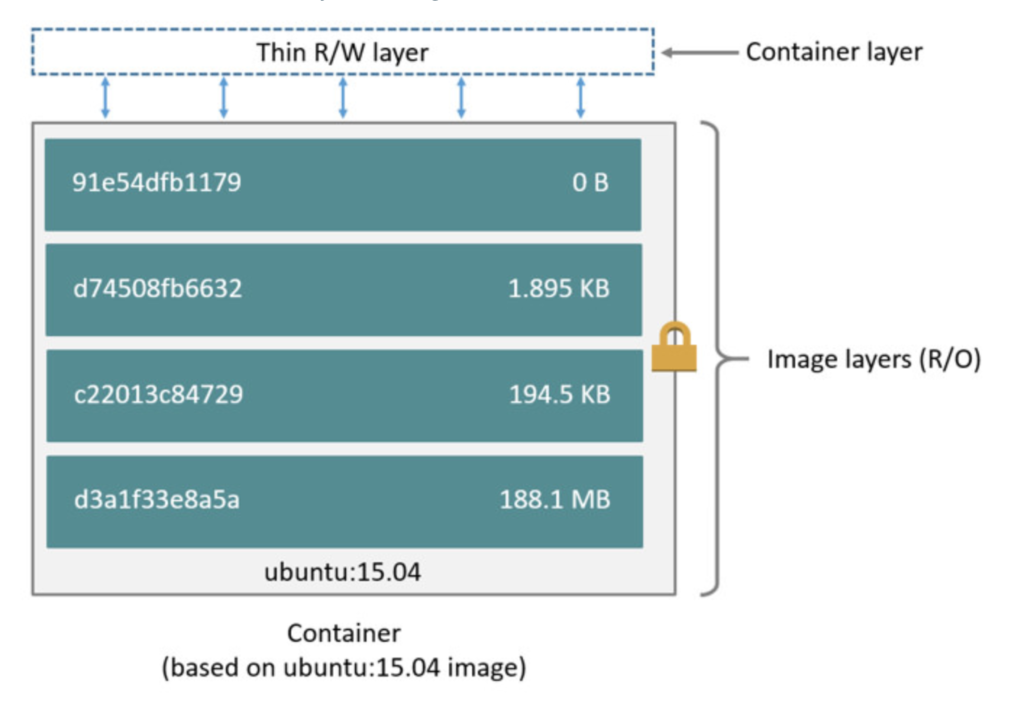
When you create a new container, you add a new writable layer on top of the underlying layers. This layer is often called the “container layer”
All changes made to the running container, such as writing new files, modifying existing files, and deleting files, are written to this thin writable container layer
If you want to check the layer of the image
$ docker image history nginx
IMAGE               CREATED             CREATED BY                                      SIZE                COMMENT
f949e7d76d63        2 weeks ago         /bin/sh -c #(nop)  CMD ["nginx" "-g" "daemon…   0B
<missing>           2 weeks ago         /bin/sh -c #(nop)  STOPSIGNAL SIGTERM           0B
<missing>           2 weeks ago         /bin/sh -c #(nop)  EXPOSE 80                    0B
<missing>           2 weeks ago         /bin/sh -c ln -sf /dev/stdout /var/log/nginx…   0B
<missing>           2 weeks ago         /bin/sh -c set -x     && addgroup --system -…   56.8MB
<missing>           2 weeks ago         /bin/sh -c #(nop)  ENV PKG_RELEASE=1~buster     0B
<missing>           2 weeks ago         /bin/sh -c #(nop)  ENV NJS_VERSION=0.3.5        0B
<missing>           2 weeks ago         /bin/sh -c #(nop)  ENV NGINX_VERSION=1.17.4     0B
<missing>           4 weeks ago         /bin/sh -c #(nop)  LABEL maintainer=NGINX Do…   0B
<missing>           4 weeks ago         /bin/sh -c #(nop)  CMD ["bash"]                 0B
<missing>           4 weeks ago         /bin/sh -c #(nop) ADD file:1901172d265456090…   69.2MB
A storage driver handles the details about the way these layers interact with each other.
Different storage drivers are available(eg: overlay2, devicemappers, aufs), which have advantages and disadvantages in different situations.
Difference between Image and Container
To sum up, what we have discussed so far, the major difference between a container and an image is the top writable layer.
All writes to the container that adds new or modifies existing data are stored in this writable layer.
When the container is deleted, the writable layer is also deleted.
The underlying image remains unchanged.
Because each container has its own writable container layer, and all changes are stored in this container layer, multiple containers can share access to the same underlying image and yet have their own data state(as shown in the above image)
Container size on Disk
To view the container size on disk
$ docker container ps -s
CONTAINER ID        IMAGE               COMMAND                  CREATED             STATUS                      PORTS               NAMES                   SIZE
424c8c51e49a        centos:centos7      "bash"                   4 hours ago         Exited (137) 3 hours ago                        objective_feynman       0B (virtual 202MB)
e2452dcdc6e1        centos:centos7      "bash"                   4 hours ago         Exited (137) 3 hours ago                        jovial_murdock          0B (virtual 202MB)
b4031e7df866        centos:centos7      "bash"                   4 hours ago         Exited (0) 4 hours ago                          charming_herschel       0B (virtual 202MB)
ce32f774053a        centos              "bash"                   5 hours ago         Exited (0) 4 hours ago                          quirky_cori             37B (virtual 220MB)
24756038f07a        busybox             "sh"                     5 hours ago         Exited (137) 3 hours ago                        mynonenetwork1          10B (virtual 1.22MB)
418657ff1fe4        ubuntu              "bash"                   5 hours ago         Exited (0) 3 hours ago                          mynonenetwork           60B (virtual 64.2MB)

* Containers, Images, Local Volume and Cache Size

$ docker system df
TYPE                TOTAL               ACTIVE              SIZE                RECLAIMABLE
Images              16                  8                   1.78GB              1.421GB (79%)
Containers          22                  0                   651MB               651MB (100%)
Local Volumes       0                   0                   0B                  0B
Build Cache         0                   0                   0B                  0B


OR if you are looking for more verbose output

$ docker system df -v
Images space usage:

REPOSITORY          TAG                 IMAGE ID            CREATED             SIZE                SHARED SIZE         UNIQUE SIZE         CONTAINERS
multistage          latest              b536984e0b37        19 hours ago        7.586MB             5.577MB             2.009MB             1
single-stage        latest              3b5798ed94c5        19 hours ago        813.8MB             802.6MB             11.24MB             1
mycentosnewapache   latest              6d082f2b1c5e        22 hours ago        449.6MB             449.6MB             0B                  0
mycentosapache      latest              03f61d93b53e        22 hours ago        449.6MB             449.6MB             0B                  2
mycustomnginx1      latest              fe85db4f4704        44 hours ago        162.4MB             162.4MB             22B                 0
mycustomnginx       latest              35d8f0969f7c        44 hours ago        162.4MB             162.4MB             22B                 0
cmdimage            latest              9888f3568e1f        2 days ago          1.22MB              1.22MB              0B                  0
healthcheck_image   latest              ca8599a83d24        2 days ago          1.22MB              1.22MB              0B                  0
ping_docker         latest              6cb5dc1118a0        5 days ago          1.22MB              1.22MB              0B                  0
centos              latest              0f3e07c0138f        9 days ago          219.5MB             0B                  219.5MB             5
golang              1.13.1              52b59e9ead8e        2 weeks ago         802.6MB             802.6MB             0B                  0
nginx               latest              f949e7d76d63        2 weeks ago         126MB               0B                  126MB               2
ubuntu              bionic              2ca708c1c9cc        3 weeks ago         64.18MB             64.18MB             0B                  3
busybox             latest              19485c79a9bb        5 weeks ago         1.22MB              1.22MB              0B                  3
centos              centos7             67fa590cfc1c        7 weeks ago         201.9MB             201.9MB             0B                  4
alpine              3.10.2              961769676411        7 weeks ago         5.577MB             5.577MB             0B                  0

Containers space usage:

CONTAINER ID        IMAGE               COMMAND                  LOCAL VOLUMES       SIZE                CREATED             STATUS                      NAMES
424c8c51e49a        centos:centos7      "bash"                   0                   0B                  5 hours ago         Exited (137) 3 hours ago    objective_feynman
e2452dcdc6e1        centos:centos7      "bash"                   0                   0B                  5 hours ago         Exited (137) 3 hours ago    jovial_murdock
b4031e7df866        centos:centos7      "bash"                   0                   0B                  5 hours ago         Exited (0) 5 hours ago      charming_herschel
ce32f774053a        centos              "bash"                   0                   37B                 5 hours ago         Exited (0) 5 hours ago      quirky_cori
24756038f07a        busybox             "sh"                     0                   10B                 5 hours ago         Exited (137) 3 hours ago    mynonenetwork1
418657ff1fe4        ubuntu              "bash"                   0                   60B                 5 hours ago         Exited (0) 3 hours ago      mynonenetwork
efb9e8f5615a        ubuntu              "bash"                   0                   88.2MB              5 hours ago         Exited (0) 3 hours ago      mynewhost1
88d9f7bfa898        ubuntu              "bash"                   0                   88.1MB              6 hours ago         Exited (0) 3 hours ago      mynewhost
94059b00c326        centos              "bash"                   0                   44.7MB              6 hours ago         Exited (0) 3 hours ago      myhost
e0fa509a4a38        centos              "/bin/bash"              0                   53B                 6 hours ago         Exited (0) 3 hours ago      mycustombridge02
757f1a00d053        centos              "/bin/bash"              0                   0B                  6 hours ago         Exited (0) 3 hours ago      mycustombridge01
394b8e5255ed        busybox             "sh"                     0                   0B                  7 hours ago         Exited (137) 3 hours ago    bridge02
46ea63e383c8        busybox             "sh"                     0                   77B                 7 hours ago         Exited (137) 3 hours ago    bridge01
dac9b0fca295        multistage          "./helloworld"           0                   0B                  19 hours ago        Exited (0) 19 hours ago     laughing_edison
3fd2abfc0e0f        single-stage        "./helloworld"           0                   0B                  19 hours ago        Exited (0) 19 hours ago     beautiful_torvalds
993f69137ed7        mycentosapache      "/usr/sbin/apachectl…"   0                   1.18kB              22 hours ago        Exited (137) 13 hours ago   mycentoscustomapache1
c04a61a61e4f        mycentosapache      "/usr/sbin/apachectl…"   0                   5.1kB               22 hours ago        Exited (137) 13 hours ago   mycentoscustomapache
c9c79d7b72cd        8f2ae044a233        "/bin/sh -c 'yum -y …"   0                   215MB               22 hours ago        Exited (1) 22 hours ago     mystifying_darwin
35355550ab59        centos:centos7      "/bin/bash"              0                   215MB               22 hours ago        Exited (137) 13 hours ago   mycentostest
733c8448e2c8        centos              "bash"                   0                   43B                 25 hours ago        Exited (0) 13 hours ago     mycentos
789f45a23f9f        nginx               "nginx -g 'daemon of…"   0                   15B                 29 hours ago        Exited (0) 13 hours ago     mynginxnew
b4db78c85559        nginx               "nginx -g 'daemon of…"   0                   0B                  29 hours ago        Exited (0) 29 hours ago     mynginx

Local Volumes space usage:

VOLUME NAME         LINKS               SIZE

Build cache usage: 0B

CACHE ID            CACHE TYPE          SIZE                CREATED             LAST USED           USAGE               SHARED
The Copy-on-Write Mechanism
When we launch an image, the Docker engine does not make a full copy of the already stored image. Instead, it uses something called the copy-on-write mechanism. This is a standard UNIX pattern that provides a single shared copy of some data until the data is modified.
To do this, changes between the image and the running container are tracked. Just before any write operation is performed in the running container, a copy of the file that would be modified is placed on the writeable layer of the container, and that is where the write operation takes place. Hence the name, “copy-on-write”.
If this wasn’t happening, each time you launched an image, a full copy of the filesystem would have to be made. This would add time to the startup process and would end up using a lot of disk space.
Let’s take a simple example, to understand how Image Layer works,below is my dockerfile
FROM busybox
RUN dd if=/dev/zero of=/tmp/test1 bs=1M count=50
RUN dd if=/dev/zero of=/tmp/test2 bs=1M count=50
Try to build an image out of this Dockerfile
$ docker build -t mylayer1 .
Sending build context to Docker daemon  2.048kB
Step 1/3 : FROM busybox
 ---> 19485c79a9bb
Step 2/3 : RUN dd if=/dev/zero of=/tmp/test1 bs=1M count=50
 ---> Running in 2495248f03df
50+0 records in
50+0 records out
52428800 bytes (50.0MB) copied, 0.030272 seconds, 1.6GB/s
Removing intermediate container 2495248f03df
 ---> 4c557085e440
Step 3/3 : RUN dd if=/dev/zero of=/tmp/test2 bs=1M count=50
 ---> Running in aca8401f91cc
50+0 records in
50+0 records out
52428800 bytes (50.0MB) copied, 0.029855 seconds, 1.6GB/s
Removing intermediate container aca8401f91cc
 ---> bfbfff240e48
Successfully built bfbfff240e48
Successfully tagged mylayer1:latest
Check the image size
$  docker build -t mylayer1 .
REPOSITORY            TAG                 IMAGE ID            CREATED             SIZE
mylayer1              latest              bfbfff240e48        4 seconds ago       106MB
Let’s make little modification to the Dockefile by trying to remove these two files
FROM busybox
RUN dd if=/dev/zero of=/tmp/test1 bs=1M count=50
RUN dd if=/dev/zero of=/tmp/test2 bs=1M count=50
RUN rm -rf /tmp/test1
RUN rm -rf /tmp/test2
Try to build the image again
$ docker build -t mylayer2 .
Sending build context to Docker daemon  2.048kB
Step 1/5 : FROM busybox
 ---> 19485c79a9bb
Step 2/5 : RUN dd if=/dev/zero of=/tmp/test1 bs=1M count=50
 ---> Using cache
 ---> 4c557085e440
Step 3/5 : RUN dd if=/dev/zero of=/tmp/test2 bs=1M count=50
 ---> Using cache
 ---> bfbfff240e48
Step 4/5 : RUN rm -rf /tmp/test1
 ---> Running in 9059f97edae0
Removing intermediate container 9059f97edae0
 ---> 3987aea24cc7
Step 5/5 : RUN rm -rf /tmp/test2
 ---> Running in 9dde88d940ee
Removing intermediate container 9dde88d940ee
 ---> fd617a5810fa
Successfully built fd617a5810fa
Successfully tagged mylayer2:latest
Check the image size
$ docker image ls
REPOSITORY            TAG                 IMAGE ID            CREATED             SIZE
mylayer2              latest              fd617a5810fa        4 seconds ago       106MB
It’s the same, this doesn’t look, right? As we introduce two more new layer
RUN rm -rf /tmp/test1
RUN rm -rf /tmp/test2
As I mentioned above, image is just the collection of layer, and we are deleting test1 and test2 at different layer and that is the reason the size of the image is the same
Let’s move those remove instruction in the same layer
FROM busybox
RUN dd if=/dev/zero of=/tmp/test1 bs=1M count=50 && rm -rf /tmp/test1
RUN dd if=/dev/zero of=/tmp/test2 bs=1M count=50 && rm -rf /tmp/test2
Re-build the image
$ docker build -t mylayer3 .
Sending build context to Docker daemon  2.048kB
Step 1/3 : FROM busybox
 ---> 19485c79a9bb
Step 2/3 : RUN dd if=/dev/zero of=/tmp/test1 bs=1M count=50 && rm -rf /tmp/test1
 ---> Running in 58ecae5b4282
50+0 records in
50+0 records out
52428800 bytes (50.0MB) copied, 0.034398 seconds, 1.4GB/s
Removing intermediate container 58ecae5b4282
 ---> 062fa630bd3d
Step 3/3 : RUN dd if=/dev/zero of=/tmp/test2 bs=1M count=50 && rm -rf /tmp/test2
 ---> Running in 493d7e59ea5b
50+0 records in
50+0 records out
52428800 bytes (50.0MB) copied, 0.029036 seconds, 1.7GB/s
Removing intermediate container 493d7e59ea5b
 ---> 13f26e00997f
Successfully built 13f26e00997f
Successfully tagged mylayer3:latest
Check the size
$ docker image ls
REPOSITORY            TAG                 IMAGE ID            CREATED             SIZE
mylayer3              latest              13f26e00997f        7 seconds ago       1.22MB
Looks promising 🙂
What is Dangling Images?
Dangling images are layers that have no relationship to any tagged images. They no longer serve a purpose and consume disk space
Let take a scenario in which these none layers will be created?
$ docker container run -d httpd
1b97fb9667c0cc373c426e1a8ac3df6703c9dc91d63b46e1a52f8cf3a499b935
Check if it’s running
$ docker container ls
CONTAINER ID        IMAGE               COMMAND                  CREATED             STATUS              PORTS                  NAMES
1b97fb9667c0        httpd               "httpd-foreground"       6 seconds ago       Up 4 seconds        80/tcp                 tender_kirch
Now let’s try to remove the image, associated with this container
$ docker image rm httpd
Error response from daemon: conflict: unable to remove repository reference "httpd" (must force) - container 1b97fb9667c0 is using its referenced image 19459a872194
As the container is using this image, we can’t delete it, so the only way we can delete this image by using -f flag
$ docker image prune
WARNING! This will remove all dangling images.
Are you sure you want to continue? [y/N] y
Deleted Images:
deleted: sha256:19459a87219415cc5751fb48e9aa37ea580b98eed1fe784e76c4bc3c9b3b0741
deleted: sha256:ebefc32f49862ee9f4f672b338f29aefe056971bcc88912ed87968f5f75b0ae7
deleted: sha256:fe3c18ca62ea3f45b69ad643869c6fd3ab567a5ad8207adf8d071d54c9152597
deleted: sha256:62d97f753807d11f7ab72f8ae1911ff22617c9134e3edec13bf909493edb025c
deleted: sha256:c4e27a02760c0a8711ac5e9f7e0fc7cffeb38b44b4041d0c6ded5087586727a8

Total reclaimed space: 84.62MB
Verify it
$ docker image ls |grep 19459a872194
NOTE: If you build an image without specifying -t (i.e docker build . ), the image will appear in the list of dangling images as it has no association with the tagged images.
How to create an image out of a container
Let’s take a scenario, where I created a new container out of busybox image
$ docker container run -dt --name mytestcont busybox
8945e3832ac3abee79250b8bb5288f62296f8430cce954f9a6db331e31e232c8
Logged into that container
$ docker container exec -it 8945e3832ac3 sh
/ #

# Create a new file
/ # touch abc.txt
/ #
To create a docker image out of this container, I need to use docker container commit command
The command will look like this
docker container commit [OPTIONS] CONTAINER [REPOSITORY[:TAG]]
$ docker container commit -a "plakhera" -m "my docker busybox image from container" 8945e3832ac3 mytestbusyboximage
sha256:aca40c0caa3b8159d2350db6240f368f6e75b06bdc1c98af268858a8089a202c

  -a, --author string    Author (e.g., "John Hannibal Smith <[email protected]>")
  -m, --message string   Commit message
To verify it, run the new container using this image
$ docker container run -it mytestbusyboximage sh
/ # ls -l
total 20
-rw-r--r--    1 root     root             0 Oct 11 05:46 abc.txt
NOTE: By default, the container being committed and its process will be paused while the image is committed.
Multi-stage builds are a new feature requiring Docker 17.05 or higher on the daemon and client. Multistage builds are useful to anyone who has struggled to optimize Dockerfiles while keeping them easy to read and maintain.
The simplest way to understand multi-stage build is the Dockerfile with multiple from instruction.
As our infrastructure grows, One of the most challenging things about building images is keeping the image size down.
Each FROM instruction can use a different base, and each of them begins a new stage of the build. You can selectively copy artifacts from one stage to another, leaving behind everything you don’t want in the final image.
Let see with the help of example
Create a directory
mkdir single-stage
cd single-stage
This is how our source code looks like, it’s a simple go program which prints hello world
package main
import "fmt"
func main() {
fmt.Println("hello world")
}
Let test it locally
$ go run helloworld.go
hello world
This is how my Dockerfile looks like
FROM golang:1.13.1
WORKDIR /tmp
COPY helloworld.go .
RUN GOOS=linux go build -a -installsuffix cgo -o helloworld .
CMD ["./helloworld"]
It’s self-explanatory, but basically I am trying to compile the helloworld and trying to create the helloworld binary
USER: The USER instruction sets the user name (or UID) and optionally the user group (or GID) to use when running the image and for any RUN, CMD and ENTRYPOINT instructions that follow it in the Dockerfile
WORKDIR : The WORKDIR instruction sets the working directory for any RUN, CMD, ENTRYPOINT, COPY and ADD instructions that follow it in the Dockerfile.
FROM centos
RUN useradd -ms /bin/bash centos_user
USER centos_user
ADD index.html /home/centos_user
WORKDIR /home/centos_user
EXPOSE 80
User Directive is used to create a non-privileged user. Rather than using root, we can use a non-privileged user to configure and run an application.
Let’s put together, all the concept we learned so far, in the Dockerfile
Before building the new image, create the index.html file, as we are using the ADD directive.
Now try to build the new image
$ docker build -t myapache .
Start the container, using this image
$ docker run -d --name myapache -p 80:80 myapache
edc76724bc7c970648e4dc5c293afffea28a92df3dcbee0d0ec693e150667731
Verify it
$ docker container ls
CONTAINER ID        IMAGE               COMMAND                  CREATED             STATUS                            PORTS                NAMES
edc76724bc7c        myapache            "/usr/sbin/apachectl…"   6 seconds ago       Up 3 seconds (health: starting)   0.0.0.0:80->80/tcp   myapache
Welcome to Day 5 of 21 Days of Docker. So far I discussed all the basic docker commands and if you are following my blogs at this stage you should know how to run a container.
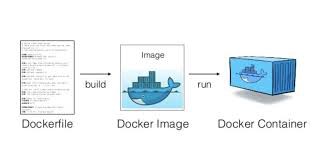
To run a Docker container, we pulled images from the Docker registry, now let see how we can build our own image and that can be done with the help of Dockerfile.
A Dockerfile is a text document that contains all the commands/set of instructions a user could call on the command line to create an image. These instructions are called directives.
ADD: The ADD instruction copies new files, directories or remote file URLs from <src> and adds them to the filesystem of the image at the path <dest>
COPY: The COPY instruction copies new files or directories from <src> and adds them to the filesystem of the container at the path <dest>.
ENV: The ENV instruction sets the environment variable to the value. This value will be in the environment for all subsequent instructions in the build stage and can be replaced inline in many as well.
EXPOSE : Documents which port(s) are intended to published when running a container
FROM: The FROM instruction initializes a new build stage and sets the Base Image for subsequent instructions. As such, a valid Dockerfile must start with a FROM instruction
LABEL: The LABEL instruction adds metadata to an image. A LABEL is a key-value pair. To include spaces within a LABEL value, use quotes and backslashes as you would in command-line parsing
STOPSIGNAL: The STOPSIGNAL instruction sets the system call signal that will be sent to the container to exit. This signal can be a valid unsigned number that matches a position in the kernel’s syscall table, for instance 9, or a signal name in the format SIGNAME, for instance SIGKILL
USER: The USER instruction sets the user name (or UID) and optionally the user group (or GID) to use when running the image and for any RUN, CMD and ENTRYPOINT instructions that follow it in the Dockerfile
VOLUME: The VOLUME instruction creates a mount point with the specified name and marks it as holding externally mounted volumes from native host or other containers
WORKDIR : The WORKDIR instruction sets the working directory for any RUN, CMD, ENTRYPOINT, COPY and ADD instructions that follow it in the Dockerfile
STOPSIGNAL: The STOPSIGNAL instruction sets the system call signal that will be sent to the container to exit. This signal can be a valid unsigned number that matches a position in the kernel’s syscall table, for instance, 9, or a signal name in the format SIGNAME, for instance SIGKILL.
HEALTHCHECK: The HEALTHCHECK instruction tells Docker how to test a container to check that it is still working. This can detect cases such as a web server that is stuck in an infinite loop and unable to handle new connections, even though the server process is still running
A simple Dockerfile will look like this
* FROM: A Dockerfile must start with a FROM instruction. The FROM instruction specifies the Base Image from which you are building.
* RUN: The RUN instruction will execute any commands in a new layer on top of the current image and commit the results. The resulting committed image will be used for the next step in the Dockerfile
* CMD: The main purpose of a CMD is to provide defaults for an executing container
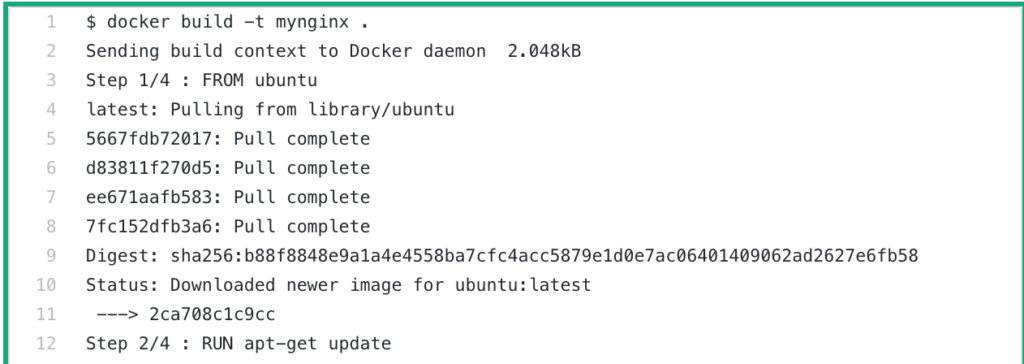
To build the image out from Dockerfile we can use the docker build command
* Step1: It download the ubuntu image
* Step2: It pull all the latest update
* Step3: Install the nginx binary
* Step4: Start the nginx daemon
To verify the new Nginx image, we just built
$ docker images
REPOSITORY          TAG                 IMAGE ID            CREATED             SIZE
mynginx             latest              43e91e210b23        4 minutes ago       152MB
To run the container
$ docker run -d -p 80:80 mynginx
7f3d9fb752632f5acaee04b8ce18fca0e2b3da2dc5615a62253b9beae002436a
$ docker ps
CONTAINER ID        IMAGE               COMMAND                  CREATED             STATUS              PORTS                NAMES
7f3d9fb75263        mynginx             "nginx -g 'daemon of…"   3 seconds ago       Up 1 second         0.0.0.0:80->80/tcp   angry_ptolemy
To test it
$ curl localhost
<!DOCTYPE html>
<html>
<head>
<title>Welcome to nginx!</title>
<style>
body {
width: 35em;
margin: 0 auto;
font-family: Tahoma, Verdana, Arial, sans-serif;
}
</style>
</head>
<body>
<h1>Welcome to nginx!</h1>
<p>If you see this page, the nginx web server is successfully installed and
working. Further configuration is required.</p>
<p>For online documentation and support please refer to
<a href="http://nginx.org/">nginx.org</a>.<br/>
Commercial support is available at
<a href="http://nginx.com/">nginx.com</a>.</p>
<p><em>Thank you for using nginx.</em></p>
</body>
</html>