
Before going further, just want to highlight two more points about the default Bridge network
- A bridge network uses a software bridge, which allows containers connected to the same bridge network to communicate while providing isolation from containers which are not connected to that bridge network.
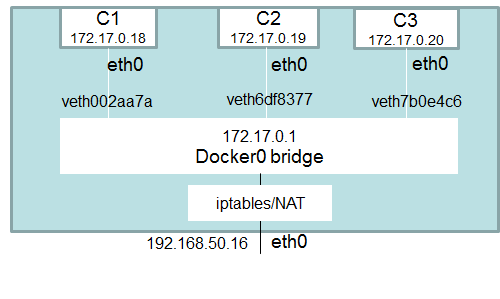
- The docker0 bridge is a virtual interface created by docker, it randomly chooses an address and subnet from the private range that is not in use on the host machine, and assigns it to docker0. All the docker containers will be connected to the docker0 bridge by default, the docker containers connected to the docker0 bridge could use the iptables NAT rules created by docker to communicate with the outside world.
- Just to strengthen the above point, so far we haven’t give any subnet range and bridge network chooses an address and subnet from the private range. But what would the case if we want to give our own network range, we can do that
$ docker network create --subnet 172.25.0.0/24 --gateway 172.25.0.1 my-custom-network
a46472497934186ae4ce1c2fec26788210f3f1e7a65e240ed124587d1da3cdb5- If we run docker inspect now
$ docker network inspect my-custom-network
[
    {
        "Name": "my-custom-network",
        "Id": "a46472497934186ae4ce1c2fec26788210f3f1e7a65e240ed124587d1da3cdb5",
        "Created": "2019-10-15T22:37:09.38816197Z",
        "Scope": "local",
        "Driver": "bridge",
        "EnableIPv6": false,
        "IPAM": {
            "Driver": "default",
            "Options": {},
            "Config": [
                {
                    "Subnet": "172.25.0.0/24", <----
                    "Gateway": "172.25.0.1"
                }
            ]
        },
        "Internal": false,
        "Attachable": false,
        "Ingress": false,
        "ConfigFrom": {
            "Network": ""
        },
        "ConfigOnly": false,
        "Containers": {},
        "Options": {},
        "Labels": {}
    }
]
- You will see the Subnet and Gateway IP we defined in the above step.
- There might be cases, where you want to specify the specific IP to a container(use –ip flag)
$ docker container run -d --name my-test --ip 172.25.0.20 --network my-custom-network nginx
c48bfb355ef75d40fbc253891f5f51a7295e6e2eb2fcaf43c2e2f82a684b311a- To verify it
$ docker container inspect c48bfb355ef7 |grep -i ipaddr
            "IPAddress": "172.25.0.20",
Now one of the major benefit of the user-defined bridge network over default bridge network
- To understand that, let’s create two containers using default bridge network
# First Container
$ docker container run -dt --name bridge01 busybox
46ea63e383c8242f72e9e991f6a88d79d37afd06f482b334d605c11150f10f85
# Second Container
$ docker container run -dt --name bridge02 busybox
394b8e5255ed4948ed0a1535961177dd1ffb037eaa23b01ed82b7dafa53f1e1e
# To verify it
$ docker container ls
CONTAINER ID        IMAGE               COMMAND             CREATED             STATUS              PORTS               NAMES
394b8e5255ed        busybox             "sh"                5 seconds ago       Up 3 seconds                            bridge02
46ea63e383c8        busybox             "sh"                14 seconds ago      Up 9 seconds                            bridge01
- Try to get the IP of both the containers
$ docker container inspect bridge01 |grep -i IPAddress
"IPAddress": "172.17.0.2"
$ docker container inspect bridge02 |grep -i IPAddress
"IPAddress": "172.17.0.3"
- Login to one of the container (bridge01) and try to ping the IP of bridge02
$ docker container exec -it bridge01 sh
/ # ping 172.17.0.3
 PING 172.17.0.3 (172.17.0.3): 56 data bytes
 64 bytes from 172.17.0.3: seq=0 ttl=64 time=0.119 ms
 64 bytes from 172.17.0.3: seq=1 ttl=64 time=0.083 ms
- Looks good
- Now try to ping it using it’s name
# ping bridge02
ping: bad address 'bridge02'
- Nah this doesn’t look good
- Let’s create a user-defined bridge, I already showed user-defined bridge above but just to reiterate it again
$ docker network create mycustombridge
fbc7613a2354dab0378a1b6141e94c0fbf336c4d8a11f9ebfda6366e3e3ef945
- List all the networks
$ docker network ls
 NETWORK ID          NAME                DRIVER              SCOPE
 9930cc0739d1        bridge              bridge              local
 2b31a4e76f07        host                host                local
 fbc7613a2354        mycustombridge      bridge              local
 2e8ca3dd377d        none                null                local
- Create two containers using this custom bridge
# Container 1
$ docker container run -dt --name mycustombridge01 --network mycustombridge centos
757f1a00d05344fb40119b009d5ad618c4e449b86b93b298c15a4b4d999cbdeb
# Container 2
$ docker container run -dt --name mycustombridge02 --network mycustombridge centos
757f1a00d05344fb40119b009d5ad618c4e449b86b93b298c15a4b4d999cbdeb
- Logged into one of the container and try to ping other container using its name
$ docker exec -it e0fa509a4a38 bash
 [root@e0fa509a4a38 /]#
 [root@e0fa509a4a38 /]# ping mycustombridge02
 PING mycustombridge02 (172.18.0.3) 56(84) bytes of data.
 64 bytes from e0fa509a4a38 (172.18.0.3): icmp_seq=1 ttl=64 time=0.027 ms
 ^C
 --- mycustombridge02 ping statistics ---
 1 packets transmitted, 1 received, 0% packet loss, time 0ms
 rtt min/avg/max/mdev = 0.027/0.027/0.027/0.000 ms
YAY success.
One more advantage of user-defined bridge
User-defined bridges provide better isolation and interoperability between containerized applications.
- Removing a container from the network
# docker network disconnect <NETWORK> <CONTAINER>
$ docker network disconnect bridge01 5d426b587a21
- Removing a network
# docker network rm [NAME]
$ docker network rm bridge01
bridge01
- Remove all unused network
$ docker network prune
 WARNING! This will remove all networks not used by at least one container.
 Are you sure you want to continue? [y/N] y
NOTE: Be careful before executing the prune command.
Summary of Bridge Drivers
- Default driver
- The bridge is a private network restricted to a single docker host
- Each container is placed in its own network namespace
- The bridge driver creates a bridge(virtual switch) on a single Docker host.
- All containers on this bridge can communicate
- Offers external access to containers through the port mapping
I think this is a good place to stop for Day10
Please follow me with my Journey
- Website:https://100daysofdevops.com/
- Twitter:@100daysofdevops OR @lakhera2015
- Facebook:https://www.facebook.com/groups/795382630808645/
- Medium:https://medium.com/@devopslearning
- GitHub:https://github.com/100daysofdevops/21_Days_of_Docker
This time to make learning more interactive, I am adding
- Slack
- Meetup
Please feel free to join this group.
Slack:
Meetup Group
If you are in the bay area, please join this meetup group https://www.meetup.com/100daysofdevops/
Pages: 1 2